

How to Create and Delete a User Group in Windows 7 and Vista
InformationThis will show you how to create a new user group and/or delete a user groupin Windows 7 and Vista.
You must be logged in as an administrator to be able to do the steps in this tutorial.
NoteThis could be useful if you would like to create a new group,add users to be a member of this group, then assign user rights to the group. This way you could have your own special custom group of users with user rights assignments that you set for them.WarningWhen you delete a group, all users that were a member of that group will automatically lose all user right privileges assigned to that group. Be very careful to not delete the wrong group. I would recommend to not delete any of the default groups, and only delete groups that you created and no longer need.
I would highly recommend that you create a restore point before adding or deleting groups. This way if you make a mistake and delete the wrong group, you will be able to do asystem restoreat boot and select the restore point to undo the mistake.
EXAMPLE: Default User Groups
OPTION ONEUsing Local Users and Groups
1. Open Local Users and Groups, and do step 2 or 3 below for what you would like to do. (see screenshot below step 2)
2. To Create a New User Group
A) In the left pane, click on Groups to open it. In the right pane of Groups, right click on a empty space, and click on New Group. (see screenshot below)
B) Type in a "group name" (ex: New Group), a "description" (ex: Example of new group created) for the group, add users (ex: my user account "Brink") that you would like to be a member of this new group, then click on the Create and Close buttons. (see screenshots below)
C) The new group has been created. (see screenshot below)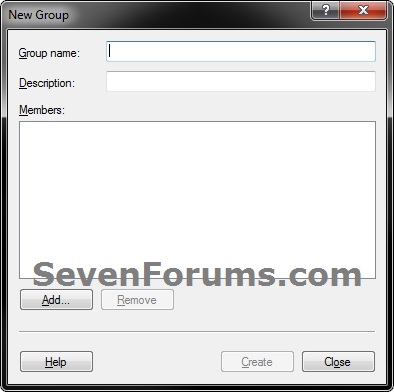
D) You can now assign user rights to the group, and add or remove users from being a member of this group at anytime.
E) Go to step 4.3. To Delete a User Group
A) In the left pane, click on Groups to open it. In the right pane of Groups, right click on a group (ex: New Group) that you wanted to delete, and click on Delete. (see screenshot below)
NOTE: See red warning box at the top of the tutorial before doing this.
B) Click on Yes to approve deleting the group. (see screenshot below)
C) The group (ex: New Group) has been deleted. (see screenshot below)
4. When finished, close Local Users and Groups.
OPTION TWOUsing a Elevated Command Prompt
1. Open a elevated command prompt, and do step 2 or 3 below for what you would like to do.
2. To Create a New User Group
A) In the elevated command prompt, type the command below and press Enter. (see screenshot below)
net localgroup "New Group Name" /add /comment:"Description of group"D) You can now assign user rights to the group, and add or remove users from being a member of this group at anytime.
For example: If I wanted to create a new group named New Group with a description of Example of a new group created, then I would type the command below and press enter.
net localgroup "New Group" /add /comment:"Example of a new group created"
C) Go to step 4.3. To Delete a User Group
A) In the elevated command prompt, type the command below and press Enter. (see screenshot below)
net localgroup "New Group Name" /delete
For example: If I wanted to delete a group named New Group, then I would type the command below and press enter.
net localgroup "New Group" /delete
4. When finished, close the elevated command prompt.That's it,
Shawn
Related Tutorials
- How to Open the Local Group Policy Editor in Windows 7
- How to Change a User Account Type in Windows 7
- How to Add or Remove User Accounts from Groups in Windows 7 and Vista
- How to Add or Remove Users and Groups from "User Rights Assignment"
- How to Allow or Deny Permissions to Users and Groups
- How to Create a User Account in Windows 7
- How to Delete a User Account in Windows 7
User Group - Create New or Delete

User Group - Create New or Delete
How to Create and Delete a User Group in Windows 7 and VistaPublished by Brink


Related Discussions