How to Add Windows 7 "Safe Mode" to Windows Boot Manager Screen
InformationSafe mode is a troubleshooting option for Windows that starts your computer with a minimal set of drivers and services.
This tutorial will show you how to add Windows 7 Safe Mode to the Windows Boot Manager to be able to easily choose Safe Mode, Safe Mode with Networking, Safe Mode with Command Prompt, Windows 8, or any another OS (ex: dual boot) at boot to run at startup.
This can be handy to have as another option to be able to start Windows 7 in Safe Mode as needed.
You must be logged in as an administrator to be able to do the steps in this tutorial.
EXAMPLE: "Windows 7 Safe Mode" added to Windows Boot Manager
OPTION ONETo Add Windows 7 "Safe Mode" to Windows Boot Manager
1. Open an elevated command prompt or a command prompt at boot.
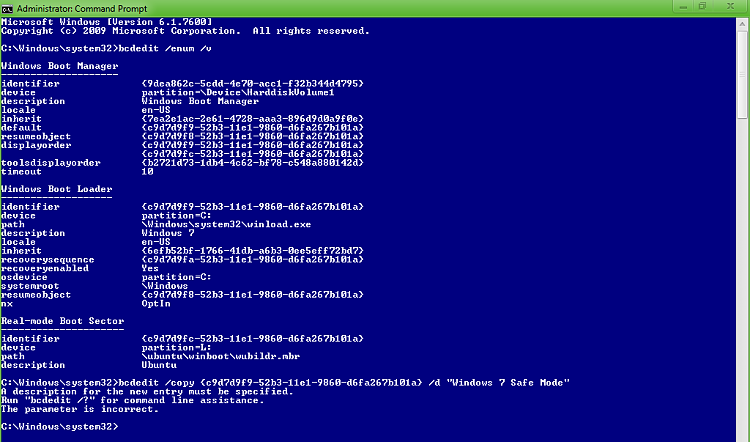
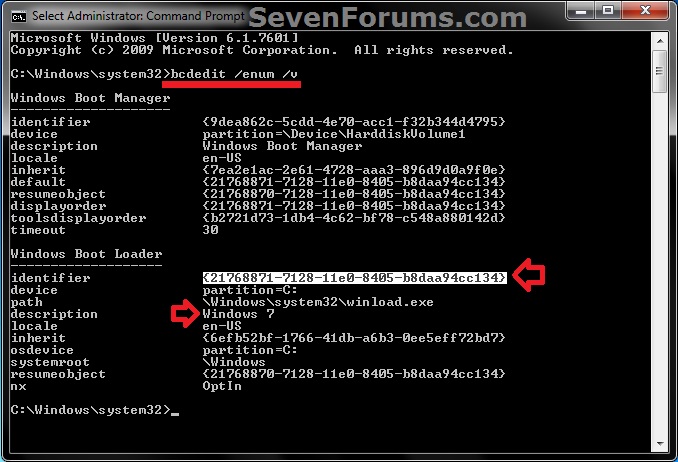
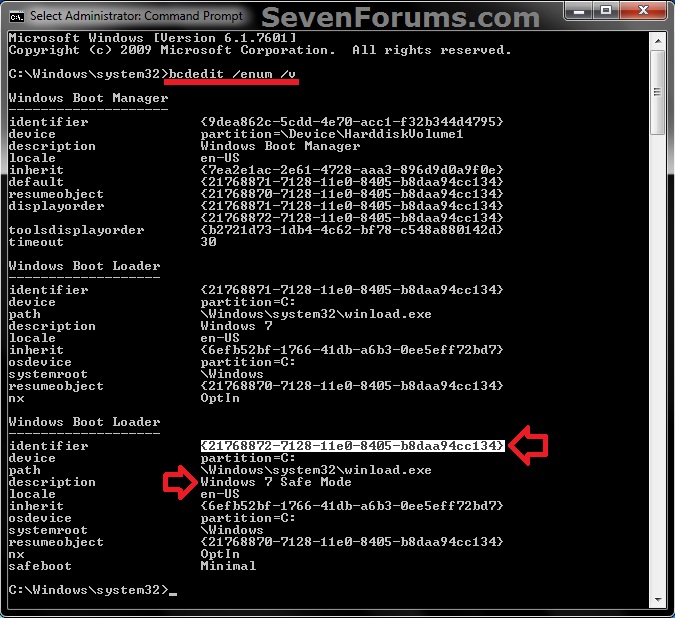
2. In the command prompt, copy and paste the command below and press Enter. (see screenshot below) 3. From under a Windows Boot Loader section, look for the description that has Windows 7 listed, and make note of it's identifier number (ex: {21768871-7128-11e0-8405-b8daa94cc134} ) . (see screenshot above)
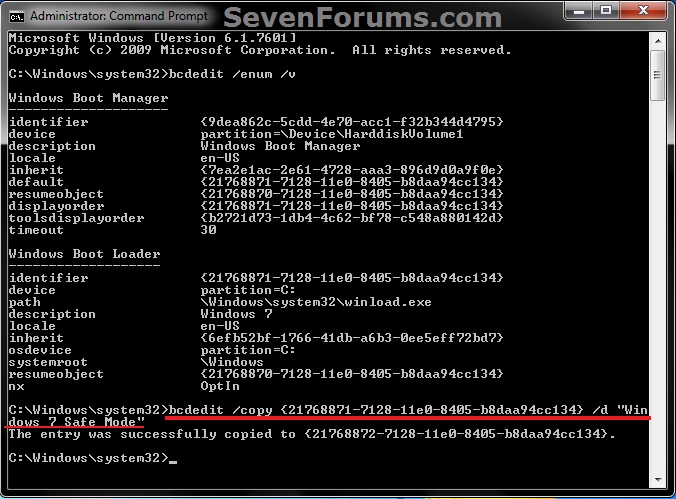
4. In the command prompt, type the command below and press Enter. (see screenshot below)
NOTE: Substitute identifier number in the command below with your actual Windows 7 identifier number from step 3.bcdedit /copy {identifier number} /d “Windows 7 Safe Mode”
OR
bcdedit /copy {identifier number} /d “Windows 7 Safe Mode with Networking”
OR
bcdedit /copy {identifier number} /d “Windows 7 Safe Mode with Command Prompt”
For example: I would type this command below exactly for Safe Mode with my identifier number {21768871-7128-11e0-8405-b8daa94cc134}.5. If successfully copied, close the elevated command prompt.
bcdedit /copy {21768871-7128-11e0-8405-b8daa94cc134} /d “Windows 7 Safe Mode”
WarningWhile you could copy and paste the bcdedit /copy {identifier number} part of the command, you must completely type out the /d “Windows 7 Safe Mode” part of the command or you will get the "A description for the new entry must be specified" error message if you try and copy and paste it. Be sure to backspace and then type out the rest of the command to also leave a space between these parts of the same command.
If it doubt, you can always type out the full command.
NOTE: If you did this from a command prompt at boot, then restart the computer into Windows 7 instead.
6. Open the Start Menu in Windows 7, type msconfig in the search box, and press Enter.
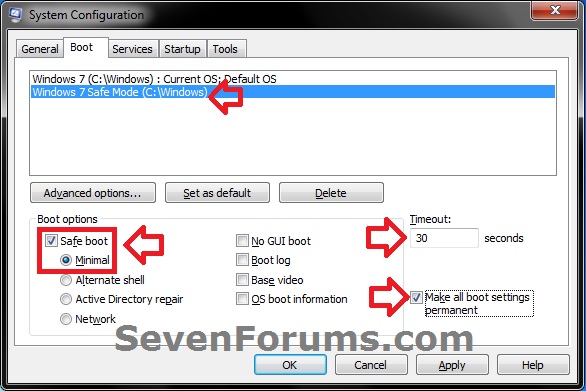
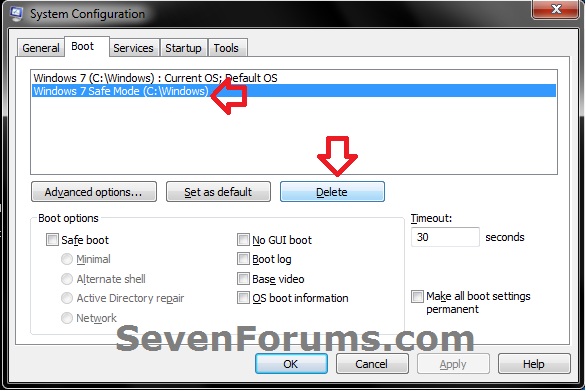
7. Click/tap on the Boot tab, verify that Windows 7 (or the OS you want) is set as the Default OS instead of Windows 7 Safe Mode. (see screenshot below)A) Next, select Windows 7 Safe Mode in the top box, and check the Safe boot box under "Boot options".
B) Select (dot) either Minimal, Alternate shell, or Network for the type of Safe Mode you wanted from step 4 above.
NoteSafe Mode (Minimal) = This starts Windows with a minimal set of drivers and services.
Safe Mode with Networking (Network) = This starts Windows in safe mode and includes the network drivers and services needed to access the Internet or other computers on your network.
Safe Mode with Command Prompt (Alternate shell) = This starts Windows in safe mode with a command prompt window instead of the usual Windows interface.
C) Set enough seconds (ex: 30) in the Timeout field to be able to have enough time to choose an OS at boot, check the Make all boot settings permanent box, and click/tap on OK. (see screenshot below)
8. Click on Yes. (see screenshot below)
9. Click on Restart. (see screenshot below) 10. When the computer restarts, you will see that Windows 7 Safe Mode has been added to the Windows Boot Manager.
OPTION TWOTo Remove Windows 7 "Safe Mode" from Windows Boot Manager
1. Boot into Windows 7, and not the Windows 7 Safe Mode option.That's it,
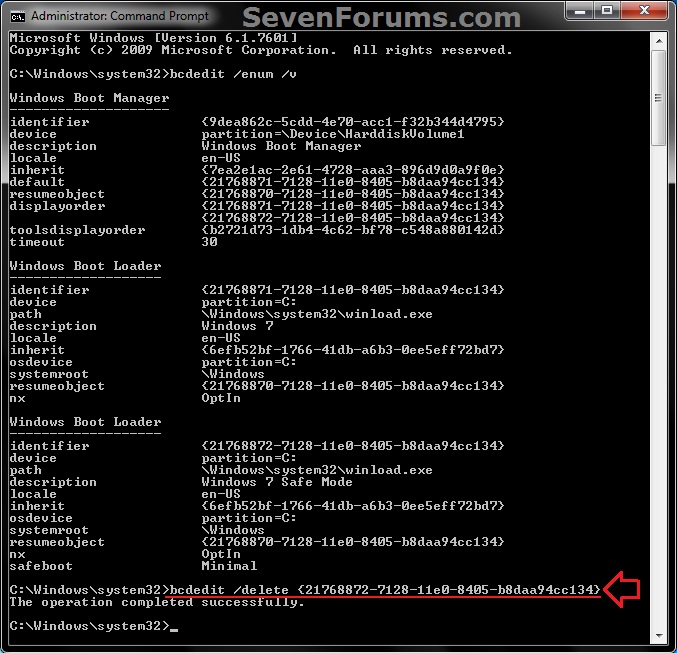
2. Using either option in the tutorial below, delete the Windows 7 Safe Mode entry like in the screenshots below.
Shawn
Related Tutorials
- How to Add "Safe Mode" to Desktop Context Menu in Windows 7 and Windows 8
- How to Add Windows 7 "Safe Mode with Command Prompt" to Windows Boot Manager Screen
- How to Add Windows 7 "Safe Mode with Networking" to Windows Boot Manager Screen
- How to Start Windows 7 in Safe Mode
- How to Delete an Operating System Listed in Windows Boot Manager
- How to Change the OS Name in Windows Boot Manager
- How to Change Time to Display Operating Systems at Boot in Windows 7
- How to Change the Default Operating System to Start in Windows 7
- How to Change the Listed OS Arrangement Order in Windows Boot Manager Screen
Safe Mode - Add to Windows Boot Manager Screen in Windows 7
-
New #1
Hi Brink, thanks for the tutorial. But I get this error:
A description for the new entry must be specified.
Run "bcdedit /?" for command line assistance.
The parameter is incorrect.
-
New #2
Hello Infinite,
It sounds like you may have made a typo or spacing mistake. Could you post a screenshot of your command prompt like in the tutorial showing what you typed in when it gave you this error? :)
-
-
New #4
Did you type the command out, or did you copy and paste any part of it?
If you copied and pasted it, then that may be the issue when copying a space and it acting as a enter instead of space and not actually using the "Windows 7 Safe Mode" (description) part of the command. Try typing it out completely to see if it may work then. :)
-
New #5
OK, I did copy and paste it before Yes. Now it is working, thanks.
However the Boot Manager list order is:
How can I move Ubuntu below Windows 7 Safe Mode, so the list order isWindows 7
Ubuntu
Windows 7 Safe Mode
Also if I want No GUI Boot, would I just need to select Windows 7 from MSConfig and select No GUI Boot?Windows 7
Windows 7 Safe Mode
Ubuntu
-
New #6
That's great news Infinite. :)
That would be correct for No GUI Boot.
The easiest way to move Ubuntu down one level is to download and install and run the free EasyBCD (registration not required to download) in Windows 7, go to the Edit Boot Menu location in the screenshot below, select (highlight) Ubuntu, click on the Down button, and click on the Save Settings button.

-
New #7
Just a thought, you could try making a tutorial for how to add Safe mode for networking or Safe mode for command prompt to Boot Manager or continue it from this, or perhaps that isn't possible.
-
New #8
Sure, you would do the same thing in this tutorial except check the "Boot option" you wanted instead in step 7 OPTION ONE instead, and change the description at step 4. :)
I'll add it to the list of tutorials to do though.
-
New #9
So it would be like this?
bcdedit /copy {identifier number} /d “Windows 7 Safe Mode with Networking”
bcdedit /copy {identifier number} /d “Windows 7 Safe Mode with Command Prompt”
Then you enable permanent boot settings, and if you added all three you would have all 3 options?

Safe Mode - Add to Windows Boot Manager Screen in Windows 7
How to Add Windows 7 "Safe Mode" to Windows Boot Manager ScreenPublished by Brink
Related Discussions





 Quote
Quote