


How to Shrink a Partition or Volume in Windows 7
InformationThis will show you how to shrink an existing partition or volume using Disk Management or Diskpart in Windows 7 to create unallocated disk space, from which you can create a new partition or volume with.WarningYou must be logged on in an administrator account to be able to do this tutorial.
If while shrinking a partition below, you get a Convert to Dynamic disks? type prompt, do not do so.
If you disable the Disk Defragmenter service, then you will get the error below when you try to do anything in Disk Management. If you get this error, then make sure that the Disk Defragmenter service is set to only Manual.
OPTION ONEUsing Disk Management
1. Open the Control Panel (icons view), and click on the Administrative Tools icon. then close the Control Panel window.
2. Click on Computer Management in Administrative Tools, then close the Administrative Tools window.
3. In the left pane under Storage, click on Disk Management. (See screenshot below)
4. In the middle pane, right click on the partition that you want to shrink and click on Shrink Volume. (See screenshot above)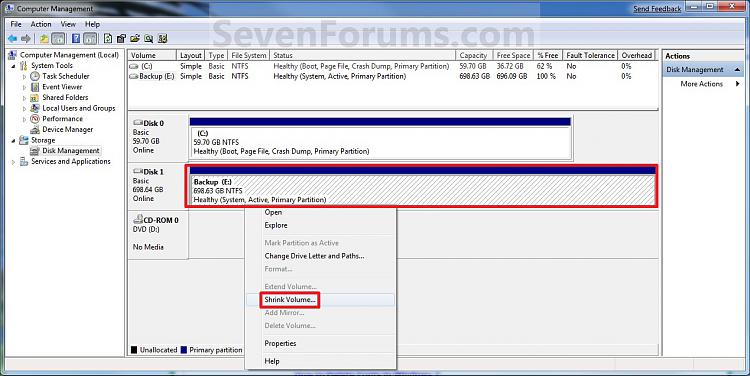
5. Type in how many MB (1 GB = 1024 MB) of the available shrink space shown that you want to shrink the partition or volume by to be used for the new unallocated space, then click on the Shrink button. (See screenshot below)
WarningThe size of the available shrink space can be restricted by the amount of space currently allocated to on the hard drive for the virtual memory page file, System Protection maximum storage space size, and hibernation files. The location of the files on the hard drive plays a big part here because these files are marked as unmovable, and Disk Management is unable to relocate them. As such, if these unmovable files are located in the middle of the total amount of free space on the disk, then only the amount of free space on the other side (to the right) of these files will actually be available for the new partition. This will result in you showing that you have x amount of free space, but not being able to use it for your partition. The only way around this is to use a 3rd party hard drive partition management program, or setup the partition when installing Vista.
6. The selected partition (step 4) has now been shrunk to create a new empty unallocated space. You can use this new unallocated space to create a new partition with. (See screenshot below)
7. Close the Computer Management window. (See screenshot above)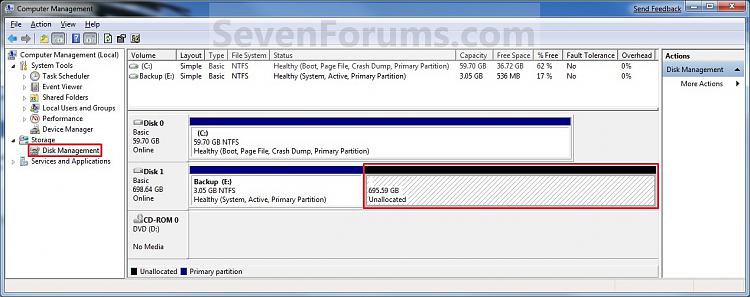
OPTION TWOUsing Diskpart in a Elevated Command Prompt
1. Open a elevated command prompt, or a command prompt at boot.That's it,
2. In the elevated command prompt, type diskpart and press Enter. (See screenshot below)
3. In the elevated command prompt, type list volume and press Enter. (See screenshot below)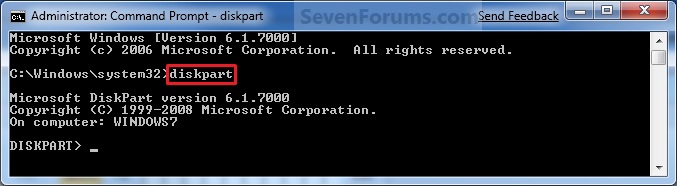
NOTE: This will give you a list of volume numbers to select from to shrink.
4. In the elevated command prompt, type select volume # and press Enter. (See screenshot below)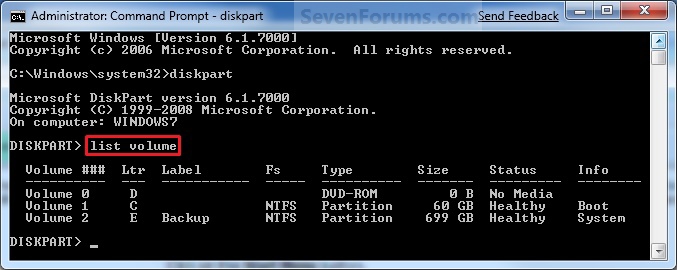
NOTE: You would substitute # for the volume number listed that you want to shrink. For example, I want to shrink the listed volume 2, so I would type select volume 2 and press Enter.
5. In the elevated command prompt, type shrink querymax and press Enter. (See screenshot below)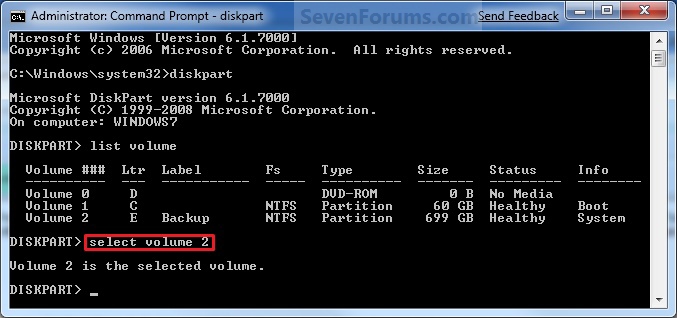
NOTE: This will give you the maximum amount of size in MB that you can shrink the selected partition or volume (step 4) by to be used as the new unallocated space. For example, I have 696 GB available to shrink.
6. To Shrink All of the Available Space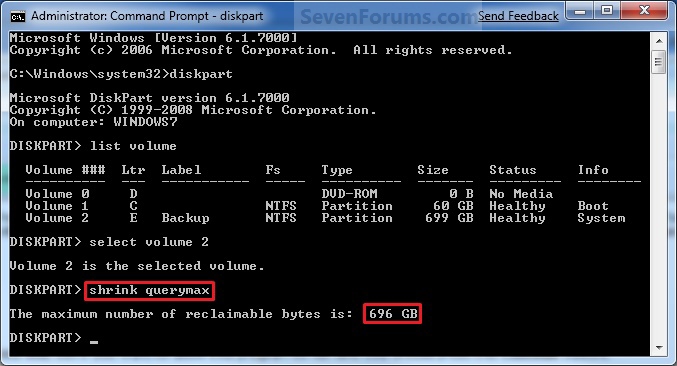
A) In the elevated command prompt, type shrink and press Enter.7. To Shrink the Available Space by a Specified Size
NOTE: This will shrink the selected partition or volume by all of the maximum number of reclaimable bytes (step 4) to be used for the new unallocated space.
B) Go to step 8.
A) In the elevated command prompt, type shrink desired=(# in MB) and press Enter. (See screenshot below)8. In the elevated command prompt, type exit and press Enter. (See screenshot below)
NOTE: You would substitute (# in MB) for how many MB (1 GB = 1024 MB) you want to shrink the selected partition or volume (step 4) by to be used for the new unallocated space. For example, if I only wanted to shrink the partition or volume by 81920 MB (80 GB), then I would type shrink desired=81920 and press Enter.

9. Close the elevated command prompt.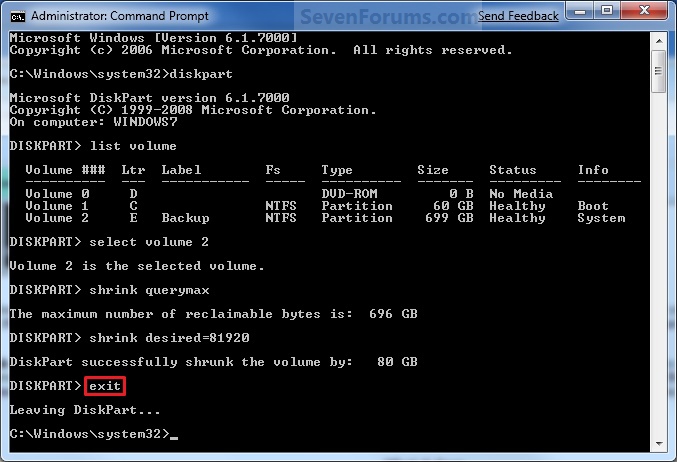
10. The selected partition (step 4) has now been shrunk to create a new empty unallocated space. You can use this new unallocated space to create a new partition with.
Shawn
Related Tutorials
- Data Partition
- How to Create a New Partition or Volume in Windows 7
- How to Extend a Partition or Volume in Windows 7
- How to Delete a Partition or Volume in Windows 7
- How to Create and Attach a Virtual Hard Disk in Windows 7
- How to Unattach and Delete a Virtual Hard Disk in Windows 7
- How to Setup Windows 7 to Boot from a VHD (Virtual Hard Disk)
- How to Convert a FAT or FAT32 Volume to NTFS in Windows 7
- How to Convert a MBR Disk to a GPT Disk
- How to Convert a GPT Disk to a MBR Disk
- How to Convert a Basic Disk to a Dynamic Disk
- How to Convert a Dynamic Disk to a Basic Disk
- How to Clean or Clean All a Disk with the Diskpart Command
- How to Quick Format a HDD or USB Drive
- How to Mark a Partition as Active in Windows 7
- How to Mark a Partition as Inactive in Windows 7 and Vista
Partition or Volume - Shrink
-
-
-
New #3
Greetings,
I am having the problem where i have 120gigabytes of free data, but I can only shrink 78. I know that i have hit an unmoveable file of some sort, but I've been told that I could get around this by defragging etc. I have defragmented by disk, but with no result.
Any ideas on how I could resolve this?
Thanks in advance.
-
New #4
Hello Aydhayeth, and welcome to Seven Forums.
You can use a trial version of a 3rd party disk management program (ex: Paragon Disk Manager) to easily shrink the partition when you have this type of problem with a unmovable file. Unfortunately, Disk Management in Windows 7 and Vista is limited.
Hope this helps,
Shawn
-
New #5
Thank you for your help.
I tried using the program, it did not get me much further but i've decided too keep it as 1 partition.
regards,
ayd
-
-
New #7
Thanks for the post, the forum is a fantastic resource.
I'm well versed with XP but the site has helped me come to terms with the changes in 7 comfortably, hope the site grows from strength to strength.
-
New #8
-
New #9
Hi,
I was able to shrink (and got unallocated space) but when I tried to create a new volume, I'm facing some errors. It said that I have already contained max number of partitions. Before I had created one. I think there is another one which is as HP Recovery Disk.
Is there any way I can create volume? I don't want to use VHDs. Every time I restart my computer, I have to reattach those drives.
Thanks,
Suranjit


 Quote
Quote
Related Discussions