How to Convert a Basic Disk to a Dynamic Disk
InformationA disk is a separate physical hard drive. This will show you how to convert a basic disk to a dynamic, also known as "software RAID", disk in Windows Disk Manager or in a command prompt without losing anything on the disk. By default Windows uses Basic disks.
Basic and dynamic disks both support using MBR and GPT partition (volume) styles. When you convert a basic disk to a dynamic disk, any existing partitions or logical drives on the basic disk become simple volumes on the dynamic disk.
For more detailed information on basic and dynamic disks, see: Basic and Dynamic Disks (Windows)
NoteDifferences Between Basic and Dynamic Disks:
- Basic disks are supported (readable) by all Windows operating systems since MS-DOS.
- Dynamic disks are only supported (readable) by Windows 2000, XP Professional, Windows Server 2003, Vista Ultimate, Vista Enterprise, Windows 7, and Windows Server 2008.
- Basic disks can have up to 128 GPT primary partitions, or 4 MBR primary partitions or or 3 MBR primary partition and 1 extended partition with up to 128 logical volumes in the extended partition.
- Dynamic disks can have up to 2000 dynamic volumes that function like a primary partition used in basic disks.
- Basic disks cannot share or split data with other primary or logical partitions, or basic disks. Each partitiion on a basic disk is treated as if it was a separate hard disk on the basic disk.
- Separate dynamic disks can be combined into a single dynamic volume (spanning), split data among several dynamic disks (striping) for increased performance, or duplicate data among several dynamic disks (mirroring) for increased reliability.
- Hard disks are basic disks by default, including removable disks and disks on a laptop (notepad).
- Removable disks or disks on a laptop (notepad) cannot be converted to a dynamic disk.
WarningVERY IMPORTANT, PLEASE READ THIS FIRST.
- You must be a administrator to do this in Windows.
- DO NOT convert a basic disk that contains a installed operating system to a dynamic disk. Doing so will cause you to no longer be able to boot or start that operating system.
- If you are using a basic disk as a storage area for shadow copies (System Protection) and you intend to convert the disk into a dynamic disk, it is important to take the following precaution to avoid the loss of data in the storage area. If the basic disk is a non-boot volume (partition) and is a different volume from where the original files reside, you must first dismount and take offline the volume containing the original files before you convert the disk containing shadow copies to a dynamic disk. You must bring the volume containing the original files back online within 20 minutes, otherwise, you will lose the data stored in the existing shadow copies. If the shadow copies are located on a boot volume, you can convert the disk to dynamic without losing shadow copies. You can use the mountvol command with the /p option to dismount the volume and take it offline. You can mount the volume and bring it online using the mountvol command or the Disk Management snap-in.
- When restoring a system image from a dynamic volume, the disks on your computer cannot be formatted to match the layout of the disks on the backup. To have full functionality, select a volume (partition) on a basic disk as your backup location instead.
- After you convert a basic disk to a dynamic disk, you cannot change the dynamic volumes back to partitions. Instead, you must delete all dynamic volumes on the dynamic disk and then convert it to a basic disk. If you want to keep your data, you must first back it up or move it to another volume.
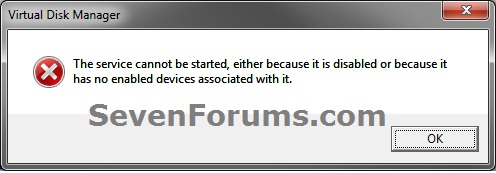
- If you disable the Disk Defragmenter service, then you will get the error below when you try to do anything in Disk Management. If you get this error, then make sure that the Disk Defragmenter service is set to only Manual.
OPTION ONEConvert Disk from Basic to Dynamic in Disk Management
1. Open the Control Panel (Icons view), and click on the Administrative Tools icon, then close the Control Panel window.
2. Click on Computer Management in Administrative Tools, then close the Administrative Tools window.
3. If prompted by UAC, click on Yes.
4. In the left pane under Storage, click on Disk Management. (See screenshot below)
5. Right click on the disk (ex: Disk 1) that you want to convert to a dynamic disk, and click on Convert to Dynamic Disk. (See screenshot above)
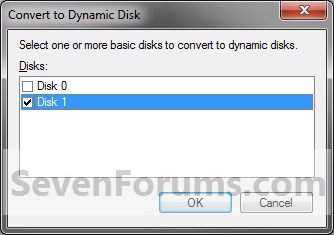
6. Make sure that the box is checked for only the disk (ex: Disk 1) that you want to convert to a dynamic disk, and click on OK. (See screenshot below)
7. Click on Convert. (See left screenshot below)
NOTE: To see more details about the disk being converted, click on the Details button first. Click on OK. when done with details. (See right screenshot below)
8. Click on Yes to confirm. (See screenshot below)
9. When done, you will notice that the disk is now a dynamic disk with your partitions from the basic disk now as simple volumes in Disk Management. (See screenshot below)
10. If this is a new HDD and it is all unallocated space, then you can now create new simple volumes with the unallocated space.
11. When done, close Disk Management.
OPTION TWOConvert Disk from Basic to Dynamic in a Command Prompt
1. Open a elevated command prompt.That's it,
A) Go to step 3.OR
2. Open a command prompt at boot.
3. In the command prompt, type diskpart and press enter. (See screenshot above)
4. Type list disk and press enter.
NOTE: Make note of the disk number (ex: Disk 1) that you want to convert to a dynamic disk.
5. Type select disk # and press enter.
NOTE: Substitute # with the actual disk number that you want to convert to a dynamic disk. For example, select disk 1.
6. Type convert dynamic and press enter.
7. When done, type exit and press enter.
8. Close the command prompt.
NOTE: Restart the computer if you did step 2 instead.
Shawn
Related Tutorials
- How to Convert a Dynamic Disk to a Basic Disk
- How to Convert a MBR Disk to a GPT Disk
- How to Convert a GPT Disk to a MBR Disk
- How to Convert a FAT or FAT32 Volume to NTFS in Windows 7
- How to Extend a Partition or Volume in Windows 7
- How to Create a New Partition or Volume in Windows 7
- How to Delete a Partition or Volume in Windows 7
- How to Shrink a Partition or Volume in Windows 7
- How to Clean or Clean All a Disk with the Diskpart Command
- How to Quick Format a HDD or USB Drive
Convert a Basic Disk to a Dynamic Disk
-
Posts : 8,375 W7 Ultimate x64/W10 Pro x64/W11 Pro Triple Boot - Main PC W7 Remote PC Micro ATX W7 Pro x64/W11 ProNew #1
Keep'em coming Shawn! That's another one to note and quite easy to follow in one quick glance!
-
-
New #3
Hello Ronny, and welcome to Seven Forums.
Since this is for the hard disk that you have your Windows 7 and factory recovery partitions on, then DO NOT CONVERT it to a dynamic disk. If you do, then Windows 7 will become unbootable and you will not be able to use your factory recovery partition to restore/reinstall Windows 7 with.
Could you post back a screenshot of your Disk Management (diskmgmt.msc) showing your drive layout? This way we can may be able to offer you some alternative suggestions.
Hope this helps,
Shawn
-
New #4
Correct, you do not want to convert this to a dynamic disk.
It looks like your OEM has done a lousy job of partitioning the drive. Since you have 4 primary partitions like this, you will not be able to create a new primary or logical partition on this drive with the size you want without having to delete one of them first. This is not recommended to do though since the ones without a drive letter are part of your OEM Windows 7 factory recovery.
I would strongly recommend getting a 2nd 2.5" drive, and installing it in your laptop to use for Linux instead. You should be able to get one pretty cheap these days. This would be your easiest option.
-
New #5
Ok, now this is not my fault, I especially purchased this new laptop with good HDD with a view to installing two OS (windows 7 and Linux) and Oracle on linux...that was my requirement. Now who is responsible for this all mess up? Can I go back to Best Buy from where I purchased it? Or should I contact Toshiba (my laptop brand) to support any help?? Your suggestions please???
-
New #6
No, it's not your fault.
It's just how Toshiba decided to set up your drive's partitions like this. On a single hard disk, you can only have up to 4 primary (Navy) partitions, or 3 Primary partitions and 1 Extended partition with up to 128 logical volumes in the extended partition.
You have basically two options. I would recommend the second one though since DVDs are not as reliable as having the factory recovery on the HDD.
1) Create a set of Toshiba recovery DVDs to be able to use for a factory restore of Windows 7 (if ever needed) instead. Delete only the 18.06 and 10.63 partitions until they are unallocated space. You can then use this unallocated for linux.
2) Get a 2nd 2.5" drive, and installing it in your laptop to use for Linux instead.
-
New #7
Thanks Shawn, Your responses were really helpful and that will save my lots of time now. I am having one harddisk with me from my another laptop, of which mother board got crashed but the HDD is intact. One of computer repairing shop owner was saying that I can convert that HDD into USB and can continue using it. I have already linux and oracle installed on that HDD. Can I continue using that HDD as a USB with my new toshiba laptop? Thanks
-
New #8
Sorry mate, but it would not work for what you are wanting to do with a USB connection.
Most laptops will have room for two 2.5" hard drives. It's usually just a small panel held in place with screws on the bottom of the laptop where you will pop in the drive at. You'll need to consult your laptop's manual for exact details on it though since each laptop will vary a bit on how it's done.
-

Convert a Basic Disk to a Dynamic Disk
How to Convert a Basic Disk to a Dynamic DiskPublished by Brink
Related Discussions


 Quote
Quote