

How to Add or Remove Computer from Navigation Pane in Windows 7
InformationThis will show you how to add or remove Computer in the Windows Explorer Navigation Pane in Windows 7.Warning
- You can only do this while logged into an administrator account.
- This will affect all user account's on the computer.
- This will also add or remove the default Computer desktop icon as well.
EXAMPLE: Computer in Navigation Pane
NOTE: This is Computer added (default) (left screenshot below) and removed (right screenshot below) from the Navigation Pane.Here's How:
1. Open the Start Menu and type regedit.exe in the search line, then press enter.
2. If prompted by UAC, then click on Yes.
3. In Regedit, go to the location below: (See screenshot below step 4)HKEY_CLASSES_ROOT\CLSID\{20D04FE0-3AEA-1069-A2D8-08002B30309D}\ShellFolder4. In the left pane of regedit, right click on the ShellFolder key and click on Permissions. (See screenshot below)5. At the top, select the Administrators group. At the bottom, check the Allow box to the right of Full Control and click on OK. (See screenshot below) 7. In the right pane of regedit, right click on a empty space and click on New and DWORD (32-bit) Value. Type Attributes and press enter. (See screenshots below)
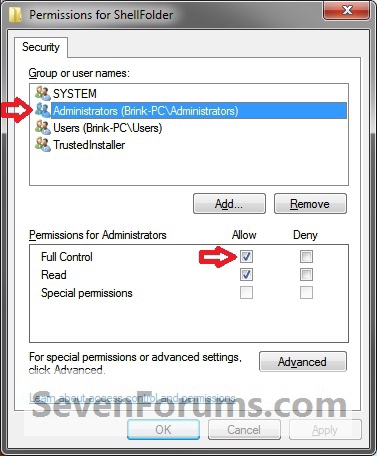
NOTE: If Attributes is already here, then you can skip this step and go to step 8 below instead.8. In the right pane of regedit, right click on Attributes and click on Modify. (See screenshot below)
9. To Add Computer to the Navigation Pane
NOTE: You can also right click on Attributes and click on Delete and Yes to restore Computer to the Navigation Pane.A) Type in b084010c and click on OK. (see screenshot below)10. To Remove Computer from the Navigation PaneB) Go to step 9.A) Type in b094010c and click on OK. (see screenshot below)11. If you have 64-bit Windows 7 Installed
Note
To also add or remove Computer from the "Open" and "Save as" type windows as well in 64-bit Windows 7, you will also need to do this step.
If you have a 32-bit Windows 7 installed, then skip this step since doing steps 1 to 7/8 will add or remove Computer from the "Open" and "Save as" type windows as well.A) In Regedit, go to the location below:Code:HKEY_LOCAL_MACHINE\SOFTWARE\Wow6432Node\Classes\CLSID\{20D04FE0-3AEA-1069-A2D8-08002B30309D}\ShellFolderThat's it,B) Repeat steps 4 to 9/10 above.11. Close regedit.
12. Restart the computer to fully apply.
Shawn
Related Tutorials
- How to Add or Remove the Windows 7 Libraries Folder from the Navigation Pane
- How to Add or Remove Favorites from the Windows 7 Navigation Pane
- How to Add or Remove Homegroup from the Windows 7 Navigation Pane
- How to Add or Remove Network from the Windows 7 Navigation Pane
- How to Add or Remove Control Panel from the Windows 7 Navigation Pane
- How to Add or Remove your User Folder from the Windows 7 Navigation Pane
- How to Show or Not Show All Folders in the Windows 7 Navigation Pane
- How to Turn On or Off Expand to Current Folder in Windows 7 Navigation Pane
- How to Pin Computer to the Windows 7 Taskbar
- How to Add or Remove a Default Desktop Icon in Windows 7
- How to Turn the Navigation Pane On or Off in Windows 7
- How to Rename "Computer" in the Windows 7 Explorer Navigation Pane
- How to Add or Remove "Computer" from Desktop Context Menu
- How to Change "Computer" Folder Name in Vista, Windows 7, and Windows 8
Computer - Add or Remove from Navigation Pane
-
New #1
As usual, great tutorial.
Edit: I found that if I quit the Explorer process and restarted it, I did not need to reboot.
Edit 2: Shawn, I noticed that the registry value does more than just remove My Computer from the navigation pane. It also removes the icon from the desktop, even when the box is checked. I rebooted just to make sure the problem was not caused by quitting explorer and restarting it, with no success. I entered the enable value and My Computer magically reappeared.
-
New #2
Thank you Jonathan. True, but if you had other user accounts on the computer, it would be easier to restart. :)
EDIT:
Thank you again Jonathan. I added a warning about the desktop icon.Last edited by Brink; 17 Nov 2009 at 17:20.
-
New #3
oh good, this means i can also remove the library from the nav pane, yes?
-
-
-
New #6
Hello Kancaras,
It sounds like you may need to use step 3 of Option Two in METHOD TWO of the tutorial below to take ownership of the ShellFolder registry key first, then try setting the permissions for it. :)
Take Ownership of file - Vista Forums
Hope this helps,
Shawn
-
New #7
Is this the only method to also hide the Computer icon under the Desktop icon in file open/save dialogs? If so then I'd rather not go with it because then it'll also hide all the drive letters in the navigation pane, which I need .
.
Edit: attached image
-
-
New #9
Just discovered ...
Remove "Computer" from Navigation Pane ... took immediate affect without rebooting
Add "Computer" to Navigation Pane ... must be rebooted to take affect
Win7 x32-bit
As Administrator
Computer - Add or Remove from Navigation Pane
How to Add or Remove Computer from Navigation Pane in Windows 7Published by Brink


 Quote
Quote
Related Discussions