

How to Extract Files from the Windows 7 Installation DVD
InformationThis will show you how to extract original files from the retail Windows 7 installation DVD. You can then use these extracted files to replace missing or corrupted system files in your current Windows 7 installation.NoteNormally you will find out that you have corrupted system files that cannot be repaired after your run a sfc /scannow command and look at it's log report.TipIf you do not have a Windows 7 with SP1 installation disc, then you can download the latest official Windows 7 with SP1 ISO file at the link below, then create an installation DVD or USB with it.
Microsoft: Windows 7 Direct Download Links
Here's How:
1. Download and install the same free 32-bit or 64-bit 7-Zip program version as your 32-bit or 64-bit Windows 7.
2. Use Compatibiliy Mode on the 7-Zip shortcut and check the Run this program as an administrator box.
3. Run 7-Zip, then click on Tools and Options on the menu bar. Next, select (highlight) .wim, and click on the plus button for All users, and click on OK. (See screenshots below)
4. Insert your retail Windows 7 installation disc into the DVD drive and wait for it to be recognized.
5. In 7-Zip, navigate to your DVD drive letter (ex: E: ) that has the Windows 7 installation disc in it, and double click on the Sources folder. (See screenshot below)
6. Scroll down and double click on the install.wim file. (See screenshot below)
7. You will now see this for a few seconds as it opens. (See screenshot below)
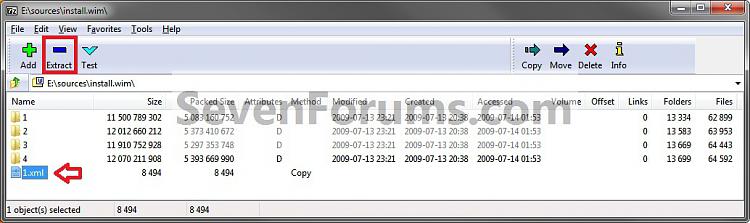
8. Each numbered folder is a different edition of Windows 7. They will vary depending on what type of Windows 7 installation DVD you have. To see what edition is for each numbered folder, select the 1.xml file and click on the Extract button on the toolbar. (See screenshots below)
9. Copy the 1.xml file to your desktop. (See screenshot below)
10. Open the 1.xml file on the desktop. Look for the <IMAGE INDEX="#"> entry and the <NAME>edition</NAME> entry a bit under it in the code (highlighted in red below) to see what Windows 7 edition is for each numbered folder in step 8. (See code box below with an example 1.xml file)
NOTE: This file will open in Internet Explorer by default.
11. Now open the numbered folder (step 8) that is the same edition as your currently installed Windows 7 edition, and navigate to the Windows\System32 folder. You can now select and extract the system files that you need to your desktop. (See screenshot below)Code:- <WIM> <TOTALBYTES>2860826557</TOTALBYTES> - <IMAGE INDEX="1"> <DIRCOUNT>13290</DIRCOUNT> <FILECOUNT>62943</FILECOUNT> <TOTALBYTES>11500789302</TOTALBYTES> - <CREATIONTIME> <HIGHPART>0x01CA0446</HIGHPART> <LOWPART>0xE89FF88A</LOWPART> </CREATIONTIME> - <LASTMODIFICATIONTIME> <HIGHPART>0x01CA045F</HIGHPART> <LOWPART>0x3C8C7A24</LOWPART> </LASTMODIFICATIONTIME> - <WINDOWS> <ARCH>9</ARCH> <PRODUCTNAME>Microsoft® Windows® Operating System</PRODUCTNAME> <EDITIONID>HomeBasic</EDITIONID> <INSTALLATIONTYPE>Client</INSTALLATIONTYPE> <HAL>acpiapic</HAL> <PRODUCTTYPE>WinNT</PRODUCTTYPE> <PRODUCTSUITE>Terminal Server</PRODUCTSUITE> - <LANGUAGES> <LANGUAGE>en-US</LANGUAGE> <DEFAULT>en-US</DEFAULT> </LANGUAGES> - <VERSION> <MAJOR>6</MAJOR> <MINOR>1</MINOR> <BUILD>7600</BUILD> <SPBUILD>16385</SPBUILD> <SPLEVEL>0</SPLEVEL> </VERSION> <SYSTEMROOT>WINDOWS</SYSTEMROOT> </WINDOWS> <NAME>Windows 7 HOMEBASIC</NAME> <DESCRIPTION>Windows 7 HOMEBASIC</DESCRIPTION> <FLAGS>HomeBasic</FLAGS> <HARDLINKBYTES>4516930990</HARDLINKBYTES> <DISPLAYNAME>Windows 7 Home Basic</DISPLAYNAME> <DISPLAYDESCRIPTION>Windows 7 Home Basic</DISPLAYDESCRIPTION> </IMAGE> - <IMAGE INDEX="2"> <DIRCOUNT>13539</DIRCOUNT> <FILECOUNT>63997</FILECOUNT> <TOTALBYTES>12012660212</TOTALBYTES> - <CREATIONTIME> <HIGHPART>0x01CA0446</HIGHPART> <LOWPART>0xE89FF88A</LOWPART> </CREATIONTIME> - <LASTMODIFICATIONTIME> <HIGHPART>0x01CA045F</HIGHPART> <LOWPART>0x5C029E16</LOWPART> </LASTMODIFICATIONTIME> - <WINDOWS> <ARCH>9</ARCH> <PRODUCTNAME>Microsoft® Windows® Operating System</PRODUCTNAME> <EDITIONID>HomePremium</EDITIONID> <INSTALLATIONTYPE>Client</INSTALLATIONTYPE> <HAL>acpiapic</HAL> <PRODUCTTYPE>WinNT</PRODUCTTYPE> <PRODUCTSUITE>Terminal Server</PRODUCTSUITE> - <LANGUAGES> <LANGUAGE>en-US</LANGUAGE> <DEFAULT>en-US</DEFAULT> </LANGUAGES> - <VERSION> <MAJOR>6</MAJOR> <MINOR>1</MINOR> <BUILD>7600</BUILD> <SPBUILD>16385</SPBUILD> <SPLEVEL>0</SPLEVEL> </VERSION> <SYSTEMROOT>WINDOWS</SYSTEMROOT> </WINDOWS> <NAME>Windows 7 HOMEPREMIUM</NAME> <DESCRIPTION>Windows 7 HOMEPREMIUM</DESCRIPTION> <FLAGS>HomePremium</FLAGS> <HARDLINKBYTES>4931998179</HARDLINKBYTES> <DISPLAYNAME>Windows 7 Home Premium</DISPLAYNAME> <DISPLAYDESCRIPTION>Windows 7 Home Premium</DISPLAYDESCRIPTION> </IMAGE> - <IMAGE INDEX="3"> <DIRCOUNT>13625</DIRCOUNT> <FILECOUNT>64487</FILECOUNT> <TOTALBYTES>11910752928</TOTALBYTES> - <CREATIONTIME> <HIGHPART>0x01CA0446</HIGHPART> <LOWPART>0xE89FF88A</LOWPART> </CREATIONTIME> - <LASTMODIFICATIONTIME> <HIGHPART>0x01CA045F</HIGHPART> <LOWPART>0x79D2BCF7</LOWPART> </LASTMODIFICATIONTIME> - <WINDOWS> <ARCH>9</ARCH> <PRODUCTNAME>Microsoft® Windows® Operating System</PRODUCTNAME> <EDITIONID>Professional</EDITIONID> <INSTALLATIONTYPE>Client</INSTALLATIONTYPE> <HAL>acpiapic</HAL> <PRODUCTTYPE>WinNT</PRODUCTTYPE> <PRODUCTSUITE>Terminal Server</PRODUCTSUITE> - <LANGUAGES> <LANGUAGE>en-US</LANGUAGE> <DEFAULT>en-US</DEFAULT> </LANGUAGES> - <VERSION> <MAJOR>6</MAJOR> <MINOR>1</MINOR> <BUILD>7600</BUILD> <SPBUILD>16385</SPBUILD> <SPLEVEL>0</SPLEVEL> </VERSION> <SYSTEMROOT>WINDOWS</SYSTEMROOT> </WINDOWS> <NAME>Windows 7 PROFESSIONAL</NAME> <DESCRIPTION>Windows 7 PROFESSIONAL</DESCRIPTION> <FLAGS>Professional</FLAGS> <HARDLINKBYTES>4804037542</HARDLINKBYTES> <DISPLAYNAME>Windows 7 Professional</DISPLAYNAME> <DISPLAYDESCRIPTION>Windows 7 Professional</DISPLAYDESCRIPTION> </IMAGE> - <IMAGE INDEX="4"> <DIRCOUNT>13655</DIRCOUNT> <FILECOUNT>64636</FILECOUNT> <TOTALBYTES>12070211908</TOTALBYTES> - <CREATIONTIME> <HIGHPART>0x01CA0446</HIGHPART> <LOWPART>0xE89FF88A</LOWPART> </CREATIONTIME> - <LASTMODIFICATIONTIME> <HIGHPART>0x01CA045F</HIGHPART> <LOWPART>0x97ECC597</LOWPART> </LASTMODIFICATIONTIME> - <WINDOWS> <ARCH>9</ARCH> <PRODUCTNAME>Microsoft® Windows® Operating System</PRODUCTNAME> <EDITIONID>Ultimate</EDITIONID> <INSTALLATIONTYPE>Client</INSTALLATIONTYPE> <HAL>acpiapic</HAL> <PRODUCTTYPE>WinNT</PRODUCTTYPE> <PRODUCTSUITE>Terminal Server</PRODUCTSUITE> - <LANGUAGES> <LANGUAGE>en-US</LANGUAGE> <DEFAULT>en-US</DEFAULT> </LANGUAGES> - <VERSION> <MAJOR>6</MAJOR> <MINOR>1</MINOR> <BUILD>7600</BUILD> <SPBUILD>16385</SPBUILD> <SPLEVEL>0</SPLEVEL> </VERSION> <SYSTEMROOT>WINDOWS</SYSTEMROOT> </WINDOWS> <NAME>Windows 7 ULTIMATE</NAME> <DESCRIPTION>Windows 7 ULTIMATE</DESCRIPTION> <FLAGS>Ultimate</FLAGS> <HARDLINKBYTES>4963044302</HARDLINKBYTES> <DISPLAYNAME>Windows 7 Ultimate</DISPLAYNAME> <DISPLAYDESCRIPTION>Windows 7 Ultimate</DISPLAYDESCRIPTION> </IMAGE> </WIM>
12. Verify that each extracted file is unblocked. You can now use the extracted files to copy and replace your missing or corrupted system files in your currently installed Windows 7.
TipYou will need to take ownership and set permissions to "Allow" your account "Full Control" of the original file in your current installation before you will be allowed to replace it with the extracted copy.
If the system file is in use and you are unable to replace it with the extracted copy, then:
Copy /Y "full path of extracted replacement file" "full path of original Windows 7 system file"
- Open a Command Prompt at boot.
- Do steps 4B to 4D in this tutorial first to verify the drive letter of your Windows 7 drive. It's not always C: at boot.
- Type in the command below to copy and replace the original file with the extracted replacement file.
For example:
If the extracted replacement uDWM.DLL is on my desktop, then I would use type this in the command prompt at boot and press enter.
Copy /Y "C:\Users\User-name\Desktop\uDWM.dll" "C:\Windows\System32\uDWM.dll"
That's it,
Shawn
Related Tutorials
- How to Repair Windows 7 System Files with System File Checker
- How to Run Disk Check in Windows 7
- How to Do a System Restore in Windows 7
- How to Do a Repair Install to Fix Windows 7
- How to Create a Windows 7 System Repair Disc
- How to Extract Files from Windows 7 System Image using Virtual PC
- How to Extract Windows 7 System Image Files Using Disk Management
- How to Manually Extract Files from a Backup in Vista and Windows 7
- How to Extract Files and Folders from System Restore Points in Windows 7 and Vista
Extract Files from Windows 7 Installation DVD
-
New #1
U da man
nah but you're making great tutorials. If I can find the time for it, I'll try to stick around here :)
+rep
-
-
New #3
Extracting Win 7 files
Nicely done. Great tut.
I also now have a great SourceForge app. Sure will come in handy to see and analyze .msi files. Sometimes a single file has to be extracted and I would just reinstall the whole program.
-
-
New #5
-
New #6
Oh, LOL
LOL
Yeah, it's very handy app to have. You can get the latest 9.08 alpha build of 7-Zip at this link.
SourceForge.net: Topic: 7-Zip 9.08 alpha
-
New #7
Thanks, Brink- but what to do if my cpu doesn't support virtualization, & I am running Home edition of win7...
all the best elisedai
-
New #8
Elisedai,
It doesn't matter since you are using the program 7-Zip to view it. This works in all editions of Windows 7. :)
-
New #9
Just wanted to say thank you Brink for another excellent tutorial. Just ran through it and was able to get to a file I wanted to try.
Interesting, in doing so I found a Windows Mail folder on my Pro X64 CD under the 3. tree.
H:\sources\install.wim\3\Program Files\Windows Mail\
I thought there was no mail program in Windows 7????? It's also installed on my system, but when I run WinMail.exe nothing happens. Mystery. I'll take this to one of the forums to pursue.

Extract Files from Windows 7 Installation DVD
How to Extract Files from the Windows 7 Installation DVDPublished by Brink


 Quote
Quote
Related Discussions