

How to Run Disk Check in Windows 7
InformationThis will show you how to run Check Disk or chkdsk in Windows 7 to check a selected hard disk for file system errors and bad sectors on it.
NoteRunning a check disk may take a bit depending on the size of the selected hard disk. For faster and better results, do not use your computer while check disk is checking for errors.
You will have a choice to scan only, scan for and attempt to fix errors, scan for and attempt recovery of bad sectors, or scan for and attempt to fix errors and recovery of bad sectors.TipSolutions to Common Check Disk (chkdsk) Issues in Windows 7
- The Chkdsk.exe program does not start correctly on a Windows 7-based computer
- Incorrect free disk space displayed after running check disk
OPTION ONETo Run Chkdsk from Drive's Properties Page
1. Open the Start Menu and click on the Computer button on the right dark side.
2. Right click the hard disk drive that you want to check, and click on Properties. (see screenshot below)3. Click on the Tools tab, and click on the Check now button under Error-checking. (see screenshot below)4. You will now see this window. Do the steps below for what you would like to do. (see screenshot below)5. To Only Scan the Drive for Errors
NOTE: This will just give you a report if there are any drive errors or not, and will not attempt to fix them.A) Leave both boxes unchecked and click on the Start button. (see screenshot below step 4)6. To Only Scan and Attempt Recovery of Bad Sectors
NOTE: This scan attempts to find and repair physical errors on the hard disk itself, and it can take much longer to complete.A) uncheck the Automatically fix file system errors box. (see screenshot below step 4)7. To Only Scan and Automatically Attempt to Fix Errors
B) Check the Scan for and attempt recovery of bad sectors box.
NOTE: This will automatically attempt to repair problems with files and folders that the scan detects.A) Check the Automatically fix file system errors box. (see screenshot below step 4)8. To Scan and Automatically Attempt to Fix Errors and Recover Bad Sectors
B) Uncheck the Scan for and attempt recovery of bad sectors box.
NOTE: This will scan for both file errors and physical errors (steps 6 and 7). It will then attempt to repair problems with files and folders, and recover physical errors.A) Check the Automatically fix file system errors box. (see screenshot below step 4)9. Click on the Start button, and do either step 10 or 11 below depending on if the drive is currently in use or not. (see screenshot below step 4)
B) Check the Scan for and attempt recovery of bad sectors box.
10. If the selected hard disk is not in use, then you will see check disk start checking the disk now. (see screenshot below)A) When the scan is complete, you will then see11. If the selected hard disk is in use, then click on the Schedule disk check button. (see screenshot below)
results similar to this. Click on Close. (see screenshots below)B) Click on OK. (see screenshot below step 3)
C) Stop, you're done.
NOTE: If the hard disk that you selected in step 2 is in use (for example, the C: drive or partition that contains Windows 7), you'll be prompted to reschedule the disk check for the next time you restart your computer. Otherwise you will not see this window below.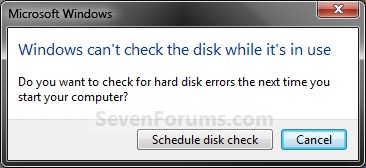 A) Restart the computer.B) During startup, you will only have 10 seconds to press a key to cancel the Disk Check from steps 7 or 8. (see screenshot below)
WarningOnce the Disk Check scan starts, DO NOT STOP the scan to prevent possible damage to the data on your hard drive.C) When the scan is complete you will see a report similar to this below briefly before the computer automatically restarts.
OPTION TWOTo Run Chkdsk from Command Prompt
NOTE: The chkdsk command can be used on a FAT32 or NTFS formatted disk.1. Open a elevated command prompt or a command prompt at startup.That's it,
2. In the command prompt, type in the following command below followed by one or more switches that you would like to use below with a space between each switch and press Enter.
NOTE: For example, the most common command to run chkdsk on your C: drive is: chkdsk C: /F
chkdsk [drive letter]: [switches with space inbetween]
Switches that you can use in the command:
- /F - Fixes errors on the disk. The disk must be locked. If chkdsk cannot lock the drive, a message appears that asks you if you want to check the drive the next time you restart the computer. For example, on the C: drive.
- /V - Displays the name of each file in every directory as the disk is checked.
- /R - Locates bad sectors and recovers readable information. The disk must be locked. /r includes the functionality of /f, with the additional analysis of physical disk errors.
- /L:[size in KB] - Can only be used with a NTFS disk. Changes the chkdsk log file size to the number size in KB you type. If you omit the size parameter, typing /L by itself will display the current chkdsk log file size. For example, to have the default 65536 KB log file for the C: drive, you would type: chkdsk C: /F /L:65536
- /X - Forces the volume to dismount first, if necessary. All open handles to the drive are invalidated. /x also includes the functionality of /f.
- /I - Can only be used with a NTFS disk. Performs a less vigorous check of index entries, which reduces the amount of time required to run chkdsk.
- /C - Can only be used with a NTFS disk. Does not check cycles within the folder structure, which reduces the amount of time required to run chkdsk.
- /B - Can only be used with a NTFS disk. Clears the list of bad clusters on the volume and rescans all allocated and free clusters for errors. /b includes the functionality of /r. Use this parameter after imaging a volume to a new hard disk drive.
Shawn
Related Tutorials
- How to Do a System Restore in Windows 7
- How to Repair Windows 7 System Files with System File Checker
- How to Extract Files from the Windows 7 Installation DVD
- How to See Windows 7 Reliability and Problem History with Reliability Monitor
- How to Run a Startup Repair in Windows 7
- How to Boot to the Advanced Boot Options in Windows 7
- How to Run the Memory Diagnostics Tool in Windows 7
- How to Boot to the System Recovery Options in Windows 7
- How to Turn the Windows 7 Disk Defragmenter Schedule On or Off
- How to Do a Repair Install to Fix Windows 7
- How to Use Windows 7 Disk Defragmenter
- How to Reset Check Disk to Not Run at Startup
- How to Use Extended Disk Cleanup in Windows 7
- How to Change the AUTOCHK Initiation Countdown Time in Windows 7
- How to Read the Event Viewer Log for Check Disk (chkdsk) in Windows
- How to Disable "Do you want to scan and fix Removable Drive" Prompt in Windows
Disk Check
-
New #1
By starting up my laptop with windows 7 build 7100 i always get step 12 & 13, what is the reason therefor? I don't like it
-
New #2
Hello Jaap Aal, and welcome to Seven Forums.
You can do STEP TWO in the tutorial below to reset disk check and stop it from running all the time for you hopefully.
Chkdsk will Not Run at Startup in Vista - Vista Forums
Hope this helps,
Shawn
-
New #3
Thank you I'll try when I've got the time!!
-
-
New #5
Sometimes it's much easier... Only took my windows 7 iso disc --> repair start up, and the problem is solved already
-
-
New #7
I am planning to run disk check soon, with both the options to fix it and recover bad sectors checked. I have a 300GB hard drive with 173GB free. Any idea on how long it would take to run the complete disk check? Are we talking about an hour, three hours, eight hours? I really have no idea. Thanks.
-
New #8
Hello Vic,
If nothing wrong is found on the drive, I would plan on at least around an hour. Longer if it finds anything and needs to fix it if able.
-
New #9
Thanks. Is there any way I can look at the scan results if the scan completed and I was not there when it was done? I just want to know if there are any problems with my hard drive.
I ran the scan last night an hour before I went to bed. In the one hour, it only completed 13 percent, so I figured it would run for many more hours. I set the alarm to wake up four hours later, and when I did, I guess the scan had already completed because the screen just showed my desktop (like after the computer has started up).


 Quote
Quote
Related Discussions