

How to Change Thumbnail Previews Border in Windows 7 and Windows 8
InformationThis tutorial will show you how to change the border of thumbnail previews for image and video files to have either a drop shadow border, photo border, video sprockets border, or no border in Windows 7 and Windows 8.
NoteYou will need to click on View or Views, on the Windows Explorer window Menu bar, and have it set to either Medium Icons, Large Icons, or Extra Large Icons to see a thumbnail preview of the file image as the icon.
For more on this, see:
EXAMPLE: Available Thumbnail Preview Image Borders
NOTE: The default border for thumbnails in Windows Explorer is the Photo_Border-2 image below.
OPTION ONETo Change Thumbnail Borders using a REG File
1. Do step 2, 3, 4 or 5, and/or step 6, 7, 8, or 9 below for what you would like to do.
2. No Border for Images
A) Click/tap on the download button below to download the .reg file below, and go to step 10 below.3. Drop Shadow Border for Images
No_Border-0_Image.reg
Download
A) Click/tap on the download button below to download the .reg file below, and go to step 10 below.4. Photo Shadow Border for Images
Drop_Shadow-1_Image.reg
Download
NOTE: This is the default setting for images.
A) Click/tap on the download button below to download the .reg file below, and go to step 10 below.5. Video Sprockets Border for Images
Photo_Border-2_Image.reg
Download
A) Click/tap on the download button below to download the .reg file below, and go to step 10 below.AND/OR
Video_Sprockets-3_Image.reg
Download
6. No Border for Videos
A) Click/tap on the download button below to download the .reg file below, and go to step 10 below.7. Drop Shadow Border for Videos
No_Border-0_video.reg
Download
A) Click/tap on the download button below to download the .reg file below, and go to step 10 below.8. Photo Shadow Border for Videos
Drop_Shadow-1_video.reg
Download
A) Click/tap on the download button below to download the .reg file below, and go to step 10 below.9. Video Sprockets Border for Videos
Photo_Border-2_video.reg
Download
NOTE: This is the default setting for images.
A) Click/tap on the download button below to download the .reg file below, and go to step 10 below.10. Save the .reg file to your Desktop.
Video_Sprockets-3_video.reg
Download
11. Double click/tap on the downloaded .reg file to merge it.
12. If prompted, click/tap on Run, Yes (UAC), Yes, and OK to approve the merge.
13. Log off and log on, or restart the computer to apply.
14. When finished, you can delete the downloaded .reg file if you like.
OPTION TWOTo Change Thumbnail Borders in Registry Editor
1. Press the Windows + R keys to open the Run dialog, type regedit, and click/tap on OK.That's it,
2. If prompted by UAC, click on Yes.
3. In Registry Editor, navigate to the location below for what you want to change. (See screenshot below)
(For image borders)
HKEY_CLASSES_ROOT\SystemFileAssociations\image
(For video borders)
HKEY_CLASSES_ROOT\SystemFileAssociations\video
4. In the right pane of image and/or video, double click/tap on Treatment to modify it. (See screenshot above)
5. Type in the value data number in the table below for the border that you want for all thumbnail images to have for image and/or video files, and click/tap on OK. (See screenshot below table)
NoteSee the example at the top of the tutorial to see what each border looks like.
2 is the default setting for image.
3 is the default setting for video.
6. Close regedit.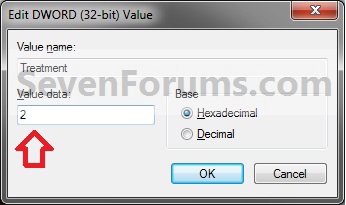
7. Log off and log on, or restart the computer to apply.
Shawn
Thumbnail Previews - Change Border
-
-
-
-
New #4
what about white borders that are used to retain aspect ratio?
right, after i installed this program "thumbnailer", it changed icons to retain aspect ratio, so it adds borders, have a look:
you see on the file selected, you can see that theres a white border created, before i installed that program it wasnt like that, so a registry entry must have been edited, since i already used your tweak to remove the shadows added, there must be another one for these borders to retain aspect ratio, any idea?
the reason i want to remove this so it would be the way it was before (no white borders), because it doesnt look very nice on the desktop, and well i just want to set up my pc to the best i can
thanks in advanceLast edited by Brink; 01 Dec 2014 at 22:43. Reason: removed broken image link
-
New #5
Hello Dareheaven, and welcome to Seven Forums.
Did uninstalling the program restore it back to normal?
If not, then you can do a system restore using a restore point dated before you installed that program to undo it and the changes it made.
Hope this helps,
Shawn
-
New #6
yes it does remove everything that happens, but i need that program for its features, i removed the shadows it added to thumbnails but i want to remove the white borders too without uninstalling, im very sure its posible as after all its only a registry edit that was done when installed i believe
-
New #7
I'm not sure what to say since I'm not familiar with that program. Since it's a program that made the change, double check it's settings to see if it may have an option to change the borders. If it doesn't, then I'm not sure how to undo it other than uninstalling the program the made the change and trying another program that doesn't do this.
-
New #8
ah shame you dont know, yea i have looked at the program from the outside, all settings posible, nothing to do with the regedit thought so i dont know, however i noticed if i changed the file extension to 3gp for example, the borders go away, so its definatelly file associations that are affected, not all files, but if i change videos to 3gp then the thumbnailer tab in properties of the file goes away, so i dont know
btw brink i read your pc build and since i notice your a pc enthusiast you should look into that program its really good, lets you customize your media thumbnails, for example a windows problem, thumbnails are generated at the beginning of the video, that program however lets you pick exact point, or pick where you want the thumbnail to be generated, i have it set to 50% but for thumbnails that dont come out nice i set a specific point, but the program is a bit buggy, if theres a file that the thumbnail cannot be generated for, windows explorer will crash, but i figured out how to get by this, in folder options tick display as icons, then switch to view in details, in organise open up details pane, switch of display as icons, and go through file by file till windows explorer crashes, when it does go back to that file (with display as icons ticked), and convert that file to mp4 for example, sorts the problem out, so say your like me have thousands of video files, once you find the faulty file, and sorted, then thats done and all good, but yeah i also had to manually use this tip you showed us, removing the droped shadows, as i believe its nicer, and now i think i found a way to get past it in a way, changing the file extension to .3gp for all files, that doesnt affect much only the thumbnailer tab in properties, and since its only a container and has the information which program to be opened with that all good
by the way just in case you didnt know, which you propably did, if you want to change all extensions in a folder, say from an .mp4 to .avi do this:
to change multiple extension files without a program, first find the extension you want to change, for example .flv, and you want to change them to .avi, create a blank text document in that same folder, write down
REN *.flv *.avi
just change the .flv part to what ever you want, dont change anything else no space nothing, exactly like that, its case sensitive by the way, make sure in windows explorer you can view all hidden files, extensions and EVERYTHING, rename the .txt file to .cmd, now just double click on that file, delete it when done, you can add several lines of code as you can see above, check all file extensions after, incase ones couldnt be done since there filenames already existed, do those manually.
for multiple lines of code it should look something like this
REN *.wmv *.avi
REN *.MOV *.avi
REN *.mp4 *.avi
REN *.mpg *.avi
REN *.mkv *.avi
REN *.3gp *.avi
REN *.mpeg *.avi
REN *.m4v *.avi
REN *.m4a *.avi
sorry for the long post lol
-
New #9
Hi,
maybe exists similar fix to change video border for specific video file extension? .mkv file have incorrect.


Thumbnail Previews - Change Border
How to Change Thumbnail Previews Border in Windows 7 and Windows 8Published by Brink


 Quote
Quote
Related Discussions