How to Manually Sync Your Offline Files in Windows 7 and Windows 8
InformationWhen you make a network file, or all files in a network folder, available offline, Windows creates a copy of the file or folder on your computer. This is called an offline file. The next time you disconnect from the network, you'll still be able to open, modify, and save the file the same way you would if you were still connected. And when you do connect to the network again, Windows will automatically sync the offline file on your computer with the corresponding file on the network for the latest changes.
When you are connected to the network, this tutorial will show you how to also manually sync your offline files whenever you like to have the latest versions of files stored on the network right away in Windows 7 and Windows 8.
NoteIn Windows 7, offline files is only available in the Windows 7 Professional, Ultimate, and Enterprise editions.
In Windows 8, offline files is only available in the Windows 8 Pro and Windows 8 Enterprise editions.
TipA hotfix if it applies to you:
Offline files synchronization may not finish on a computer that is running Windows 7 or Windows Server 2008 R2
OPTION ONETo Sync Offline Files through Sync Center
1. Open the Control Panel (icons view) in Windows 7 or Windows 8, and click/tap on the Sync Center icon.
2. To Sync All Offline Files at OnceA) Select the Offline Files folder to only highlight it, then click/tap on the Sync toolbar button, or right click on the Offline Files folder and click/tap on Sync Offline Files. (see screenshot below)3. To Sync Only a Single or Multiple Offline Files
NOTE: Notice the Status of when the offline files have last been synced under the progress bar. B) You will now notice the progress bar fully green to indicate that the sync completed. (see screenshot below)
NOTE: After a few moments, the progress bar and status will return to normal like above with the new last sync date and time now. C) Go to step 4 below.
NOTE: Notice the Status of when the offline files in the offline folders have last been synced under the progress bar.A ) Click/tap on the Offline Files folder to open it. (see screenshot above)4. When done, close the Sync Center.
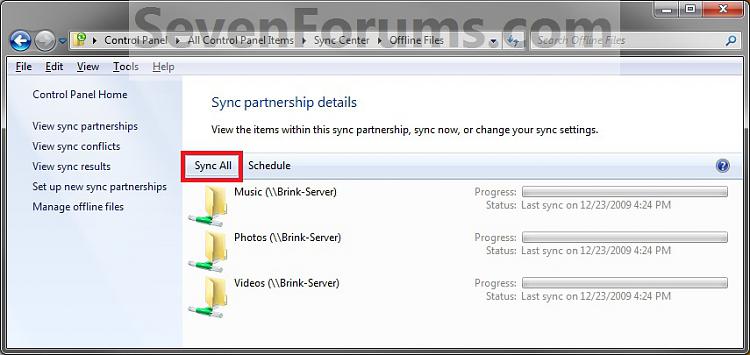
B) To Sync All Offline Files at Once
- Click/tap on the Sync All toolbar button. (see screenshot below)
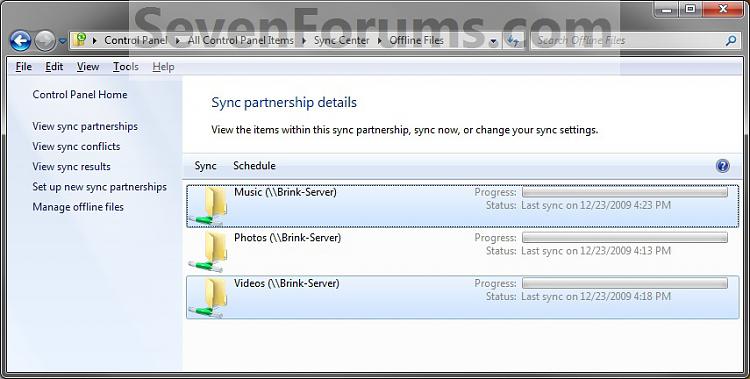
C) To Sync all Offline Files in Only One or More Selected Offline Folders
- Select One or More offline folders, and click on the Sync toolbar button. (see screenshots below)
D) You will now notice the progress bar(s) fully green to indicate that the sync completed for the select offline folders. (see screenshot below)
NOTE: After a few moments, the progress bar and status will return to normal like above with the new last sync date and time now.
OPTION TWOTo Sync Offline Files from the Offline Files Location
1. Browse to the network folder that is or contains the file(s) that are set as Always available offline. (see screenshot below) 2. To Sync All Offline Files in Selected Offline Folders at OnceThat's it,A) Select one or more offline folders, then right click on a selected offline folder and click/tap on Sync and Sync selected offline files. (see screenshot below) OR3. To Sync Selected Offline Files in a Selected Network Folder
B) Open a offline folder, then click/tap on the Sync toolbar drop down menu and Sync selected offline files in this folder. (see screenshot below) C) Go to step 4 below.
NOTE: This is for when only one or a few files in a network folder have been made always available offline and not the network folder itself.A) Open a network folder that contains the offline files. (see screenshot below step 1)
NOTE: This network folder will not have the green Sync Center overlay icon on it's icon since it is not a offline folder, but only contains offline files.
B) To Sync All Offline Files at Once in the Network Folder
- Click/tap on the Sync toolbar drop down menu and Sync selected offline files in this folder. (see screenshot below) (see screenshot below)
C) To Sync one or more Offline Files in a Selected Network Folder
- Select one or more offline files, then right click on a selected offline file and click/tap on Sync and Sync selected offline files. (see screenshot below)
D) The offline files have now been synced.
Shawn
Related Tutorials
- Enable or Disable the Use Of Offline Files in Windows 7 and Windows 8
- How to View All Your Offline Files in Windows 7 and Windows 8
- How to Make Network Files or Folders Available Offline in Windows 7 and Windows 8
- How to View and Change Your Offline Files Status in Windows 7
- How to Encrypt or Unencrypt Offline Files in Windows 7 and Windows 8
- How to Create an Offline Files "Sync Center" Shortcut in Windows 7 and Windows 8
- How to Create a "Sync Conflicts" Shortcut in Windows 7 and Windows 8
- How to Create an Offline Files "Sync Results" Shortcut in Windows 7 and Windows 8
- How to Create an Offline Files "Sync Setup" Shortcut in Windows 7 and Windows 8
Sync Offline Files
-
-
-
New #3
Setting Another Disk Partition for the Offline Files.
Nice Tutorial Brink,
My HDD have another partition which is bigger than the one used for the Offline Files.
Is it possible to use another partition for saving the Offline File on Laptop Running Windows 7 ?
Thx
-
New #4
Hello Rudy, and welcome to Seven Forums.
You can use this to change the default location from C: to another drive or partition instead.
Offline files save to alternate partition
Hope this helps,
Shawn
-
New #5
Thank You
Will give it a try.
Thanks Brink !
-
New #6
You're welcome. Be sure to create a restore point first to be safe in case a mistake is made. :)

Sync Offline Files
How to Manually Sync Your Offline Files in Windows 7 and Windows 8Published by Brink
Related Discussions


 Quote
Quote