

How to Boot from a CD or DVD in a Windows Virtual PC
InformationThis will show you how to boot from a CD or DVD in an existing virtual machine, including XP Mode, created in Windows Virtual PC.NoteIn a virtual machine you will need to use a ISO of the bootable CD/DVD to boot from instead. If you do not have a ISO of the bootable CD/DVD, then you can use a free program like ISO Recorder or ISODisk to create a ISO from the CD/DVD.
Here's How:1. If the virtual machine is open, then you will need to shut down and close it first.That's it,
2. Open the settings of the virtual machine.
3. In the left pane select DVD Drive, then select (dot) Open an ISO image in the right pane. Click on the Browse button and navigate to the location of the ISO file of the CD/DVD, then select the ISO file and double click on it. (see screenshots below)4. In the left pane select Integration Features, then make sure that the Enable at startup box in the right pane is unchecked. (see screenshot below)
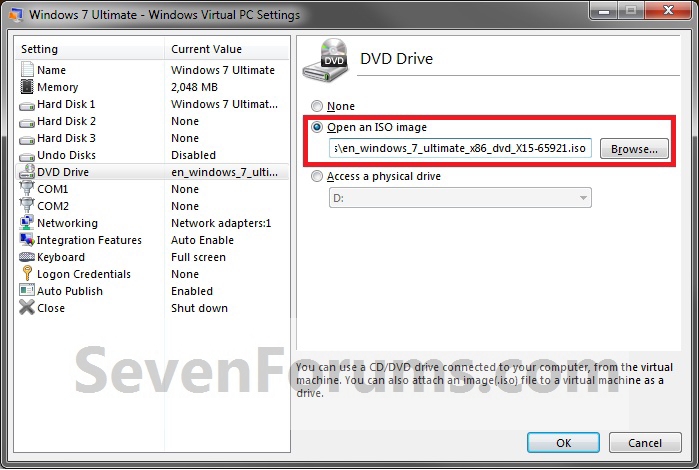
5. Click on OK. (see screenshot above)
6. Start the virtual machine. (see screenshots below)7. While the virtual machine is starting, tap the Delete key every second until you see the virtual BIOS Setup Utility screen. (see screenshot below step 8)

8. Using the arrow keys, select the Boot menu bar item, then select Boot Device Priority and press enter. (see screenshot below)NoteYou will only have a few brief seconds to press the Delete key. If you miss it, you will need to restart the virtual machine and try again.
You could also click on Action (menu bar) and Restart.

9. Select 1st Boot Device and press enter to change it to have CDROM listed as the 1st Boot Device and Hard Drive as the 2nd Boot Device. When done press the ESC (escape) key. (see screenshot below) 10. Select the Exit menu bar item, then select Exit Saving Changes and press enter. (see screenshot below)
 11. Select OK, and press enter. (see screenshot below)
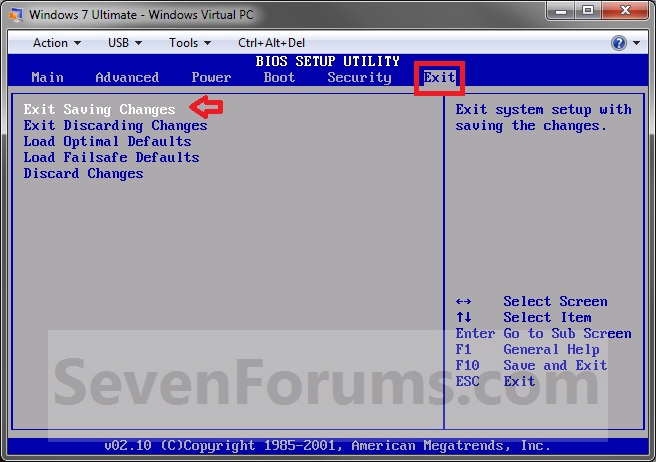 12. When you see the Press any key to boot from CD or DVD message, press a key (ex: spacebar) to boot from the ISO made from the CD or DVD.
NoteYou will only have 8 seconds to press a key when you see this message. If you miss it, you will need to restart the virtual machine and try again.
13. When you are finished, you can select (dot) None in step 3 above to stop having the option to boot from the ISO.
Shawn
Related Tutorials
- How to Install and Setup Virtual Windows XP Mode in Windows 7
- How to Enable the Built-in Administrator Account in Windows XP Mode
- How to Create a Virtual Machine in Windows Virtual PC
- How to Create Differencing Disks in Windows Virtual PC
- How to Delete a Virtual Machine Created with Windows Virtual PC
- How to Copy a Virtual XP Machine in Windows 7
- How to Add Limited User Accounts to Windows Virtual PC XP Mode
- How to Change Virtual Machine Settings in Windows Virtual PC
- How to Connect Windows Virtual PC to the Network
- How to Install, Enable, and Disable Windows Virtual PC Integration Features
- How to Select Host Devices to Share with Virtual Machines in Windows Virtual PC
Windows Virtual PC - Boot from a CD in Virtual Machine
-
-
-
New #3
Wow, it is working, thanks! How can it is not doucmented some where by microsoft.
And it seems that you must set step 4 even after you did BIOS setup, is it ture?
-
New #4
You're welcome Oldman,
I'm sure that Microsoft probably has it documented somewhere.
Setting the integrated features to be enable or disabled from within the VM only affects that current session. It needs to be done from the VM settings in step 4 before the VM is opened to be able to boot to the BIOS in the VM. That's all. :)
-
New #5
I can't seem to get past step 7. Every time I boot up the virtual pc (XP Mode), I tap the DELETE button like a mad man, but to no avail. The OS just takes over. Should I try some other buttons - F10, or something?
Never mind, I figured it out. ThanksLast edited by Brink; 06 Feb 2010 at 22:49. Reason: merged posts
-
New #6
Hello Badboy,
I'm happy to hear that you figured it out. What turned out to be the solution for you?
-
New #7
I had trouble at step 7 too...
This is a great little how to, thanks for this.
When I got to step 7 I couldn't get the system to recognize the DEL key. I had integration auto-enabled and keyboard set to "full screen".
I toggled integration off and set the keyboard to "virtual machine" (probably unnecessarily) and closed the machine, then restarted it. Got into the BIOS, set the CDROM to boot first, closed the BIOS and rebooted to the ISO I wanted.
After I reset a password (my whole reason to this was to crack the password I forgot last year sometime), I shut the machine down, turned integration back on and set the keyboard back, and its working fine. It's now presenting as a windowed VM rather than hiding the bootup, which is also nice.
Anyway, thanks!
-
-
New #9
That worked... with one slight change...
First of all, great work on the research and original post. Overall the process worked. One exception I had, since I had joined the VM to a domain which locked out the administrator account by Group Policy, then fallen off the domain due to the token expiration (hadn't logged in for over 90 days)... was that I needed to load my Hiren's CD so I could clear the built-in administrator account lockout... In my csae, I had to disable integration features, otherwise by Group Policy, I was not able to log in interactively using any account... after I disabled that feature, the rest of your walk through worked perfectly. Thank you.

Windows Virtual PC - Boot from a CD in Virtual Machine
How to Boot from a CD or DVD in a Windows Virtual PCPublished by Brink


 Quote
Quote
Related Discussions