How to Enable or Disable Content Advisor in Internet Explorer
InformationContent Advisor is a tool for controlling the types of content that your computer can access on the Internet. This will show you how to enable or disable Content Advisor for all users in Windows 7. Content Advisor is disabled by default in Windows 7.
You will only be able to do the steps in this while logged in to an administrator account.
NoteDepending on how you configure the settings for it, Content Advisor uses ratings that websites voluntarily provide to block or allow certain content. Because not all websites are rated, unrated websites are automatically blocked (but you can choose to allow them). Once you've adjusted the settings and turn Content Advisor on, it checks websites as you visit them.WarningIf you have IE10 or IE11 now through Windows Updates, then you will have the "Family Safety" option instead of "Content Advisor" now.
If you like, you can set to show Content Advisor in IE10 and IE11 Internet Options again.
When you click on "Family Safety", you will be taken to Parental Controls. However, Web restrictions and activity reports are not included in Windows 7 Parental Controls like they were in Vista. You can still restrict the sites a standard user account can visit and see reports of their online activity by adding a service provider in Windows 7 Parental Controls, such as Windows Live Family Safety.
OPTION ONETo Enable Internet Explorer Content Advisor
1. Open the Control Panel (icons view), and click on the Internet Options icon.
A) Go to either step 3 or 4 depending on if you have enabled Content Advisor before or not.OR
2. In Internet Explorer, click on Tools and Internet Options.
A) Go to either step 3 or 4 depending on if you have enabled Content Advisor before or not.3. If Content Advisor has Not been Enabled Before
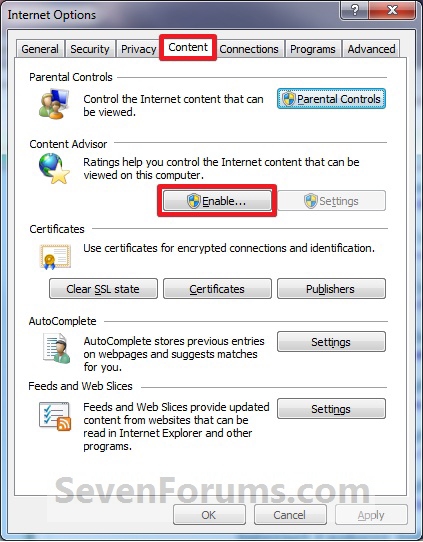
A) Click on the Content tab and on the Enable button. (See screenshot below)4. If Content Advisor has been Enabled Before
B) If prompted by UAC, click on Yes.
C) Click on the General tab and the Create Password button. (See screenshot below)
D) Type in your supervisor password twice to confirm it, then type in a hint and click on OK. (See screenshot below)
WARNING: Be sure to write this password down somewhere safe in case you need to look it up.
E) Click on OK. (See screenshot below)
F) Click on OK. (See screenshot below step 3C)
G) Click on OK. (See screenshot below)
H) Click on OK. (See screenshot below step 3A)
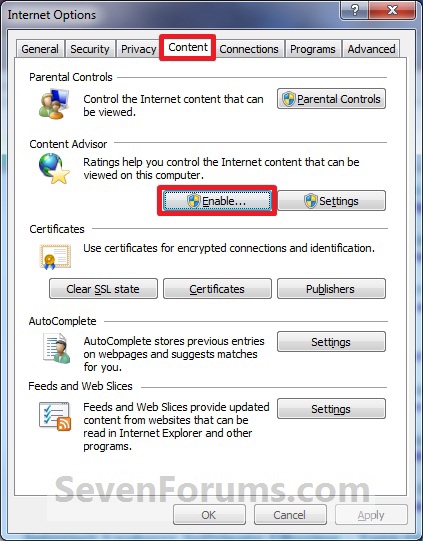
A) Click on the Content tab and on the Enable button. (See screenshot below)
B) If prompted by UAC, click on Yes.
C) Type in your Content Advisor supervisor password created from step 3 earlier and click on OK. (See screenshot below)
D) Click on OK. (See screenshot below)
E) Click on OK. (See screenshot below step 4A)
5. You will now be able to change your Content Advisor settings.
OPTION TWOTo Disable Internet Explorer Content Advisor
1. Open the Control Panel (icons view), and click on the Internet Options icon.That's it,
A) Go to step 3.OR
2. In Internet Explorer, click on Tools and Internet Options.
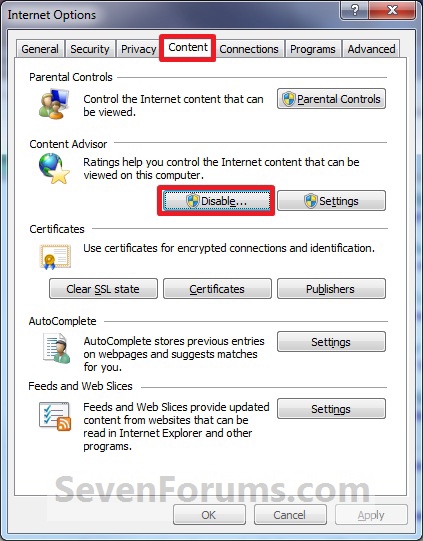
3. Click on the Content tab and on the Disable button. (See screenshot below)
4. If prompted by UAC, click on Yes.
5. Type in your Content Advisor supervisor password and click on OK. (See screenshot below)
6. Click on OK. (See screenshot below)
7. Click on OK. (See screenshot below step 3)
Shawn
Related Tutorials
- How to Reset Windows 7 Internet Explorer Content Advisor
- How to Reset or Change the Internet Explorer Content Advisor Password
- How to Change the Internet Explorer Content Advisor Ratings Level
- How to Allow or Block Specific Websites in Internet Explorer Content Advisor
- How to Allow or Block Unrated Websites with Internet Explorer Content Advisor
- How to Create a Internet Explorer Content Advisor Shortcut
- Hide or Show Content Advisor in Internet Options for IE10 and IE11
Internet Explorer Content Advisor - Enable or Disable

Internet Explorer Content Advisor - Enable or Disable
How to Enable or Disable Content Advisor in Internet ExplorerPublished by Brink
Related Discussions


