

How to Restore Backup User and System Files in Windows 7
InformationIf you used created a backup of your user and system files, then this will show you how to restore them in Windows 7.
You can restore backed-up versions of files that are lost, damaged, or changed accidentally. You also restore individual files, groups of files, or all of the files that you've backed up.
NoteNew backups are saved in this format:
drive letter:\computer name\Backup Set YYYY-MM-DD HHMMSSFor example: If your computer name is Brink-PC, your backup location is on hard drive (network or local) F: , and you backed up on July 9th 2011 at 3:10:38 PM (it will use 24 hour time), then your backup would be located at:F:\BRINK-PC\Backup Set 2011-07-09 151038
There will be a incremental Backup Files YYYY-MM-DD HHMMSS folder in the Backup Set... folder location above that contains ZIP folders each under 200MB in size. These ZIP folders contain the selected backed up files. If a file that you included to be backed up is larger 200MB then it will be automatically broken up into several pieces each under 200 MB to fit into multiple ZIP files. The pieces are combined back automatically when restored from the backup though.
OPTION ONERestore Backup from the Backup Drive
1. Open the drive that you saved your backup on, then double click on the computer name shortcut (ex: Brink-PC). (see screenshot below)
A) Click on either Restore.... option below. (see screenshot below)B) If prompted by UAC, then click on Yes.
C) Close the drive window, and go to step 7 below.
OPTION TWORestore Backup from "Backup and Restore"
2. Open the Control Panel (icons view), and click on the Backup and Restore icon.That's it,
3. Do either step 4, 5, or 6 below for which file(s) and/or folder(s) you would like to restore from a backup. (see screenshot below)4. To Restore Your Files from Current LocationA) Click on the Restore my files button. (see screenshot below step 3)5. To Restore All Users' Files from Current Location
B) Go to step 7.A) Click on the Restore all users' files link. (see screenshot below step 3)6. To Restore another Backup from any Location
B) If prompted by UAC, then click on Yes.
C) Go to step 7.A) Click on the Select another backup to restore files from link. (see screenshot below step 3)7. You will now see the Restore Files window. (see screenshots below)
B) If prompted by UAC, then click on Yes.
C) If you wanted to select a network backup location, then click on the Browse network location. (see screenshot below)D) Select (highlight) an available Backup Period from the location you want, and click on the Next button.. (see screenshot below step 6C)
- Browse to and select a network backup location, then click on OK. (see screenshot below)
NOTE: By default, all selected files below (steps 9, 10, 11, and 12) will be restored to the lastest version that was last backed up unless you choose a different date in step 9.8. To Select All Files and Folders from the Backup

NOTE: This option will only be available if you did step 6 above.A) Check the Select all files from this backup box. (see right screenshot below step 7)9. To Choose a Different Backup Period and Date
B) Click on Next, and go to step 14. (see screenshot below)
NOTE: All selected files below (steps 10, 11, and 12) will be restored to the version they were on the date the backup period you select was made.A) Click on the Choose a different date link. (see screenshots below step 7)10. To Search For Contents of the Backup to Add Files to be Restored
B) Select a Show backups from period, select a Date and time, then click on OK. (see screenshot below)A) Click on the Search button. (see screenshots below step 7)11. To Add Backup Files to be Restored
B) Type all or part of a file name, and then click Search. (see screenshot below)C) In the search results, check the boxes of the files you want to select to restore, and click on OK. (see screenshot below)
Tip
- If you're searching for files or folders associated with a specific user account, you can improve search results by typing the location of the file or folder in the Search for box. For example, to search for all JPG files that were backed up, type JPG in the Search for box. To only search for JPG files associated with the user Bill, type C:\Users\Bill\JPG in the Search for box.
- You can use wildcard characters such as *.jpg to search for all JPG files that were backed up.
NOTE: This will add the selected files to the list of items to be restored (step 13).A) Click on the Browse for files button. (see screenshots below step 7)12. To Add Backup Folders to be Restored
B) Just like in Windows Explorer, navigate to and select a backup file that you want to restore from a backup location in the left navigation pane, then click on the Add files button. (see screenshot below)
NOTE: This will add the backup file to the list of items to be restored (step 13).C) If you would like to add another backup file to be restored, then repeat step 10.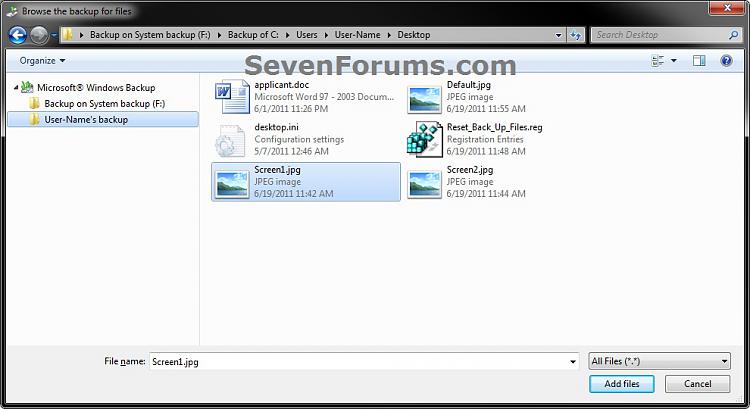 A) Click on the Browse for folders button. (see screenshots below step 7)13. When finished selecting backed up files and folders to be restored, click on the Next button. (see screenshot below)
B) Just like in Windows Explorer, navigate to and select a backup folder that you want it and it's contents to be restored from a backup location in the left navigation pane, then click on the Add folder button. (see screenshot below)
NOTE: This will add the backup folder to the list of items to be restored (step 13).C) If you would like to add another backup folder to be restored, then repeat step 11.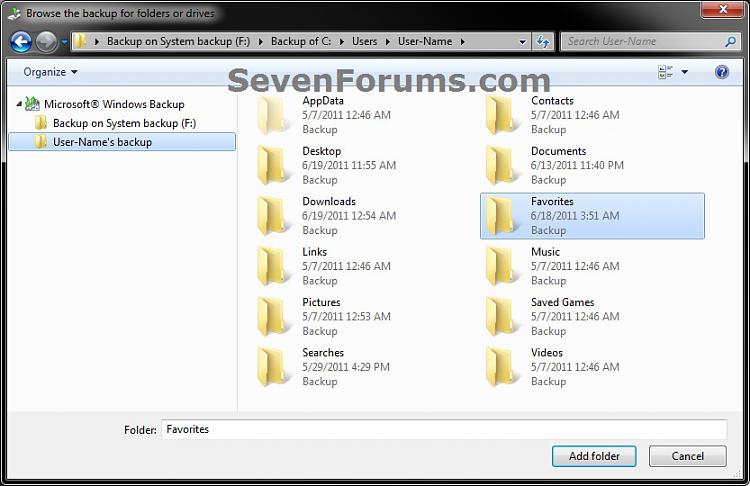
NOTE: If you change your mind about a listed file or folder to be restored, then you could select a item and click on Remove to not have it restored. Click on Remove all will remove all listed files and folders.14. Select (dot) where you want to restore the backup files to, and click on the Restore button. (see screenshot below)
- In the original location - Restores the selected backup files and folders to their original location on the computer.
- In the following location - Allows you to restore the selected backup files and folders to a location of your choice instead. You have the choice of restoring the backup with it's subfolders and files or only the files in the backup to the selected location.
15. You will now see this window. (see screenshot below)16. If you have existing copies of the selected backup files and folders at the restore location you have selected, then click on the Copy and Replace option. (see screenshot below)
NOTE: You will not see this pop-up if you do not have existing copies of the selected backup files and folders at the restore location.17. When it is finished restoring the backup, click on the Finish button. (see screenshot below)18. When finished, you can close the Backup and Restore window. (see screenshot below step 3)
Shawn
Related Tutorials
- How to Enable or Disable Restoring Backup Files in Windows 7
- How to Backup User and System Files in Windows 7
- How to Turn the Windows 7 Backup Files Schedule On or Off
- How to Delete Windows 7 User and System Backup Files
- How to Create a "Manage Windows Backup Disk Space" Shortcut in Windows 7
- How to Reset the Backup Files Configuration in Windows 7
- How to Do a System Image Recovery in Windows 7
- How to Enable or Disable to Backup Data Files in Windows 7
- How to Create a Windows 7 "Backup User and System Files" Shortcut
- How to Create a Windows 7 "Restore Backup User and System Files" Shortcut
- How to Create a "Restore Files from Selected Backup Location" Shortcut
- How to Create a System Recovery Shortcut in Windows 7
- How to Create a Windows 7 "Backup and Restore" Shortcut
- How to Restore Files and Folders in Windows 7 with Previous Versions
- How to Delete Windows 7 User Data and System Image Backup Files
- How to Manually Extract Files from a Backup in Vista and Windows 7
- How to Make a "Create Incremental Backup" Shortcut in Windows 7 and Vista
- How to Make a "Create New Backup" Shortcut in Windows 7 and Vista
Restore Backup User and System Files
-
New #1
Thanks for the tutorial: When I get to the backup set on my backup drive when I double click I see the sets but do not see a restore facility indicated I can see all the zip files on clicking again but as per you image at the beginning of this tutorial I do not get a restore option.. using Win 7x64
-
New #2
Hello Artinusa,
Are you able to see your restore points to select from using OPTION TWO instead? :)
-
New #3
Thanks Brink...sadly I am not now able to see the restore points as my system refuses to recognize by USB disk drives where I had created the backups and restore..this is getting silly..I did 4 different restore point for restoring non were effective and thus my system was left as it is...M<Y reg backups are also on one of the drives..
I have another problem which I am tackling now which might be related..this forum is helping with my USB problems.. Thanks
I have a windows backup on one of the USB drives.. I can read that USB with another machine and maybe load it to disk if I knew what zip parts had the drivers in it I could place them from the zip they are contained in on a DVD and read from their.. Is there any mileage in this..?Last edited by artinusa; 31 Aug 2011 at 17:45. Reason: Additional info
-
New #4
Ok mate. When the other issue gets sorted, just let me know. I'll be happy to continue to help with this one. :)
-
-
-
New #7
Alternate way to restore
Use 7-zip or WinRAR to open the .vhd file created by Windows 7 native Backup and Restore. You will be able to see all your files in an explorer-like listing and pick the ones you want to restore.
-
New #8
Hello DEL1, and welcome to Seven Forums.
You might be thinking about system images instead since they use VHD files. However, you could also just attach (mount) the VHD in Windows 7 to view and extract the contents instead.
Windows Backup uses zip folders instead, but there's a lot more involved to extract them than just unzipping them though. You could use the built-in ZIP feature of Windows 7. No need for 3rd party programs to manually extract files from a backup. :)
-
New #9
Can individual files be viewed in your backup?
I am looking at the backup file on my backup drive and cannot see the individual backed up data folders.
I assume the W7 backup file is a compressed file that transformed to a large .vhd file.
Is there a way I can actually browse through the W7 backup file on my backup drive and restore individual files???
Thanks for your help

Restore Backup User and System Files
How to Restore Backup User and System Files in Windows 7Published by Brink


 Quote
Quote
Related Discussions