


How to Rename a Drive in Vista, Windows 7, and Windows 8
InformationThis tutorial will show you how to rename a drive in Vista, Windows 7, and Windows 8. For example, a hard disk drive, USB flash drive, CD/DVD drive, etc...
TipIf the drive name is missing or was changed and you did not do it with the methods below, then look for a hidden (not always hidden though) autorun.inf file (OPTION TWO below) when you open the drive letter in Computer, then right click on the autorun.inf file, and click on Delete. Next, approve the deletion.
WarningYou must be logged in as an administrator to be able to do rename a drive.
CONTENTS:
- Option One: Rename a Drive in the "Computer" Window
- Option Two: Change a Drive Name using an "autorun.inf" File
- Option Three: Rename a Drive Through Registry Editor
- Option Four: Rename a Drive Through Disk Management
- Option Five: Rename a Drive using "Label" Command
EXAMPLE: Rename a Hard Disk Drive
EXAMPLE: Rename a DVD Drive
NOTE: Devices with Removable Storage, such as a DVD drive, can only be renamed by adding a label at the end of the drive description using OPTION THREE below. These devices do not have a Rename option in the context menu when you right click on them in Computer or Disk Management.
OPTION ONERename a Drive in the "Computer" Window
NOTE: For Devices with Removable Storage, such as a DVD drive, that do not have a Rename option, you could use OPTION THREE below instead.
1. If you did OPTION TWO below previously, then you will need to either remove the label=new drive name entry from the autorun.inf file, or delete the autorun.inf file in the root of the drive that you want to change the name of.
2. Open the Computer window.
3. Select the drive you want to rename to highlight it, right click on it, and click/tap on Rename. (see screenshot below)
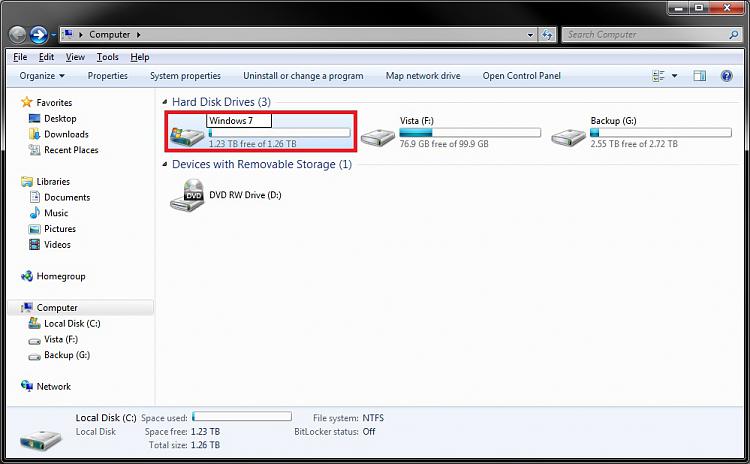
4. Type in a name you want for the drive, then press enter. (see screenshots below)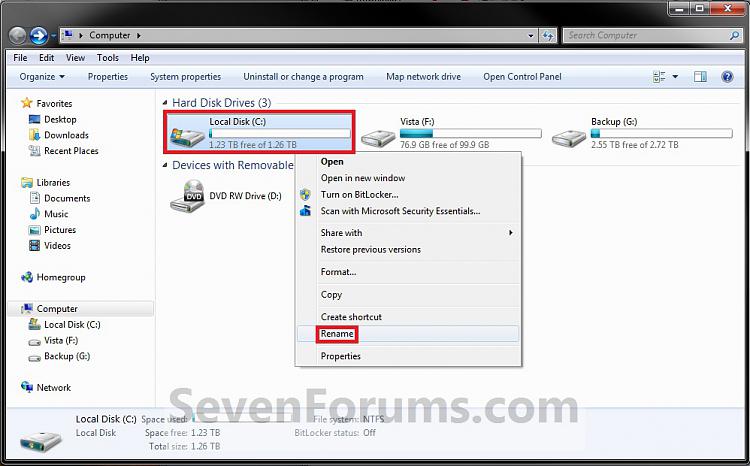
5. Click/tap on Continue. (see screenshot below)
6. If prompted by UAC, then click/tap on Yes (Windows 7/8) or Continue (Vista).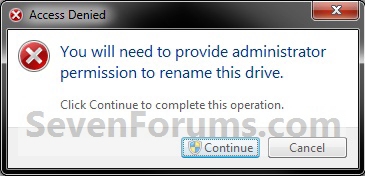
7. The selected drive is now renamed.
OPTION TWOChange a Drive Name using an "autorun.inf" File
NOTE: While this option can be used for any drive, it is really useful for external drives like a USB flash drive.
1. Set your known file extensions to no longer be hidden.
NOTE: This way you will be able to rename the file extension in step 3 below.
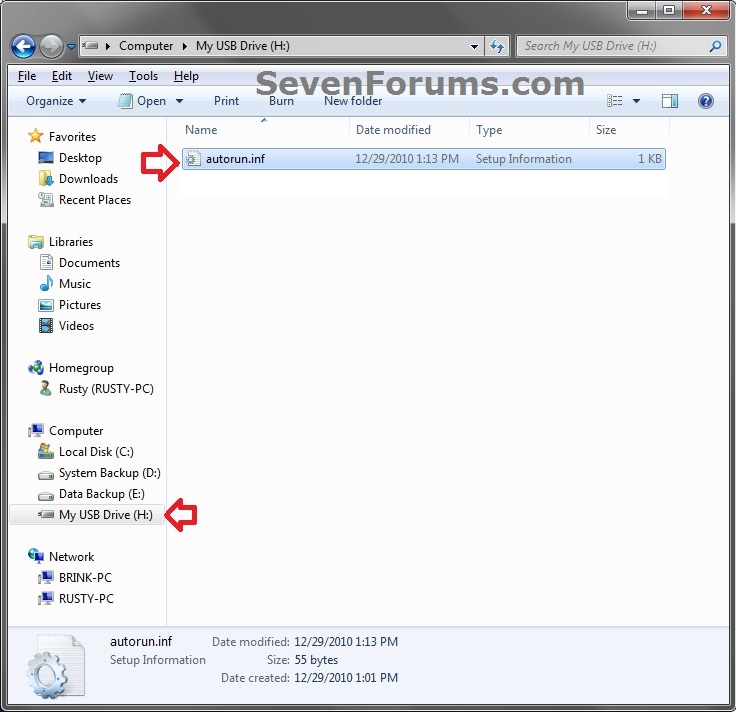
2. Connect and/or open the drive that you want to change the name of.
3. In the root of the drive, right click or press and hold on an empty space, click/tap on New and Text Document, then rename this file autorun.inf and press Enter. (see screenshots below)
NOTE: If you already have an autorun.inf file in the root of this drive, then skip this step and proceed to step 4 or 5.
4. If this is a New autorun.inf File
A) Open the autorun.inf file, then type each line below followed by pressing enter. (see screenshot below)5. If you already have a autorun.inf File
NOTE: Substitute new drive name (ex: My USB Drive) with the actual name you want to use for the drive.
B) Click on File (menu bar) and Save, then close the autorun.inf file. (see screenshot above)Code:[autorun] label="new drive name"
A) Open the autorun.inf file, then add or change the label= line below. (see screenshots below)7. If this is for an Internal or eSATA Dive
NOTE: Substitute new drive name (ex: My USB Drive) with the actual name you want to use for the drive.
B) Click on File (menu bar) and Save, then close the autorun.inf file. (see screenshots above)Code:[autorun] label="new drive name"
A) Restart the computer to apply.8. If this is for an External Dive
A) Unplug and plug in the drive to apply.9. Open the Computer window to see the changes.
NoteTo Restore the Default Name
You would just need to either option below and repeat steps 7 to 9.
- Delete the autorun.inf and .ico file.
OR
- Remove the label= line and save the changes if you have other lines (ex: icon=) you wish to continue using.
OPTION THREERename a Drive Through Registry Editor
1. If you did OPTION TWO above previously, then you will need to either remove the label=new drive name entry from the autorun.inf file, or delete the autorun.inf file in the root of the drive that you want to change the name of.
2. Press the Windows + R keys to open the Run dialog, type regedit, and press enter.
3. If prompted by UAC, then click/tap on Yes (Windows 7/8) or Continue (Vista).
4. In regedit, navigate to the location below. (see screenshot below)
Code:HKEY_LOCAL_MACHINE\SOFTWARE\Microsoft\Windows\CurrentVersion\Explorer5. In the left pane, right click on Explorer, and click/tap on New and Key. Type DriveIcons and press enter.
NOTE: If you already have the DriveIcons key under Explorer, then go to step 6. (see screenshot above and below)
6. In the left pane, right click on DriveIcons and click/tap on New and Key. Type the drive letter (ex: D ) that you want to change the icon for and press enter.
NOTE: If you already have the drive letter (ex: D ) key under DriveIcons, then go to step 7. (see screenshot above and below)
7. In the left pane, right click on the drive letter (ex: D ), and click/tap on New and Key. Type DefaultLabel and press enter.
NOTE: If you already have the DefaultLabel key under the drive letter (ex: D ), then go to step 8 or 9. (see screenshot above and below)
8. To Rename the Drive
A) In the right pane of DefaultLabel, double click/tap on (Default) to modify it. (see screenshot below step 7)9. To Restore the Default Drive Name
B) Type in the new name (HDD) or label (DVD) you want for the drive, and click/tap on OK. (see screenshot below)
C) The registry should now look similar to this. (see screenshot below)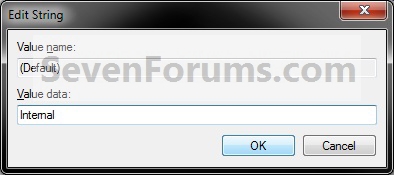
D) Go to step 10.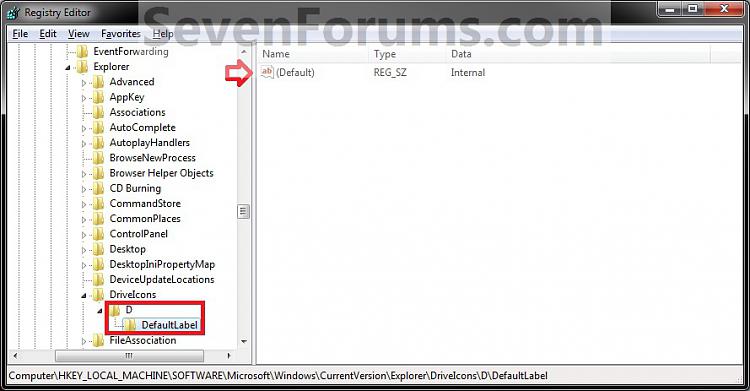
A) Right click on the drive letter (ex: D ) from step 5 above that you want to restore, and click/tap on Delete and Yes. (see screenshot below step 6)10. Close regedit.
11. The changes should be immediate, but in some cases you may need to restart the computer to apply the changes.
OPTION FOURRename a Drive Through Disk Management
1. If you did OPTION TWO above previously, then you will need to either remove the label=new drive name entry from the autorun.inf file, or delete the autorun.inf file in the root of the drive that you want to change the name of.
2. Do step 3, 4, or 5 below for what you would like to do.
3. In Vista and Windows 7, open the Start Menu, right click on the Computer button (dark right side), click on Manage, and go to step 6 below.
4. In Windows 8, open the Power Users Tasks menu, click/tap on Disk Management, and go to step 6 below.
5. Press the Windows + R keys to open the Run dialog, type either compmgmt.msc OR diskmgmt.msc, press Enter, and go to step 6 below.
6. If prompted by UAC, then click/tap on Yes (Windows 7/8) or Continue (Vista).
7. In the left pane of Computer Management, click/tap on Disk Management under Storage. (see screenshots below)
8. In the middle pane, right click on the drive letter that you want to rename, and click/tap on Properties. (see screenshot below)
9. Under the General tab, type in the new name that you would like, and click/tap on OK. (see screenshot below)
10. When finished, you can close the Computer Management or Disk Management window.
OPTION FIVERename a Drive using "Label" Command
NOTE: For Devices with Removable Storage, such as a DVD drive, that do not have a Rename option, you will need to use OPTION THREE above instead.
1. If you did OPTION TWO above previously, then you will need to either remove the label=new drive name entry from the autorun.inf file, or delete the autorun.inf file in the root of the drive that you want to change the name of.
2. Open an elevated command prompt.
3. Do step 4 or 5 below for what you would like to do.
4. To Directly Change Drive Name
A) In the elevated command prompt, type the command below, press Enter, and go to step 6 below. (see screenshot below)5. To See Current Drive Name and Change
label DriveLetter: Name
For example: label C: Windows
NoteSubstitute DriveLetter in the command with the actual drive letter you want to rename.
Substitute Name in the command with the name/label you want to rename the drive with. Leave blank if you do not want a name/label.
A) In the elevated command prompt, type the command below, and press Enter. (see screenshot below)6. When finished, you can close the elevated command prompt if you like.
label DriveLetter:
For example: label C:NoteSubstitute DriveLetter in the command with the actual drive letter you want to rename.
B) You will see the current name/label of the drive. Type in the name/label you want to rename the drive with, press Enter, and go to step 6 below.
NoteIf you do not want a name/label for the drive, then leave this blank, and press Enter.
That's it,
Shawn
Related Tutorials
- How to Hide or Show Empty Drives in Windows 7 Computer Folder
- How to Show Windows 7 Computer Drive Letters Before or After Drive Name
- How to Change a Drive Icon in Vista, Windows 7, and Windows 8
- How to Fix Missing Vista Hard Disk Partition Letter in Windows 7
- How to Add, Change, or Remove a Drive Letter in Vista, Windows 7, and Windows 8
- How to Pin or Unpin a Drive to the Windows 7 Taskbar
- How to Completely Block Autorun.inf Files in Windows
- How to Rename a Printer in Windows 7 and Windows 8
Drive - Rename
-
-
New #2
Hello Shawn, the above is written under Option Two, should be Option three?NOTE: For Devices with Removable Storage, such as a DVD drive, that do not have a Rename option, you will need to use OPTION TWO below instead.
-
-
New #4
Thanks for this. Does the name have to be in "" like the text suggests? The screen-cap suggests otherwise...
-
New #5
Hello TheDookie, and welcome to Seven Forums.
No, the name doesn't have to be in quotes. It's just something that I like to add to make the code look neater. That's all. :)
-
New #6
Thanks, registry method worked fine for me on Win 8 Pro x64.
-
-
New #8
Neat trick. Helped me out when trying to distinguish my new LiteOn iHAS124 drive. My old Asus drive is starting to fail so I got it. Anyone know if LiteOn is any good? :)
-


 Quote
Quote
Related Discussions