

How to Create a "Windows Defender" Shortcut in Windows 7
InformationThis will show you how to create or download a Windows Defender shortcut. You can also Pin to Taskbar or Pin to Start Menu this shortcut, or move where you like in Windows 7 for easy use.NoteThe release of the Microsoft Safety Scanner has resulted in confusion about the available anti-malware tools provided by Microsoft and questions about when they should be used.
Read more at: Understanding Microsoft Anti-Malware Software ~ Security Garden
WarningIf you installed Microsoft Security Essentials, then it will turn off Windows Defender by default and be used instead.
EXAMPLE: Windows Defender
OPTION ONETo Download the "Windows Defender" Shortcut
1. Click on the Download button below to download the file below.
Windows_Defender.zip2. Click on Save, and save the .zip file to the desktop.
3. Open the .zip file and extract the Windows Defender shortcut to the desktop.
4. Right click on the Windows Defender shortcut, and click on Properties, General tab, and on the Unblock button. (see screenshot below)
NOTE: If you do not have a Unblock button under the General tab, then the shortcut is already unblocked and you can continue on to step 5.
5. Move the shortcut to where you like for easy use.
6. When done, you can delete the downloaded .zip file on the desktop if you like, or save it to use again.
OPTION TWOTo Manually Create the "Windows Defender" Shortcut
1. Right click on a empty area on desktop, and click on New and Shortcut.
2. Copy and paste either location below into the location area, and click on the Next button. (See screenshot below)
%ProgramFiles%\Windows Defender\MSASCui.exe
OR%windir%\explorer.exe shell:::{D8559EB9-20C0-410E-BEDA-7ED416AECC2A}3. Type Windows Defender for the name, and click on the Finish button. (See screenshot below)That's it,
NOTE: You can name this anything you would like though.
4. Right click on the new Windows Defender shortcut on the Desktop and click on Properties.
5. Click on the Shortcut tab, then click on the Change Icon button. (See screenshot below)
6. In the line under "Look for icons in this file", copy and paste the location below, and press Enter. (See screenshot below)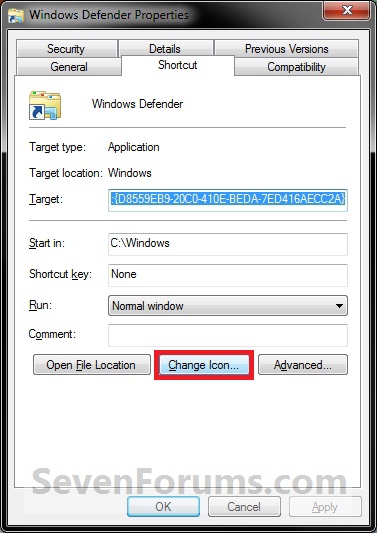
%ProgramFiles%\Windows Defender\MsMpRes.dll7. Select the icon highlighted in blue above and click on OK. (See screenshot above)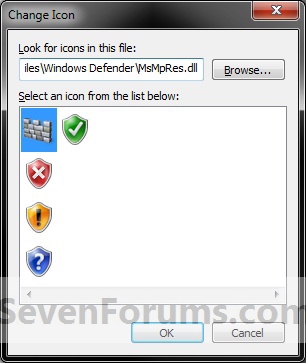
NOTE: You can use any icon that you would like instead though.
8. Click on OK. (See screenshot below)
9. Move the shortcut to where you like for easy use.
Shawn
Windows Defender Shortcut - Create
-
-
-
New #3
How to stop windows defender on win 7
Dear Sir,
Please let me know as to how to deactivate Win Defender on my desktop with win 7.I have Avira working for me .Till date there has been no interference or discordance between these two.I am just worried,that's all.If you think that there won't be any problem,do advise me accordingly.
ThanksLast edited by Brink; 15 Mar 2013 at 11:44. Reason: removed email address
-
New #4
Hello Bandoo, and welcome to Seven Forums.
It will not hurt anything to leave Windows Defender turned on if you like. It will give you added protection.
If you still wanted to, the tutorial below will show you how to turn off Windows Defender.
Hope this helps, :)
Shawn

Windows Defender Shortcut - Create
How to Create a "Windows Defender" Shortcut in Windows 7Published by Brink


 Quote
Quote
Related Discussions