

How to Change Default Icon of Favorites in Navigation Pane in Windows 7 and Windows 8
InformationThis tutorial will show you how to change the default icon of the Favorites folder in the navigation pane to any icon of your choice in Windows 7 and Windows 8.
EXAMPLE: Favorites in Navigation PaneWarning
- You can only do this while logged into an administrator account.
- This will affect all user account's Favorites icon on the computer.
NOTE: This is Favorites with the default icon (left screenshot below) and with a changed icon (right screenshot below) in the Navigation Pane.Here's How:1. Press the Windows + R keys to open the Run dialog, type regedit, then press Enter.
2. If prompted by UAC, then click/tap on Yes.
3. In regedit, navigate to the location below: (see screenshot below step 4)Code:HKEY_CLASSES_ROOT\CLSID\{323CA680-C24D-4099-B94D-446DD2D7249E}\DefaultIcon4. In the left pane of regedit, right click on the DefaultIcon key, and click/tap on Permissions. (see screenshot below)5. In Windows 8, Windows RT, Windows 8.1, or Windows RT 8.1, you will need to take ownership (step 3 of Option Three at link) of the DefaultIcon key before being able to do step 6 below.
6. At the top, select the Administrators group. At the bottom, check the Allow box to the right of Full Control, and click/tap on OK. (see screenshot below)7. In the right pane of regedit, double click/tap on (Default) to modify it, and do step 8, 9, or 10 below for what you would like to do. (See screenshot below)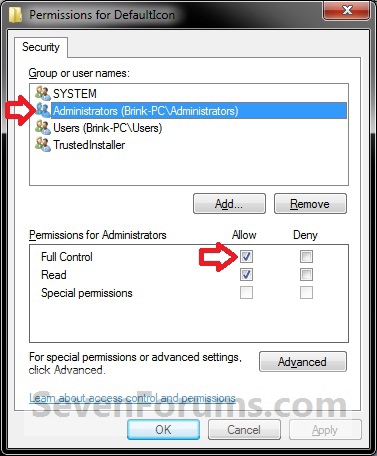 8. To Restore the Default Favorites Icon
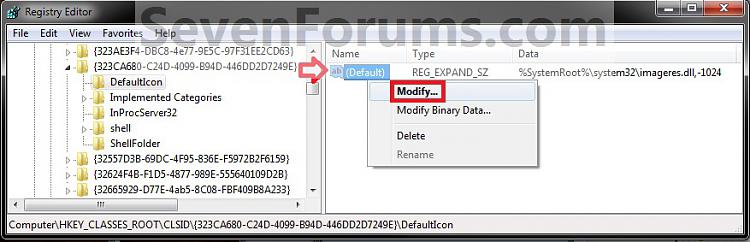 A) In the Modify window from regedit, copy and paste the path below, click/tap on OK, and go to step 11 below.9. To Use a Custom Icon of Your Own%SystemRoot%\system32\imageres.dll,-1024
 A) In the Modify window from regedit, type in the full path in quotes of where you have your custom icon (.ico file) saved at, click/tap on OK, and go to step 11 below. (see screenshot below)10. To Use another Windows Icon
WARNING: You will need to use a 256x256 pixel icon for them to display properly at all of the available icon view sizes in Windows. You will also need to leave the icon (.ico file) saved at the exact location you typed below for it to continue to work. If you delete or move this icon, then it will no longer be displayed.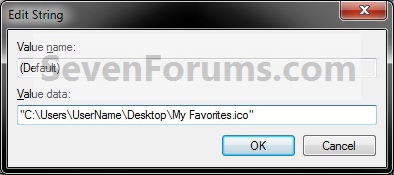 A) If you have not already, download and install the free program IconViewer to add the Icons tab in the screenshot below step 10B.11. If you have a 64-bit Windows Installed
NOTE: Be sure to download the correct 32-bit or 64-bit version for your Windows.
B) In Windows Explorer navigate to the .exe (ex: for program icons) or .dll (ex: Windows icons) file that contains the icon that you want to use for the default Favorites icon, then right click on the file, click on Properties, and the Icons tab. (see screenshot below)
NOTE: The most common Windows icons come from the C:\Windows\System32\imageres.dll file.C) Make note of the icon number for the icon that you want to use instead. (see screenshot above)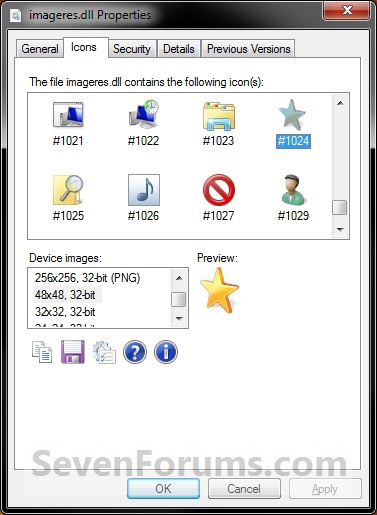
NOTE: For example, the default Favorites icon number is 1024. I'm going to change it to the 1029 icon number just as an example.
D) In the Modify window from regedit, type in the full path of the .exe or .dll file followed by ,-icon# (fullpath,-####), click/tap on OK, and go to step 11 below. (see screenshot below)
NOTE: For example, if I want to use the path (step 9B) and the 1029 icon (step 9C), I would type:%SystemRoot%\system32\imageres.dll,-1029
OR
C:\Windows\System32\imageres.dll,-1029
NoteTo also change the Favorites icon in the "Open" and "Save as" type windows as well in 64-bit Windows, you will also need to do this step.
If you have a 32-bit Windows installed, then skip this step since doing steps 1 to 8/9/10 will change the Favorites icon in the "Open" and "Save as" type windows as well.A) In regedit, go to the location below:Code:HKEY_LOCAL_MACHINE\SOFTWARE\Wow6432Node\Classes\CLSID\{323CA680-C24D-4099-B94D-446DD2D7249E}\DefaultIconThat's it,B) Repeat steps 5 to 8/9/10 above.12. Close regedit.
13. Restart the PC to fully apply.
Shawn
Related Tutorials
- How to Add or Remove Favorites from Navigation Pane in Windows 7
- How to Add or Remove "Favorites" from Navigation Pane in Windows 8 or Windows 8.1
- How to Create a "Favorites" Shortcut in Windows 7 and Windows 8
- How to Change the Default Libraries Icon in Windows 7
- How to Change the Default HomeGroup Icon in Windows 7
- How to Change or Restore Default Windows 7 Desktop Icons
- Fix Empty Favorites in Navigation Pane in Vista, Windows 7, and Windows 8
- Restore Default Favorite Links in Navigation Pane of Windows 7 and Windows 8
- How to Rename "Favorites" in Navigation Pane in Windows 7 and Windows 8
- Add or Remove "Favorites" Links in Navigation Pane of Windows 7 and Windows 8
Favorites - Change Default Icon
-
New #1
Good tutorial, thank you! :)
But I have a question, why is this the only tutorial where the custom icon path has to be between quotes?
-
New #2
You're most welcome Shrantellatessa.
The full icon path doesn't really have to be in quotes unless the icon file name has a space in it. Since the path is unpredictable, I just went ahead and included having quotes to cover all bases so someone with a space wouldn't have a problem using the steps. I'm currently updating other tutorials that I run across that may have the same situation. That's all. :)
-
New #3
Ok, thanks for the explanation, Shawn ^_^Last edited by Shrantellatessa; 15 Mar 2010 at 09:50.
-
-
-
-
-
New #8
Hello Jew,
Could you give more details please? (ex: icon you used, error message, what you got instead, screenshots, logged in as administrator, etc.....)
Double check to see if you may have made a mistake somewhere in the steps.
-
New #9
I followed all your steps fine received no error messages just when i restarted it was still the default icon.

this is the icon i used. It is 256x256.


Favorites - Change Default Icon
How to Change Default Icon of Favorites in Navigation Pane in Windows 7 and Windows 8Published by Brink

 Quote
Quote

Related Discussions