

How to Set Account Lockout Duration for Locked Out User Accounts
InformationThe account lockout duration security setting determines the number of minutes a locked out account remains locked out, after reaching the account lockout threshold of invalid logon attempts with a incorrect user name and/or password, before automatically becoming unlocked.
When you first setup an account lockout threshold, the default account lockout duration is set to 30 minutes. This tutorial will show you how to set how many minutes you want for the account lockout duration to be in Windows 7 and Windows 8.
WarningYou will only be able to do this while logged in as an administrator.
EXAMPLE: Locked Out User Account
NOTE: This is the locked out message a user will get if they reach the account lockout threshold number of invalid logon attempts.
OPTION ONEThrough Local Security Policy
1. If you have not already, you will need to set a account lockout threshold first for the number of invalid or failed logon attempts that causes a user account to be locked out.
2. Open the Local Security Policy editor.
3. In the left pane, expand Account Policies, and click on Acount Lockout Policy. (see screenshot below)
4. In the right pane, double click on Account lockout duration. (see screenshot above)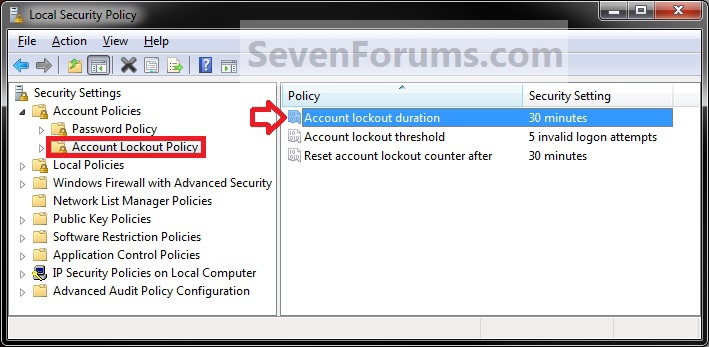
5. Type in a number between 0 and 99999 for how many minutes you want the user acount to be locked out for until automatically unlocked, then click on OK. (see screenshot below)
NOTE: The account lockout duration must be greater than or equal to the reset account lockout counter after time.
WARNING: If you set the account lockout duration to 0, then a locked out user account will be locked out until an administrator manually unlocks that locked out user account.
6. Click on OK. (see screenshot below)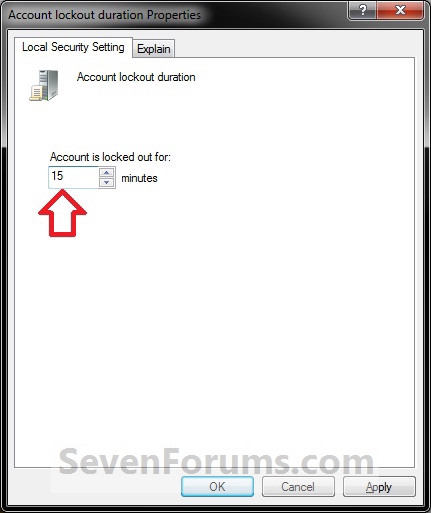
NOTE: You will not see this unless the account lockout duration is not greater than or equal to the reset account lockout counter after time.
7. When done, close the Local Security Policy editor. (see screenshot below)
OPTION TWOThrough an Elevated Command Prompt
1. If you have not already, you will need to set a account lockout threshold first for the number of invalid or failed logon attempts that causes a user account to be locked out.That's it,
2. Open an elevated command prompt in Windows 7 or Windows 8.
3. To See the Current "Account Lockout Duration" Setting
A) In the elevated command prompt, type net accounts and press enter. (see screenshot below)4. In the command prompt, type the command below and press Enter.
NOTE: The account lockout duration must be greater than or equal to the reset account lockout counter after time.
NOTE: Substitute (1-99999) for a number between 1 and 99999 for how many minutes you want the user acount to be locked out for until automatically unlocked.
5. Close the elevated command prompt.For example, for 45 minutes until a locked out user account is unlocked automatically, I would type in this command below and press enter.Code:net accounts /lockoutduration:(1-99999)
Code:net accounts /lockoutduration:45
Shawn
Related Tutorials
- How to Create a Password for a Windows 7 User Account
- How to Change the Password for Your or Another User Account in Windows 7
- How to Create a Password for a Local User Account in Windows 8
- How to Change or Remove a Local Account Password in Windows 8
- How to Change or Reset Password of Your Microsoft Account in Windows 8
- How to Enable or Disable Secure Logon CTRL+ALT+DELETE in Windows 7
- How to Automatically Log On a User Account at Windows 7 Startup
- How to Make Windows 7 Require a User Name and Password at Log On
- How to Enable or Disable Password Expiration for a User in Windows 7
- How to Change the Maximum and Minimum Password Age in Windows 7
- How to Enable or Disable Windows 7 Password History Enforcement
- How to Change the Time to Warn a User to Change Password Before Expiration
- How to Set an Audit Policy for an Account Lockout
- How to View Detailed Information About All User Accounts on a Windows PC
Account Lockout Duration for Locked Out User Accounts
-
New #1
I want to be able to set the account lockout duration to 0 using cmd. When doing this in Local Security Policy, it shows that a lockout duration of 0 means an administrator will have to unlock the account. I need to be able to do this same function via cmd or Powershell.
Here is what happens when I try and do it via cmd: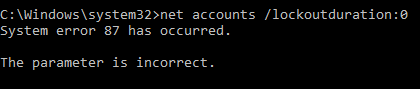
-
New #2
Hello zwork, and welcome to Seven Forums. :)
It appears that Microsoft has changed this for the command for some reason. I suppose you could enter the maximum value of 99999 as workaround for them to be blocked out for about 70 days.
In addition, see this below for a GPO that may help.
https://technet.microsoft.com/en-us/...(v=ws.11).aspx
-
New #3
Is there a way to change a GPO setting via CMD or Powershell? A quick google search didn't reveal anything outside of a registry change, but the local security policies aren't "in the clear" in the registry
-
-
New #5
Ok thanks, I'll keep looking.
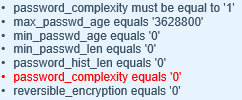
Also, is there aoption for password complexity?Code:net accounts
-
New #6
If you know the exact text for the LSP setting, you can use this:
Just replace "PasswordComplexity" with the setting you want to change (and then obviously update the new values)Code:secedit /export /cfg c:\secpol.cfg (gc C:\secpol.cfg).replace("PasswordComplexity = 0", "PasswordComplexity = 1") | Out-File C:\secpol.cfg secedit /configure /db c:\windows\security\local.sdb /cfg c:\secpol.cfg /areas SECURITYPOLICY rm -force c:\secpol.cfg -confirm:$false
The left PasswordComplexity is the existing value, and the one on the right is the new, desired value.
-

Account Lockout Duration for Locked Out User Accounts
How to Set Account Lockout Duration for Locked Out User AccountsPublished by Brink


 Quote
Quote
Related Discussions