

How to Add, Change, or Remove a Drive Letter in Vista, Windows 7, and Windows 8
InformationThis will show you how to add, change, or remove a drive letter for any drive installed or connected to the computer in Vista, Windows 7, and Windows 8.
Note
- You can only assign the letters D to Z to each drive on your computer.
- The letters A and B are usually reserved for floppy disk drives. If you do not have a floppy disk drive installed, then you could assign A and B to a drive, partition, or volume if you like. However, it's not recommended to assign A and B to anything other than a floppy or floppy substitute.
- The letter C is reserved for the drive or partition that the operating system (Windows 7 or Vista) is installed on. If you multi boot operating systems, then whatever OS that you happen to startup in will always show as the C drive by default. You do not want to change or remove the C: drive letter.
- If you change or remove a drive letter of a drive, partition, or volume that a shortcut or installed program references as their target location, then that shortcut or program may not work afterwards since it can no longer find that drive letter.
OPTION ONETo Change, Add, or Remove Drive Letter in Disk Management
1. Press the Windows + R keys to open the Run dialog, type compmgmt.msc OR diskmgmt.msc, and press Enter.
2. If prompted by UAC, then click on Yes.
3. In the left pane of Computer Management, click/tap on Disk Management under Storage. (see screenshots below)
4. Do step 5, 6, or 7 for what you would like to do.

5. To Change a Drive Letter
NOTE: You cannot change a drive letter if the drive is either a system partition or a boot partition, like the partition or drive that Windows 7 is installed on. If you get an error, the partition or drive you are trying to change might be in use. Close any program or window that is using the partition or drive and try again.
A) Right click on a listed drive, partition, or volume letter that you want to change the drive letter of, and click on Change Drive Letter and Paths. (see screenshot below)6. To Add a Drive Letter
B) Click/tap on the Change button. (see screenshot below)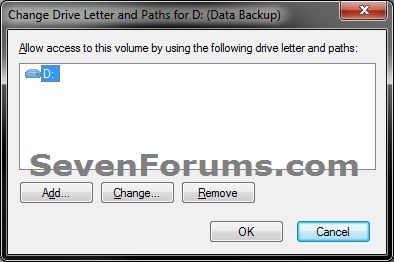
C) Select (dot) Assign the following drive letter, then select an available drive letter from the drop down box, and click/tap on OK. (see screenshot below)
D) Click/tap on Yes to confirm changing the drive letter. (see screenshot below)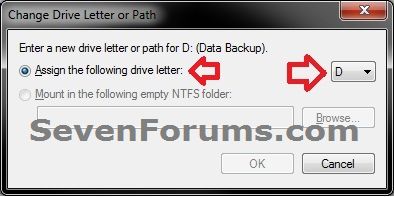
E) If you get a AutoPlay pop-up window afterwards, then you can just close this. It indicates that the drive, partition, or volume has been assigned the drive letter. (see screenshot below)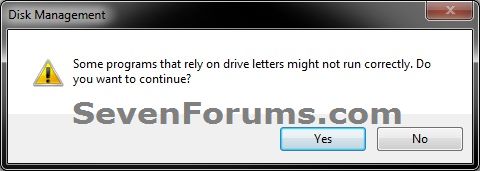
F) Go to step 8.
NOTE: This is to assign a drive letter to a drive, partition, or volume if a drive letter has been removed or does not already have one assigned to it.
A) Right click on a listed drive, partition, or volume that does not have a driver letter that you want to add one to, and click/tap on Change Drive Letter and Paths. (see screenshot below step 5A)7. To Remove a Drive Letter
B) Click/tap on the Add button. (see screenshot below)
C) Select (dot) Assign the following drive letter, then select an available drive letter from the drop down box, and click/tap on OK. (see screenshot below)
D) Go to step 8.
NOTE: This will only remove the drive letter and not the drive, partition, or volume. This can be useful if you are getting a low disk space warning for this drive letter.
A) Right click on a listed drive, partition, or volume letter that you want to remove the drive letter of, and click/tap on Change Drive Letter and Paths.8. Close the Computer Management or Disk Management window.
B) Click/tap on the Remove button. (see screenshot below)
C) Click/tap on Yes to confirm removing the drive letter. (see screenshot below)
9. Open the Computer window to confirm the changes.
OPTION TWOTo Change or Remove Drive Letter Manually in Registry Editor
1. Press the Windows + R keys to open the Run dialog, type regedit in the search box, and press Enter.
2. If prompted by UAC, then click on Yes.
3. In regedit, navigate to the location below, and do step 4 or 5 below for what you would like to do.. (see screenshot below)
HKEY_LOCAL_MACHINE\SYSTEM\MountedDevices4. To Change a Drive Letter
WARNING: Do not change the C: drive letter.
A) Right click on a listed /DosDevices\(drive letter) (Ex: /DosDevices\D: ) that you want to change the drive letter of, then click on Rename. (see screenshot above)5. To Remove a Drive Letter
B) Rename it with a drive letter that you want to use, and is not already listed here, and press enter. (see screenshot above)
For Example: If I wanted to change it from D: to K: , then I would rename it to /DosDevices\K: instead.
WARNING: Do not remove the C: drive letter.
A) Right click on a listed /DosDevices\(drive letter) (Ex: /DosDevices\D: ) that you want to remove the drive letter of, then click on Delete. (see screenshot above)6. Close regedit.
B) Click/tap on Yes to confirm the deletion. (see screenshot below)
7. Log off and log on, or restart the computer to apply the changes.
OPTION THREETo Add, Change, or Remove a Drive Letter in Command Prompt
1. Open either an elevated command prompt in Windows 7 or Windows 8, or a command prompt at boot for Windows 7 or Windows 8.That's it,
NOTE: Changing the drive letter at boot will not always result in having the same drive letter in Windows. Changing the drive letter while in Windows is preferred.
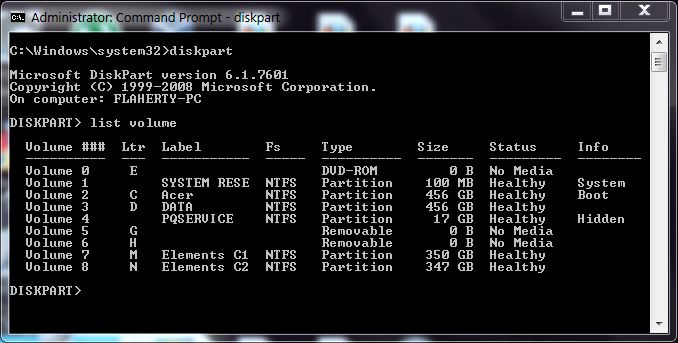
2. In the command prompt, type diskpart and press Enter. (see screenshot below step 6)
3. In the command prompt, type list volume and press Enter. (see screenshot below step 6)
NOTE: Make note of what the volume # is for the drive label/size that you wanted to add or change the drive letter of.
4. In the command prompt, type select volume # and press Enter. (see screenshot below step 6)
NOTE: Substitute # in the command with the volume number from step 3 that you wanted to add or change the drive letter of.
For example: If I wanted to add or change the drive letter of my listed volume 1 for my I: System Back drive, I would type the command below exactly and press Enter.5. Do step 6 or 7 below for what you would like to do.
select volume 1
6. To Add or Change a Drive Letter
A) In the command prompt, type assign letter=letter and press Enter, and go to step 8 below. (see screenshot below)7. To Remove a Drive Letter
NOTE: Substitute the second letter in the command with the drive letter that you wanted to add or change the drive from step 4 to.
For example: If I wanted to add or change the drive letter of my listed volume 1 for my I: System Back drive from I to E, I would type the command below exactly and press Enter.
assign letter=E
A) In the command prompt, type remove letter=letter and press Enter, and go to step 8 below.8. When successful, you're done. Close the elevated command prompt, or close the command prompt at boot and restart the computer.
NOTE: Substitute the second letter in the command with the drive letter that you wanted to remove the drive from step 4.
For example: If I wanted to remove the drive letter of my listed volume 1 for my I: System Back drive, I would type the command below exactly and press Enter.
remove letter=E
Shawn
Related Tutorials
- How to Rename a Drive in Vista, Windows 7, and Windows 8
- How to Show Windows 7 Computer Drive Letters Before or After Drive Name
- How to Change a Drive Icon in Vista, Windows 7, and Windows 8
- How to Fix Missing Vista Hard Disk Partition Letter in Windows 7
- How to Remove or Show Drives in the Vista and Windows 7 "Send To" Context Menu
- How to Turn Off Hard Disk After so many Minutes of being Idle or Never
- How to Hide or Show Empty Drives in Windows 7 Computer Folder
Drive Letter - Add, Change, or Remove in Windows
-
New #1
I am puzzled by the registry entries I have for mounted devices which I can change in line with the tutorial.
Here is my screen shot from Disk management showing option for changing "N".
Below are the mounted volumes. So far fine and consistent.
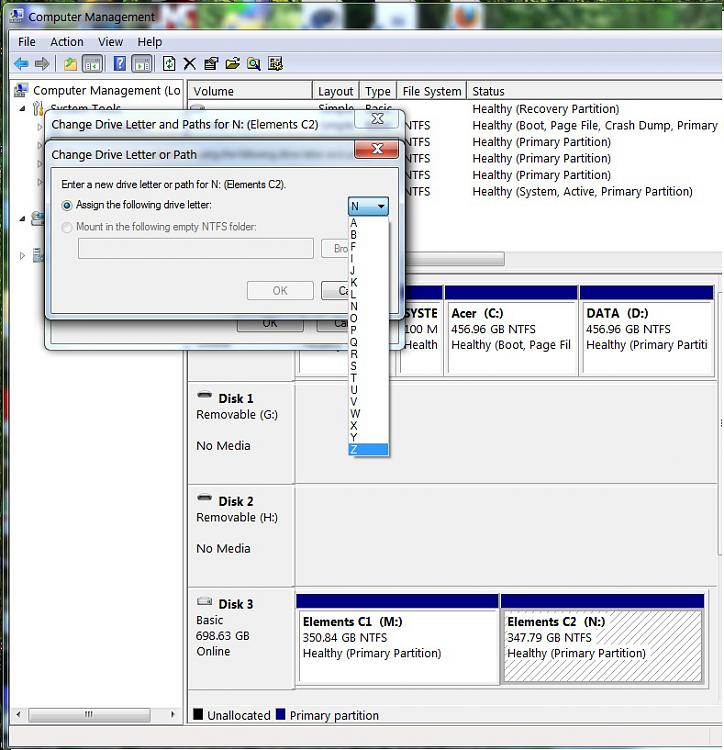
But the "mounted devices" in the registry include many unmounted devices except the unmounted (B, O, P, Q, R, W).

It also appears you can then make changes to unmounted device letters.
Can you shed any light on this?
-
New #2
Sure, if Windows uses the same letter for some commonly used unmounted devices (ex: USB flash drive) and has it listed in the registry as above, then you should be able to change the drive letter for it as well.
-
New #3
I'm trying to backup a load of files from a friend's WD2500BB-55GUCO IDE HDD which has XP on it, but in 7 Pro I get no drive letter assigned to either of the drive's partitions and I CANNOT change drive letter...so I can't access any of the files I need to backup
Is there any way for me to get 7 to assign a drive letter to each partition?
-
New #4
Hello Rythmeister,
Could you post a screenshot of your Disk Management window showing what it has for this drive? :)
-
-
New #6
Rhythmeister,
Since this is an IDE HDD, double check to see if the jumper on the HDD is set to "master".
Afterwards, if the computer tries to boot to the IDE HDD instead of your Windows 7 HDD, then press the F key (usually F10 or F11) at boot to bring up the boot menu to be able to select the Windows 7 boot drive. Next, see if it has a drive letter, or if you can add one to it in Disk Manangement now.
-
New #7
I got it sussed Brink, it was a Ubuntu installation on that drive. I never considered the possibility of a different file system but fired the stuff onto an external drive from Ubuntu without issue!
-
-
New #9
Hi.
Sorry if I revive this too much ^^
After changing the disk where I have the O.S., the new installation of 7 does the same thing that happens to Rhythmeister, with my second disk. But the diference is I never install a O.S. on that disk and is NTFS.
And I can see the information inside from a Ubuntu live cd.
There is a way fix this, or i have to back up everythig to my new disk and make a new volume?
Sorry about my english :P
Drive Letter - Add, Change, or Remove in Windows
How to Add, Change, or Remove a Drive Letter in Vista, Windows 7, and Windows 8Published by Brink


 Quote
Quote
Related Discussions