Windows 7 Universal Installation Disc - Create

Page 38 of 40 FirstFirst ... 283637383940 LastLast

  1. Posts : 61
    The one I am using to register is my Windows 7 Professional x64 one.
       #370

    SIW2 said:
    There is an updater on this site, however it is not for multi bit version.

    If you want to do multi, there is a scipt that does it. Is in Russian.
    If you can find a native Russian speaker to translate it all for you - you are in luck.


    video demonstration:
    Пример работы UP_Integrator - YouTube


    Code:
    The main task of UP_Integrator is to conveniently integrate UpdatePack7R2 updates into the original install.wim from Windows 7, the ability to create mono \ multi-bit install.wim, install.esd or split install.wim into install.swm, as well as mono \ multi-bit installation ISO image of Windows 7. For UP_Integrator to work, you must have install.wim and UpdatePack7R2 files next to it.
    
    Key features:
    * Updating the original bootable ISO image of Windows 7.
    * Automatic extraction of instal.wim and boot.wim files from bootable ISO images of Windows 7 and older for their subsequent processing by the integrator.
    * Removing unnecessary indexes from install.wim, integrating updates into selected indexes. The ability to update all install.wim indexes by increasing the Windows edition
    * Combine bit install.wim and create multi bit install.wim convertible to install.esd or install.swm.
    * Integration into install.wim, boot.wim, winre.wim of the SmartFix.exe and MSDaRT utilities (md5: ECDA7B18A5C1EAE49344E825B84A06C8).
    * Creation of a mono \ multi-bit bootable ISO image based on loaders from Windows 7 or later with the ability to add custom settings and applications.
    * Support for your own launch keys UP_Integrator for processing adjacent files.
    * Support for launch keys and additional functionality UpdatePack7R2.
    
    Peculiarities:
    - The system must have at least 10 GB of free hard disk space and at least 1 GB of free RAM. When updating the ISO image of Windows 7, the free space must be increased.
    - Installation ISO images of Windows, files install.wim and boot.wim must be original, without previously integrated updates and additions.
    - The names and extensions of the install.wim and boot.wim files can be anything, the files must be located near the integrator. The script will itself determine their type and bit depth.
    - Integration of updates into all indexes using the upgrade method is much faster than the integration with the standard method.
    - The installation interface based on Windows 8.1 and later boot loaders will be similar to that of the original Windows 7 installer.
    - The date the Windows was modified in the installation window will match the UpdatePack7R2 date
    - The integrator can process install.wim and boot.wim files, * .swm files in the swn folder, bootable ISO images in the Original_ISO folder. Folders and files should be near the integrator.
    - An AutoUnattend_bw _ *. Xml answer file may be automatically added to boot.wim files, bypassing the end user agreement.
    - Creating a multi-bit install.wim is possible only if there is one Windows 7 edition next to UP_Integrator.
    - Creating a bootable image is possible only if there is a pair of install.wim and boot.wim next to UP_Integrator. Multi-bit install.wim and boot.wim pairs can create a multi-bit boot image.
    The default bootable disk image is built with the Retail version. To change the version of the disk image, place your ei.cfg file in the ISO folder next to UP_Integrator.
    
    
    When starting UP_Integrator with the [Shift] button held down, the following is performed:
    - compression of the adjacent install.wim in install.esd
    - Integration of SmartFix into the recovery environment and bootloaders if there are a number of SmartFix, winRE.wim, boot * .wim files.
    - integration of Win7USB3 into install.wim indexes if there are a number of Win7USB3.exe, install * .wim files
    
    
    Application Integration Keys:
    UP_Integrator.exe -aiU -gm2 -fm0 - integration of Win7USB3 into all indexes install * .wim if there is Win7USB3.exe nearby.
    UP_Integrator.exe -aiF -gm2 -fm0 - integration of SmartFix into boot * .wim if SmartFix.exe is available nearby.
    UP_Integrator.exe -aiE -gm2 -fm0 - compress install * .wim to install * .esd
    UP_Integrator.exe -aiW -gm2 -fm0 - decompress install * .esd into install * .wim
    UP_Integrator.exe -aiS -gm2 -fm0 - splitting install * .wim into install * .swm files in the swm folder
    UP_Integrator.exe -aiC -gm2 -fm0 - build install * .wim from install * .swm files in swm folder
    UP_Integrator.exe -aiI -gm2 -fm0 - create a boot image
    UP_Integrator.exe -aiM -gm2 -fm0 - modification of the boot.wim interface for Windows 8 and older under Windows 7
    UP_Integrator.exe -aiX -gm2 -fm0 - extract * .wim from images in the Original_ISO folder
    
    * wim name can be any, multiple indication of keys is possible, keys -gm2, -fm0 are optional.
    - - - Updated - - -

    Here you go - somebody has done it - too much effort for me, so you are lucky

    UP_Integrator_v6.5.6.1_en.zip

    Attachment 419964

    you can check the video to find out where to put everything:

    and check my updater thread for links to simplix updatepack7, and abbodi netframework and vc redist .wa files
    Update your Win 7 installation media

    - - - Updated - - -

    That looks great work by Sov, there are some similarities to my much humbler updater, but Sov's has extra functions that mine doesn't and is more complicated.
    Thanks for replying. With post SP1 updates, I can just use NTLite and then repeat it 10 times although an automated batch file that does it all for me would probably be a hell lot quicker than via GUI and by hand... What about the recovery and repair modes? Or is that all included in the russian video....?
      My Computer


  2. Posts : 16,163
    7 X64
       #371

    What about the recovery and repair modes? Or is that all included in the russian video....?
    You will have to try it and see what it does.

    I gave the english version a quick run, and it didnt work properly.

    There is a newer version in Russian,Up_Int_v6.5.6.2.zip maybe that fixed the bugs.


    I havent got time to examine it thoroughly at the moment
      My Computers


  3. Posts : 61
    The one I am using to register is my Windows 7 Professional x64 one.
       #372

    Hoopstar said:
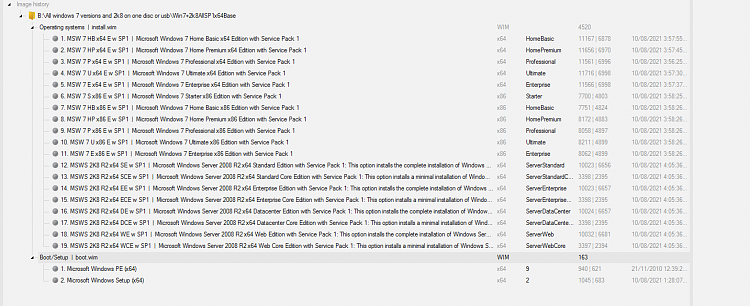
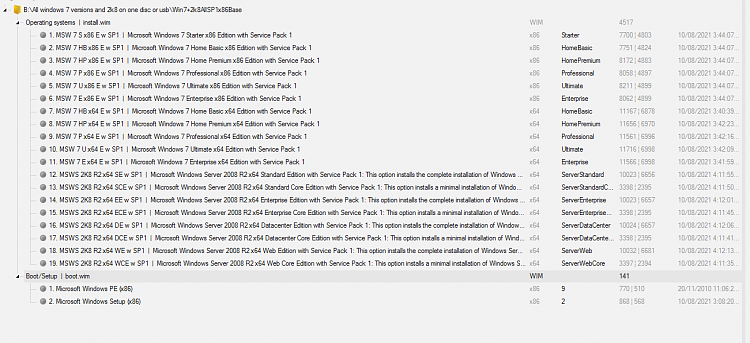
    Sooo.. I did manage to get all versions on 1 usb. :)
    se the gimagex list.png

    Heres how:

    Open the attached AIO manual.txt

    and download the createaio.bat

    follow the manual and it should work.
    IF you get the error where it comes up blank when you have to choose the edition to install

    then open the install.wim with GIMAGEX.exe and go to the Change tab and browse for source wim and select the image number (in my case both enterprises)
    Put a Name and description on them and pres Change button.

    That should make it work
    You forgot to mention that your batch file isn't *exactly* ready to go by double clicking, as the folder you're suppose to create does not have a leading 7, so it's just "aio" instead of "7aio" you said to make. Also that D:\ is suppose to be C:\ if going by your instructions. Otherwise yes, the rest is easy to follow for even a noob to do with default settings. Would have been nice if you told us how to edit the name, description (maybe add your own flavour text if there isnt one or the one there sounds boring or bland) and or change the selection order, when shown the choice selections at the setup screen.... I thought I remember reading someone's post requesting assistance on this, so will be back on that to see if I can find it or not...

    SIW2 said:
    You will have to try it and see what it does.

    I gave the english version a quick run, and it didnt work properly.

    There is a newer version in Russian,Up_Int_v6.5.6.2.zip maybe that fixed the bugs.


    I havent got time to examine it thoroughly at the moment
    Hmmm.... So how did you do yours with your universal disc? You mentioned in a post earlier you used some sort of custom script for this? Do you still have that script or lost the script? Can you make the script again? Or is the script made by someone else and you just stole it so you could add a recovery environment and repair modes to your install media?

    I can't read russian and those symbols will show up with questions marks and square boxes. According to this: Create your own x86 and x64 All in one Windows 7 ISO • Raymond.CC WinAIO Maker Professional can do both 32-bit and 64-bit recovery and repair modes. Unfortunately it looks like it only works for Windows 7, so I won't be able to add one for my 2008 R2 Server ones that are included in my choice selection... They also mention this can be added manually but is painstakingly long but they didnt specify any instructions to do so...so I have no leads...

    But....this looks promising: Adding additional boot options to deployment USB - WinCert

    Will report back of any progress.
      My Computer


  4. Posts : 16,163
    7 X64
       #373

    add other Windows PE images
    That is easy enough, been doing it for years.

    Give the bootable wims different names and then just add bcd entry pointing at each one.
      My Computers


  5. Posts : 61
    The one I am using to register is my Windows 7 Professional x64 one.
       #374

    Sorry, been busy with other stuff, just got time to get back to this.

    Okay, the method there shows a deployment method which is different and adds more complicated (and probably unneeded steps on an otherwise simple to do tutorial shown here...) steps just to add a recovery environment. Still doesn't show if the order can be changed or not and unbroken pictures would also help.. Also Diagnostics and Recovery Toolkit (DaRT) can only be acquired via the Microsoft Desktop Optimization Pack (MDOP) which is only available to customers with Software Assurance for Windows Client OS...which of course I don't have access to.....

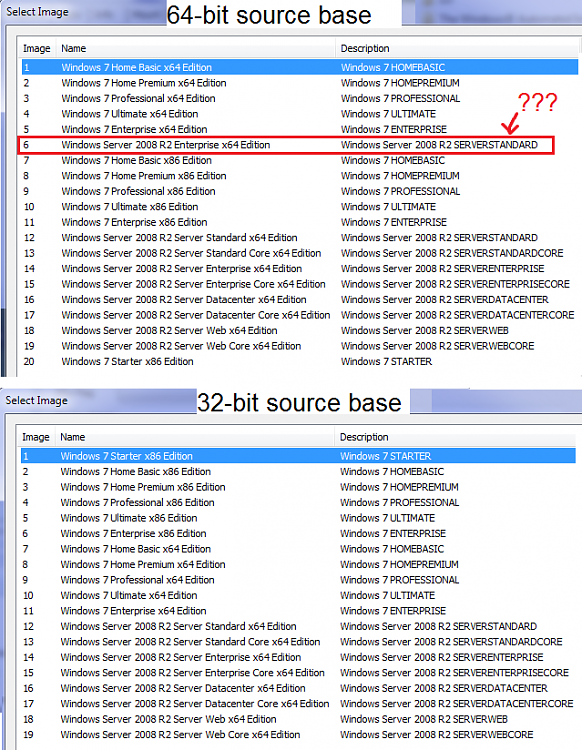
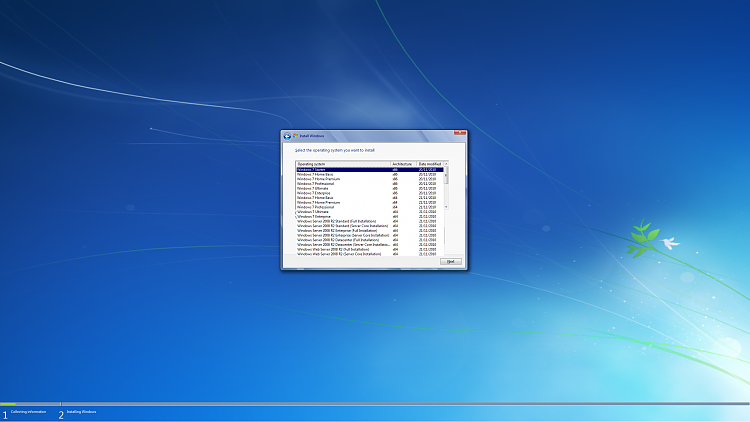
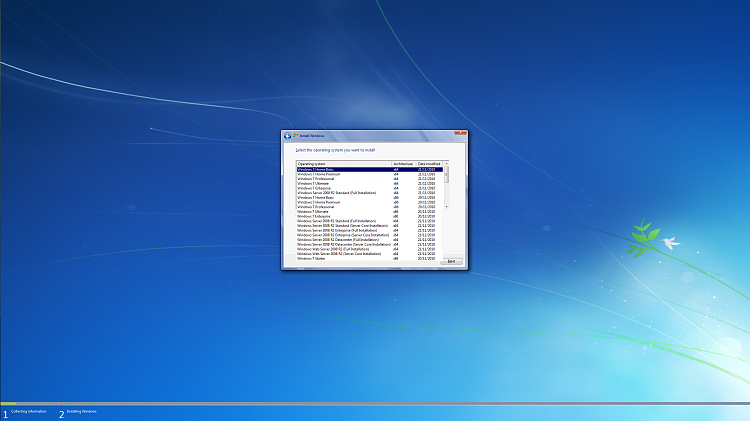
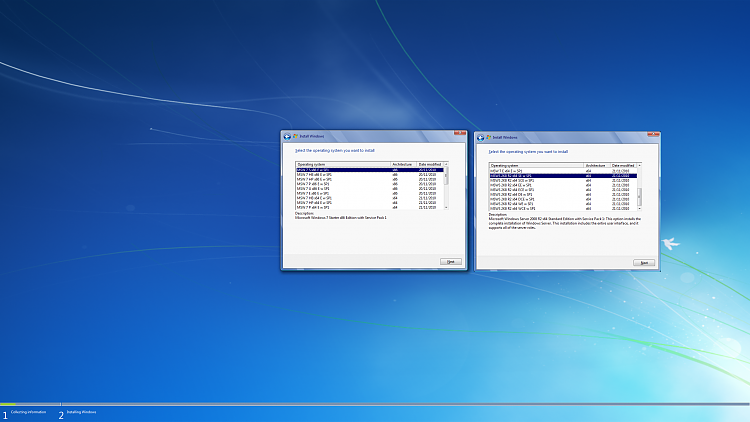
    What I have found out is that you can change the name and description through GImageX and WinAIO Maker Professional, but you have to edit the entries manually one by one, though I still dunno how to change the order that shows on the setup screen. Although having the universal install media be based on x86 build seems to have a better looking order than with the x64 build as base and changing/switching the imagex /export lines don't order them as you would think it should..... Also a weird phantom entry appears on the x64 base....see attached screenies.
    Windows 7 Universal Installation Disc - Create-mines-better.pngWindows 7 Universal Installation Disc - Create-setup-x86-base.pngWindows 7 Universal Installation Disc - Create-setup-x64-base.png
      My Computer


  6. Posts : 16,163
    7 X64
       #375

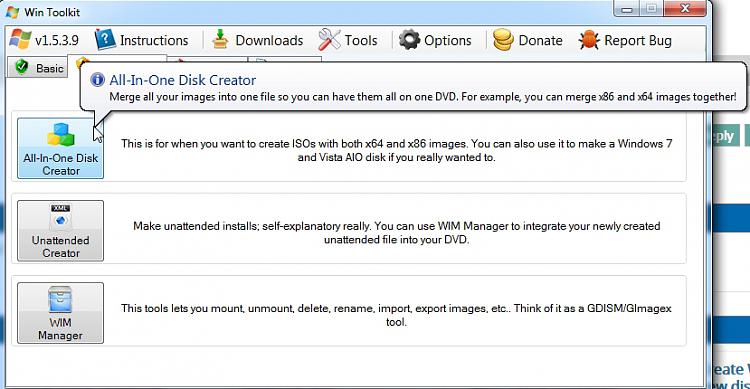
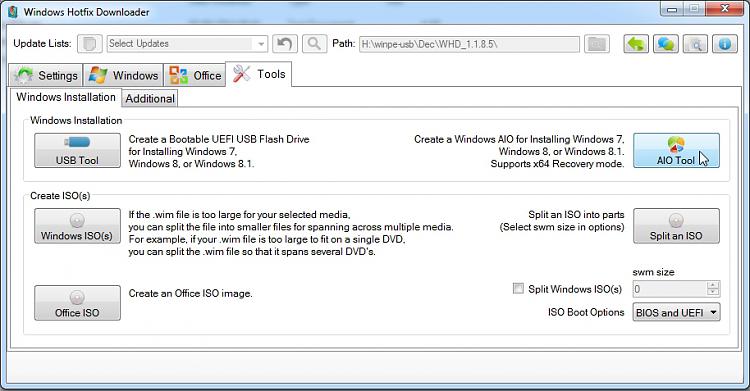
    If you cant be bothered doing it manually, wintoolkit is another gui way of doing it. Also Windows Hotfix Downloader v1.1.8.5 and there might be others.

    Windows 7 Universal Installation Disc - Create-wintoolkit.jpg


    Windows 7 Universal Installation Disc - Create-whd.jpg

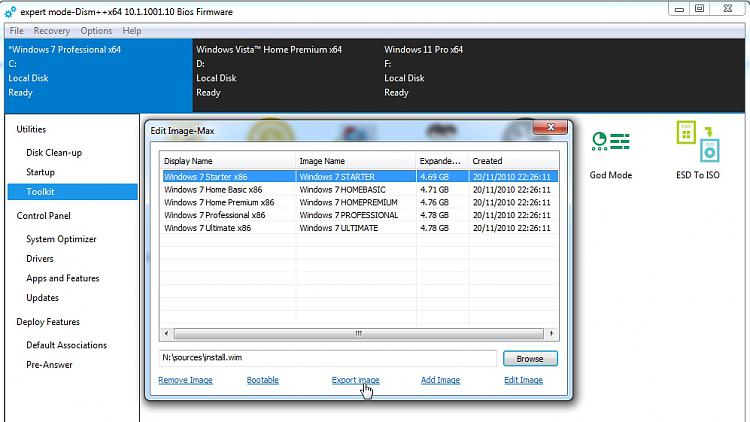
    I would most likely use dism++ (gui) or wimlib (command line)

    Windows 7 Universal Installation Disc - Create-dism-.jpg
      My Computers


  7. Posts : 61
    The one I am using to register is my Windows 7 Professional x64 one.
       #376

    Ok so it took a while editing the names and description of each one. GImageX and WinAIO Maker Professional crashing 80% of the time doing this wasn't helpful and me making *one* typo resulting me redoing the whole process again since the entries aren't saved (so I cant just edit the presaved entries) and I would have to retype or repaste the names and description again and correct them.... I finally did it, check it out:

    Windows 7 Universal Installation Disc - Create-setup-x86-base.pngWindows 7 Universal Installation Disc - Create-setup-x64-base.pngWindows 7 Universal Installation Disc - Create-ntlite-x64-base.pngWindows 7 Universal Installation Disc - Create-ntlite-x86-base.png

    It looks like editing the name and description of every installment of windows 7 and 2008 seems to have removed the phantom entry! As you can see in the above screenshot it is no longer present! Weird bug....

    I guess I'll give up trying to make a recovery and repair environment for both 32-bit and 64-bit on one disc so opted to make two versions of the universal media - a 32-bit based one where the recovery and repair environment should work with any 32-bit install windows 7 and a 64-bit based one where hopefully that works with either the 64-bit version of windows 7 or 2008. Hopefully should come predone unless I still have to manually add this into either of the universal install media after making said universal media?

    Assuming all is well here, the next bit is update all 19 copies of the operating systems to their latest patches and updates...
      My Computer


  8. Posts : 16,163
    7 X64
       #377

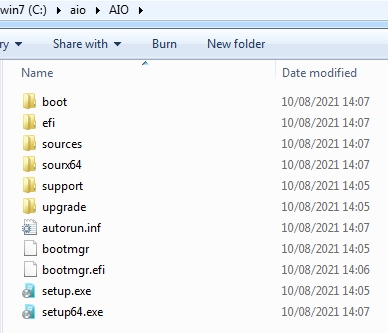
    Windows 7 Universal Installation Disc - Create-aio.jpg
      My Computers


  9. Posts : 61
    The one I am using to register is my Windows 7 Professional x64 one.
       #378

    SIW2 said:
    Windows 7 Universal Installation Disc - Create-aio.jpg
    Wait, how did you get 2 exe files on there? Thought 64 bit and 32 bit can be installed with just the one setup exe file?
      My Computer


  10. Posts : 16,163
    7 X64
       #379

    It is patched so you can use x64 recovery environment.

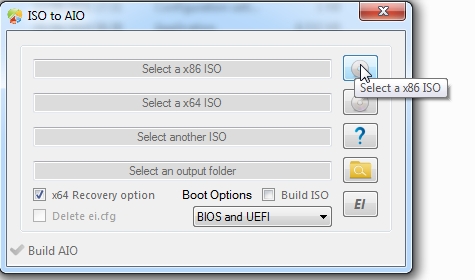
    Easiest to let whd do it for you. whd

    Windows 7 Universal Installation Disc - Create-whd1.jpg

    Windows 7 Universal Installation Disc - Create-whd2.jpg

    Windows 7 Universal Installation Disc - Create-whd3.jpg

    Windows 7 Universal Installation Disc - Create-whd4.jpg

    Windows 7 Universal Installation Disc - Create-whd5.jpg


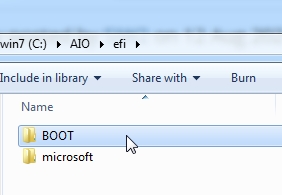
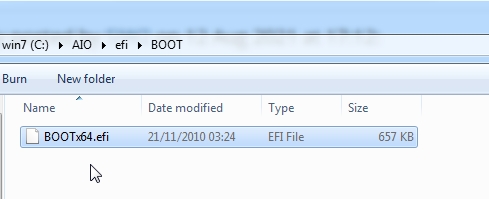
    You can then manually add Boot\bootx64.efi to the efi folder

    BOOT.zip

    Windows 7 Universal Installation Disc - Create-add-bootfoldewr-efi1.jpg

    Windows 7 Universal Installation Disc - Create-add-bootfoldewr-efi2.jpg
    Last edited by SIW2; 12 Aug 2021 at 19:11.
      My Computers


Page 38 of 40 FirstFirst ... 283637383940 LastLast

  Related Discussions
Our Sites
Site Links
About Us
Windows 7 Forums is an independent web site and has not been authorized, sponsored, or otherwise approved by Microsoft Corporation. "Windows 7" and related materials are trademarks of Microsoft Corp.

© Designer Media Ltd
All times are GMT -5. The time now is 06:49.
Find Us