

How to Change the Default Control Panel Icon in Windows 7
InformationThis will show you how to change the default Control Panel icon in the Windows 7 Start Menu, Desktop icon, and navigation pane to be a icon of your choice.
You should use a 256x256 pixel .ico (icon) file to have the best support for all icon view sizes.
EXAMPLE: Default and Changed Control Panel Icon
OPTION ONETo Change Control Panel Icon for Current User Only
NOTE: This option will only change the default icon for the user account that you are currently logged in, and will override the icon from OPTION TWO below for only this user account. This option will not change the icon for all users like OPTION TWO below, but only for the current user.
1. To Change the Control Panel Icon for Current User
A) Click on the Download button below to download the file below.2. To Restore the Default Control Panel Icon for Current User Only
Add_Default_Control_Panel_Icon_Entries.regB) Save the .reg file to the desktop.
C) Right click the downloaded .reg file on the Desktop and click on Merge.
D) Click on Run, Yes (UAC), Yes, and OK when prompted.
E) Open the Start Menu, then type regedit in the search box and press Enter.
F) If prompted by UAC, then click on Yes (administrator) or enter administrator's password (standard user).
G) In regedit, navigate to the location below. (see screenshot below)
NOTE: This will be the registry locations added from steps A to D.
Code:HKEY_CURRENT_USER\Software\Microsoft\Windows\CurrentVersion\Explorer\CLSID\{26EE0668-A00A-44D7-9371-BEB064C98683}\DefaultIconH) In the right pane of DefaultIcon, right click on (Default) and click on Modify. (see screenshot above)
I) Do either step J or K below.
J) To Use another Windows 7 Icon
J1) Download and install the free program IconViewer to add the Icons tab in the screenshot below step J2.K) To Use a Custom Icon of Your Own
NOTE: Be sure to download the correct 32-bit or 64-bit version for your Windows 7.
J2) In Windows Explorer navigate to the .exe (ex: for program icons) or .dll (ex: Windows 7 icons) file that contains the icon that you want to use, right click on the file, click on Properties, and the Icons tab. (see screenshot below)
NOTE: The most common Windows 7 icons come from the C:\Windows\System32\imageres.dll file.
J3) Make note of the icon number for the icon that you want to use instead. (see screenshot above)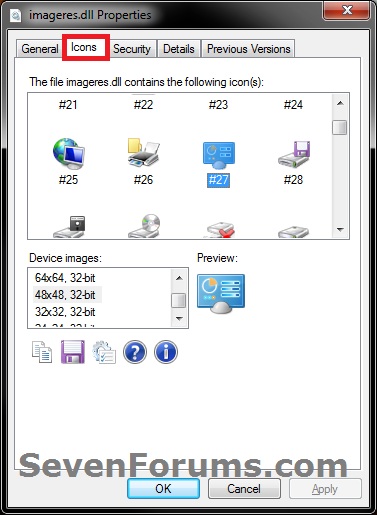
NOTE: For example, the default Control Panel icon number is 27.
J4) In the Modify window from regedit, type in the full path of the .exe or .dll file followed by ,-icon# (full path,-####) and click on OK. (see screenshot below)
NOTE: For example, if I wanted to use the path (step J2) and the 27 icon (step J3), I would type:
%SystemRoot%\system32\imageres.dll,-27
OR
C:\Windows\System32\imageres.dll,-27
J5) Go to step L below.
K1) In the Modify window from regedit, type in the full path of where the custom icon (.ico) file is saved at with the file extension in quotes, then click on OK. (see screenshot below)L) In regedit, navigate to the location below.
WARNING: You will need to use a 256x256 pixel icon that was made for Windows 7 and Vista for them to display properly at all of the available icon view sizes in Windows 7. You will also need to leave the icon (.ico file) saved at the exact location you typed below for it to continue to work. If you delete or move this icon, then it will no longer be displayed.
NOTE: This will be the registry locations added from steps A to D.
M) In the right pane of DefaultIcon, right click on (Default) and click on Modify. (see screenshot above)Code:HKEY_CURRENT_USER\Software\Microsoft\Windows\CurrentVersion\Explorer\CLSID\{5399E694-6CE5-4D6C-8FCE-1D8870FDCBA0}\DefaultIcon
N) Do either step J or K above, and use the same icon you used at step G above. When finished, go to step 3.
NOTE: This will undo the changes made to the icon in OPTION ONE for only the current user, and restore the icon back to what the icon is set as in OPTION TWO below.A) Click on the Download button below to download the file below.3. Log off and log on, or restart the computer to apply.
Restore_Default_Current_User_Control_Panel_Icon.regB) Save the .reg file to the desktop.
C) Right click the downloaded .reg file on the Desktop and click on Merge.
D) Click on Run, Yes (UAC), Yes, and OK when prompted.
4. When done, you can delete the downloaded .reg file if you like.
OPTION TWOTo Change Control Panel Icon for All Users
NOTE: This option will change the default icon for all users on the computer. You will need to be logged in as an administrator to be able to do this option. OPTION ONE above will override this option's changed icon only in the user account that OPTION ONE was applied in.
1. To Change the Control Panel Icon for All UsersThat's it,
A) Open the Start Menu, then type regedit in the search box and press Enter.2. To Restore the Default Control Panel Icon for All Users
B) If prompted by UAC, then click on Yes.
C) In regedit, navigate to the location below. (see screenshot below)
Code:HKEY_CLASSES_ROOT\CLSID\{26EE0668-A00A-44D7-9371-BEB064C98683}\DefaultIconD) In the left pane, right click on DefaultIcon, click on Permissions. (see screenshot above)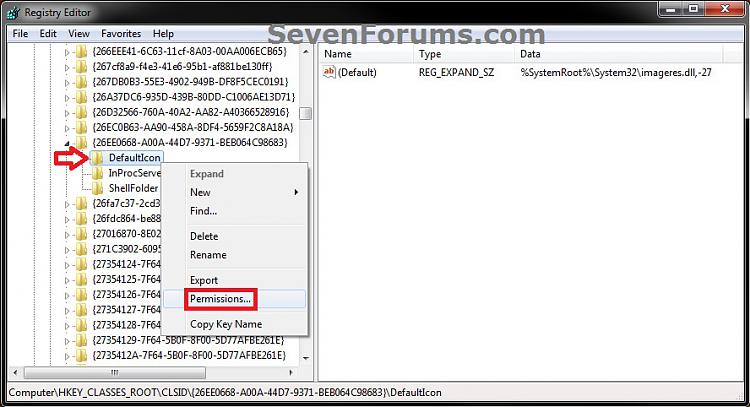
E) Select your Administrators account, check the Allow box for Full Control, then click on OK. (see screenshot below)
F) In the right pane of DefaultIcon, right click on (Default) and click on Modify. (see screenshot below step 1C)
G) Do either step H or I below.
H) To Use another Windows 7 Icon
H1) Download and install the free program IconViewer to add the Icons tab in the screenshot below step H2.I) To Use a Custom Icon of Your Own
NOTE: Be sure to download the correct 32-bit or 64-bit version for your Windows 7.
H2) In Windows Explorer navigate to the .exe (ex: for program icons) or .dll (ex: Windows 7 icons) file that contains the icon that you want to use, then right click on the file, click on Properties, and the Icons tab. (see screenshot below)
NOTE: The most common Windows 7 icons come from the C:\Windows\System32\imageres.dll file.
H3) Make note of the icon number for the icon that you want to use instead. (see screenshot above)
NOTE: For example, the default Control Panel icon number is 27.
H4) In the Modify window from regedit, type in the full path of the .exe or .dll file followed by ,-icon# (full path,-####) and click on OK. (see screenshot below)
NOTE: For example, if I wanted to use the path (step H2) and the 27 icon (step H3), I would type:
%SystemRoot%\system32\imageres.dll,-27
OR
C:\Windows\System32\imageres.dll,-27
H5) Go to step J below.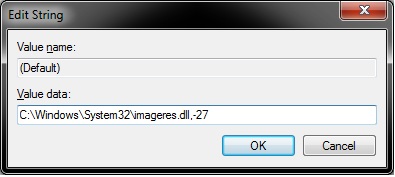
I1) In the Modify window from regedit, type in the full path of where the custom icon (.ico) file is saved at with the file extension in quotes, then click on OK. (see screenshot below)J) In regedit, navigate to the location below.
WARNING: You will need to use a 256x256 pixel icon that was made for Windows 7 and Vista for them to display properly at all of the available icon view sizes in Windows 7. The icon will need to be saved in a location that all users have access to. For example, in a C:\Users\Public folder. You will also need to leave the icon (.ico file) saved at the exact location you typed below for it to continue to work. If you delete or move this icon, then it will no longer be displayed.
NOTE: This will be the registry locations added from steps A to D.
K) In the right pane of DefaultIcon, right click on (Default) and click on Modify.Code:HKEY_CLASSES_ROOT\CLSID\{5399E694-6CE5-4D6C-8FCE-1D8870FDCBA0}\DefaultIcon
L) Do either step H or I above, and use the same icon you used at step C above. When finished, go to step 3.
NOTE: This will restore the default icon for your user account and all users except the user accounts that had applied OPTION ONE above.
A) Click on the Download button below to download the file below.3. Log off and log on, or restart the computer to apply.
Restore_All_Users_Default_Control_Panel_Icon.regB) Save the .reg file to the desktop.
C) Right click the downloaded .reg file on the Desktop and click on Merge.
D) Click on Run, Yes (UAC), Yes, and OK when prompted.
4. When done, you can delete the downloaded .reg file if you like.
Shawn
Related Tutorials
- How to Change the Default Icons in the Windows 7 Control Panel
- How to Add or Remove Control Panel from the Windows 7 Navigation Pane
- How to Set a Default Control Panel View in Windows 7 and Windows 8
- How to Change or Restore Default Windows 7 Desktop Icons
- How to Rename "Control Panel" in the Windows 7 Explorer Navigation Pane
- How to Enable or Disable the Control Panel in Vista and Windows 7
- How to Hide or Show a Control Panel Icon in Vista and Windows 7
- How to Change the Default "Help and Support" Icon in the Windows 7 Start Menu
- How to Change the Default "Default Programs" Icon in the Windows 7 Start Menu
- How to Change the Default "Connect To" Icon in the Windows 7 Start Menu
- How to Change the Default "Run" Icon in the Windows 7 Start Menu
- How to Change the Default "HomeGroup" Icon in Windows 7
- How to Change the Default "Devices and Printers" Icon in the Windows 7 Start Menu
- How to Change the Default "Games" Explorer Icon in the Windows 7 Start Menu
- How to Change or Restore Default Windows 7 Desktop Icons
- How to Change the Default "Recent Items" Icon in the Windows 7 Start Menu
Control Panel - Change Default Icon
-
New #1
Thank you Shawn :) had a little problem at first, but dubble checked and tripple checked ur guide :)
Works a 100% :)
-
-
New #3
so far every singel tutorial here has worked for me :) really happy
-
New #4
Hi there...
the tutorial is great, but for some reason, the only icon that doesnt change is the icon in the start menu...
following the steps in the tutorial, the icon changed in every location apart from the start menu one.
Please see attached images.
Image 1 - this shows the icon still at its original state

Image 2 - this shows the icon in its changed state

Image 3 - this shows the regedit key entered

Please advise!!
thanks!
-
New #5
Hello Kevin,
Have you already restarted the computer afterwards to see if that may have been the issue?
If you did, then also do OPTION ONE to see if it will change afterwards.
Hope this helps,
Shawn
-
New #6
Kevin,
After following Brink's advice to restart the computer, this problem was resolved on my system. Should work for all other users too.
Another thing I have discovered is that when accessing the control panel in the 'Large Icons' or 'Small icons' view modes, the taskbar icon remains unchanged along with the small icon to the immediate left of the URL bar. Viewing in 'Category' mode resolves this issue.
[hint] Perhaps further tweaking can resolve this minor problem! [\hint]
A well written tutorial nonetheless. Back to further customising my Windows 7.
-
New #7
Control Panel Icon Changing
My Control panel Icon does not change.
I went through all the steps and restarted my computer often.
/image
This is how my computer currently looks.
I went back and tried both methods.
I even went to the different registry files and changed them both.
I used the registry merge app as well.


In Summary, it seems like my computer feels like she is married to the wrong person. Am I begin strong armed here or what?
-
-
New #9
Okay, so I went through step one again and took a screenshot of that location and the new path I made to the new Icon.
Also, I double checked the icon in gimp, it was 256x256 and I uploaded it here in a zip.TronControl.zip

Control Panel - Change Default Icon
How to Change the Default Control Panel Icon in Windows 7Published by Brink

 Quote
Quote
Related Discussions