

How to Set and Lock a Default Skin in Windows Media Player for Users
InformationThis will show you how to have Windows Media Player (WMP) display only in skin mode with a skin of your choice for all users in XP, Vista, and Windows 7.
If enabled, a user has access only to the Player features that are available with the specified skin. Users will not be able to Switch to Library (full mode) in WMP, and cannot choose a different skin.
You must be logged in as an administrator to be able to do this tutorial.
NoteWMP skins are installed to the location(s) below. Here you will see the available skin file names that can be used.
In 32-bit and 64-bit Windows:
C:\Program Files\Windows Media Player\Skins
In 64-bit Windows Only:
C:\Program Files (x86)\Windows Media Player\Skins
You can download and install more skins for Windows Media Player (WMP) at:
Skins for Windows Media Player - Microsoft Windows
The N and KN editions of Windows 7 have all the features that normally come with each individual Windows 7 edition, except for Windows Media Player 12 and related programs, such as Windows Media Center or Windows DVD Maker.
The N editions of Windows 7 allow you to choose your own media player and software required to manage and play CDs, DVDs, and other digital media files. If you choose to use Windows Media Player 12, downloading it, along with related software, is free.
EXAMPLE: WMP Corporate.wmz and Revert.wmx Skins
NOTE: These are the WMP skins that available by default in Windows.
OPTION ONEThrough the Local Group Policy Editor
1. If open, close WMP.
2. Open the all users, specific users or groups, or all users except administrators Local Group Policy Editor for how you want this policy applied.
3. In the left pane, click on to expand User Configuration, Administrative Templates, Windows Components, Windows Media Player, and User Interface. (see screenshot below)4. In the right pane, right click on Set and Lock Skin and click on Edit. (see screenshot above)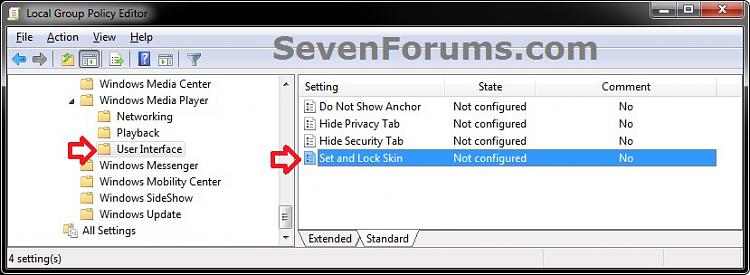
5. Do either step 6 or 7 below for what you would like to do.
6. To Allow User(s) to Change their Own Skin in WMP
NOTE: This is the default setting. Users can display the Player in full or skin mode and have access to all available features of the Player.A) Select (dot) either Not Configured or Disabled. (see screenshot below step 8)7. To Set and Lock a Default Skin in WMP for User(s)
B) Go to step 8.A) Select (dot) Enabled. (see screenshot below step 8)8. Click on OK. (See screenshot below)
B) Under Options, type in the full file name of the skin (ex: corporate.wmz) with the .wmz file extension that you want to set as the default skin to be used by all users. (see screenshot below step 8)
NOTE: To see what skins are available, see the NOTE box at the top of the tutorial.9. Close the Local Group Policy Editor window.
10. Open WMP to see the change.
OPTION TWOManually in Registry Editor
NOTE: This option is applied to all users.1. If open, close WMP.
2. Open the Start Menu, type regedit in the search box, and press Enter.
3. If prompted by UAC, then click on Yes (Windows 7) or Continue (Vista).
4. In regedit, navigate to the location below. (see screenshot below)
NOTE: If you do not have the WindowsMediaPlayer key in the left pane, then right click on the Microsoft key, click on New and Key, type WindowsMediaPlayer and press Enter.HKEY_CURRENT_USER\Software\Policies\Microsoft\WindowsMediaPlayer5. Do either step 6 or 7 for what you would like to do.
6. To Set and Lock a "Default" Skin in WMP for User(s)A) In the right pane of WindowsMediaPlayer, right click on a empty area, click on New and String Value, type in DefaultSkin, and press Enter. (see screenshot below)B) Right click on DefaultSkin, and click on Modify. (see screenshot above)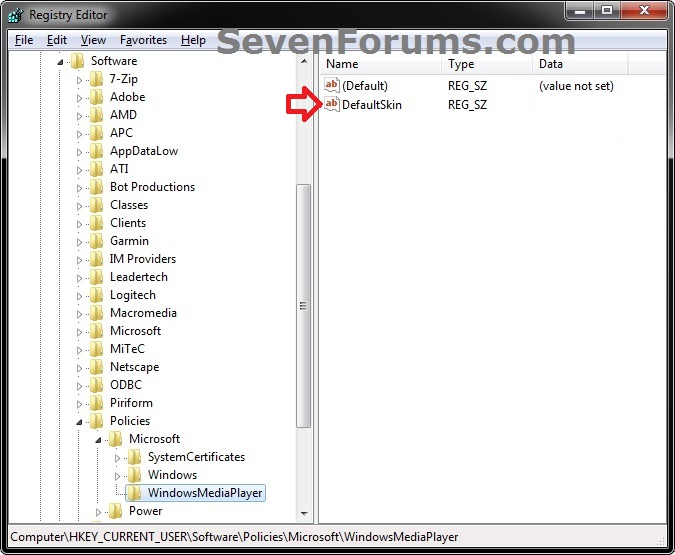
C) Do either step D or E below.D) To Use another Default WMP Skin
- Type in the full file name of the skin (ex: corporate.wmz) with the .wmz file extension that you want to set as the default skin to be used by all users, and click on OK. (see screenshot below)
NOTE: To see what skins are available, see the NOTE box at the top of the tutorial.That's it,E) To Use a "Custom" WMP Skin Saved at any Location 8. To Allow User(s) to Change their Own Skin in WMP
- Type in the full full path of the skin with the .wmz file extension within quotes that you want to set as the default skin to be used by all users, and click on OK. (see screenshot below step 6D)
For example:F) In the right pane of WindowsMediaPlayer, right click on a empty area, click on New and DWORD (32-bit) Value, type in SetAndLockSkin, and press Enter. (see screenshot below)
Code:"C:\Users\Nonpasaran\AppData\Roaming\Microsoft\Media Player\Skins\00462D77\Batman Begins.wmz"G) Type in 1 and click on OK. (see screenshot below) H) Go to step 9.
NOTE: This is the default setting. Users can display the Player in full or skin mode and have access to all available features of the Player.A) In the right pane of WindowsMediaPlayer, right click on DefaultSkin and click on Delete. (see screenshot below)9. Close regedit.B) Click on Yes to approve deletion. (see screenshot below) C) In the right pane of WindowsMediaPlayer, right click on SetAndLockSkin and click on Delete. (see screenshot below)
 D) Click on Yes to approve deletion. (see screenshot below)
10. Open WMP to see the change.
Shawn
Windows Media Player - Set and Lock Skin
-
New #1
Hi Bring,
Also there is another option;
İf you use custom skins you can use their own adres. But custom skins have stored at different location. Like this;
C:\Users\Nonpasaran\AppData\Roaming\Microsoft\Media Player\Skins\00462D77\Batman Begins.wmz
If you use this adress instead of corporote.wmz it still works;


Hope it helps :)
-

Windows Media Player - Set and Lock Skin
How to Set and Lock a Default Skin in Windows Media Player for UsersPublished by Brink


 Quote
Quote
Related Discussions