

How to Turn Password Protected Sharing On or Off in Windows 7
InformationPassword protected sharing is a more secure method of sharing files and folders on a network, and it is enabled by default. If password protected sharing is turned on, people on your network will not be able to access shared folders on other computers on the network, including the Public folders (except on a homegroup), unless they log in to a user account with a password on the computer that has the shared folders stored on it. They will be prompted to type a user name and password when accessing the shared folders.
This tutorial will show you how to turn Password protected sharing on or off in Windows 7.
You must be logged in as an administrator to be able to do the steps in this tutorial.
NoteIf you have password protected sharing turned on, then using the same username and password on each computer on the network that you want to share with will make it easier and faster to access.
Here's How:
1. Open the Control Panel (icons view), and click on the Network and Sharing Center icon.
2. In the left pane, click on the Change advanced sharing settings link. (see screenshot below)
3. Click on theThat's it,to expand the network profile (type) that you want to turn password protected sharing on or off for. (see screenshot below)
NOTE: Normally this would be your current profile.
4. To Turn On Password Protected Sharing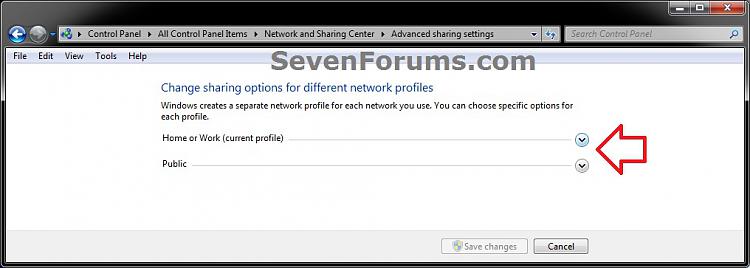
NOTE: This is the default setting.
A) Select (dot) Turn on password protected sharing. (see screenshot below step 6)5. To Turn Off Password Protected Sharing
B) Go to step 6.
A) Select (dot) Turn off password protected sharing. (see screenshot below step 6)6. Click on the Save Changes button. (see screenshot below)
7. If prompted by UAC, then click on Yes.
8. When finished, you can close the Network and Sharing Center.
Shawn
Related Tutorials
- How to Allow or Deny Permissions to Users and Groups
- How to Join or Add a Computer to a Windows 7 Homegroup
- How to Create a Homegroup in Windows 7
- How to Change Windows 7 Homegroup File and Folder Sharing Settings
- How to Turn Network Discovery On or Off in Windows 7
- How to Turn Public Folder Sharing On or Off in Windows 7
Password Protected Sharing - Turn On or Off in Windows 7
-
New #1
Lovely, but I need to do that via registry (for my unattended installation). How?
-
New #2
Hello supraspecies,
I'm afraid that I cannot find a way to do so through the registry on the internet at all.
-
New #3
Is there a way to set up my computer so that password protection and encryption automatically turn off when connected to certain networks, specifically my home network?
When I am at home I want my shared folders to be automatically available to the other computers on my network. The only way that my XP computers can see these files is if I disable the password and encryption protections in sharing options on my Win7 computer as instructed above.
It is an annoyance to disable them and enable them every time I leave my home network.
-Tek
-
New #4
Hello Tek,
Other than turning it off, I suppose that you could upgrade them to Windows 7 or 8 to then not have to worry about it anymore.
-
New #5
Ha! There is always that option. I was hoping for one that did not involve spending money on upgrades though. :)
Thank you for your quick reply!
-Tek
-
New #6
Brink or other friends... My issue is sorta addressed by one of the other questions here but maybe not... my ignorance of the topic is THAT vast
- when we speak of turning pwd-protected-sharing off on Win7 machine that is connected to a conventional windows client network [mix of xp, androids, ios, etc] is it ONE-WAY? that is, to turn "OFF" means that the files/folders etc on the Win7 client then theoretically are inaccessible to other members of the same workgroup? implication being that the other direction still worky? the win7 client would still have his/her network drives mapped and working?
Then, if you don't mind a question from the 'other end'... Its dreadfully easy to get into a win7 system via network FROM an XP Pro machine - enter the credentials and you're in. HOW to reverse that??? The routine from the XP side persists indefinitely and I don't see a way to "log out" !!
a tad scary... persists through restarts etc
I note that Simple File Sharing is turned OFF on the xp side
I also have win 8.1 on the same net and am thinking the answers pretty much apply there also
-
New #7
Hello Claude,
When password protected sharing is on, people locally or on the network must sign into a user account with a password on your Windows PC to be able to access shared files and printers and Public folders on your PC.
When password protected sharing is off, people on the network will be able to access shared files and printers and Public folders on your Windows PC without having to sign in to your PC, and local user accounts on your computer will not require having a password.
Yep, it's the same way in Windows 8/8.1 as well.
Password Protected Sharing - Turn On or Off in Windows 8
Mapped drives work a bit different than simple file sharing though.
Hope this helps. :)
-
New #8
yes that helps. got the concept.
I know you'll have to reach into your deep archive for this, but I can't find a way to 'undo' the accessing of win7 or 8.1 resources from the 'other end' - from the XP Pro "server".... Setting up the access was a breeze: browse the machine, connect, get credential challenge, sign-in, and 'voila'... everything is there. but how to undo that? I have searched in vain so far - obviously the Administrator-level user that originated the connection has to be logged-in to that resource [the xp server] but it still bugs me as a security issue... I can't find a menu that lets me undo that access.
thx again.
-
New #9
After making sure that password protected sharing is turned on for the PC that the folder is on, I would just disconnect the mapped drive on XP, then map it again being sure to not check the "Remember my credentials" box.

Password Protected Sharing - Turn On or Off in Windows 7
How to Turn Password Protected Sharing On or Off in Windows 7Published by Brink


 Quote
Quote
Related Discussions