How to Allow or Deny Permissions to Users and Groups
InformationThis will show you how to allow or deny users and groups access permissions and add or remove inheritable permissions to either a file, folder, drive, or registry key objects in Windows 7 or Vista.
NoteAfter you set user or group permissions of a parent object (folder, drive, or registry key), any newly created files and subfolders in the folder or drive, or newly created subkeys under the registry key, will also inherit these permissions by default.
WarningI would highly recommend that you create a restore point before making changes to a file, folder, drive, or registry key permission settings. This way if you make a mistake and lock (access denied) yourself out of the item, you will be able to do a system restore at boot and select the restore point to undo the mistake.
Here's How:1. Do step 2 or 3 below for what object (folder, drive, or registry key) you would like to change the permission settings of.
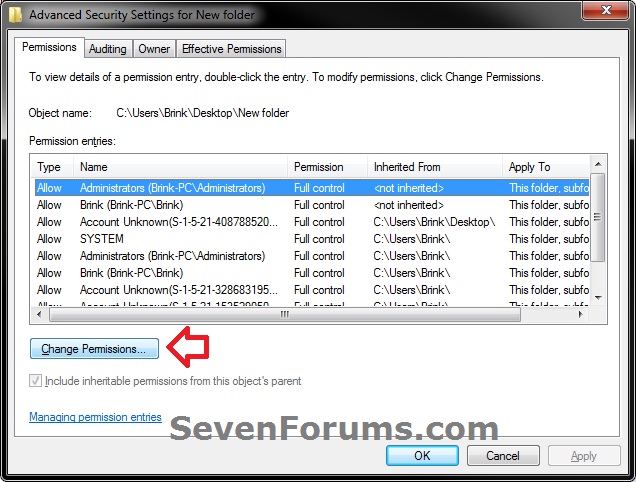
2. To Change the Access Permissions of a File, Folder, or DriveA) In Windows Explorer, right click on the file, folder, or drive (object) that you want to change the permissions of and click on Properties.3. To Change the Access Permissions of a Registry Key
B) Click on the Security tab, and click on the Advanced button. (see screenshot below)C) In the Permissions tab, click on the Change Permissions button. (see screenshot below)D) If prompted by UAC, then click on Yes (Windows 7) or Continue (Vista)
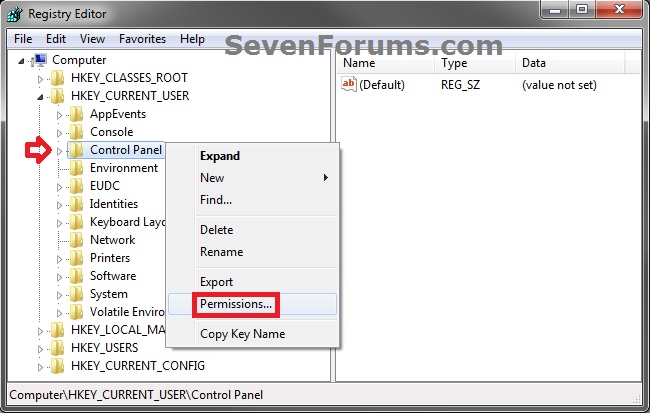
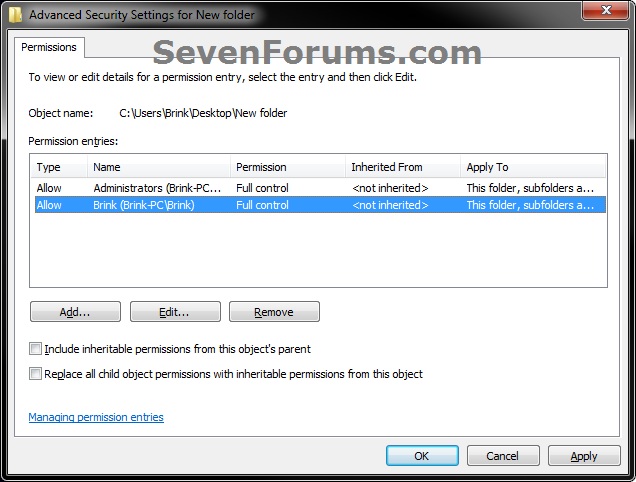
E) Go to step 4.A) In the left pane of Registry Editor (regedit.exe), right click on the key (object) that you want to change the permissions of and click on Permissions. (see screenshot below)B) Click on the Advanced button. (see screenshot below)C) Go to step 4 below.4. You will now see this below. Do step 5, 6, or 7 below for what you would like to do. (see screenshot and table below)5. To Include Inheritable Permissions from Object's Parent
Item Description Object Name Full path of the selected file, folder, drive, or registry key from step 2 or 3 above. Permission entries Displays each permission entry for this object: Type - Either Allow or Deny this group or user this permission for this object. Name - Resource, user, or group. Permission - Restrictions currently applied to this object for this resource, user, or group. Inherited from - Identifies the full path of the parent object for the "object name". Apply To - Identifies any descendant objects to which the permissions are also applied.
NOTE: This will have this "object name" inherit (add) all of the permission entries from it's "parent object".A) Check the Include inheritable permissions from the objects parent box, and click on Apply. (see screenshot below step 4)6. To Remove All Inherited Parent Permissions from Object
B) Go to step 8 or 9 below.
NOTE: This will remove all of the inherited parent permission entries from this "object name".A) Uncheck the Include inheritable permissions from the objects parent box. (see screenshot below step 4)7. To Convert All Inherited Parent Permissions as Explicit for Object
B) Click on the Remove button. (see screenshot below)C) Click on the Apply button. (see screenshot below)D) Go to step 8 below.
NOTE: This will convert all of the inherited parent permission entries as explicit permissons (<not inherited>) instead for this "object name" under the Inherited From column.A) Uncheck the Include inheritable permissions from the objects parent box. (see screenshot below step 4)8. Do step 9 and/or 10 below if you would like to add or remove permissons entries that are explicit (<not inherited>). If not, then go to step 11 below instead.
B) Click on the Add button. (see screenshot below)C) Click on the Apply button. (see screenshot below step 4)
NOTE: If you get a Access is denied message, then it means that you will need to take ownership of this object first and repeat the steps above.
D) Go to step 8 below.
9. To Remove Explicit Permission Entries from Object
NOTE: This step is if you want to remove permission entries (users or groupa) that have explicit (<not inherited>) permissions from this object.A) Select a listed permission entry that has <not inherited> under the Inherited From column that you want to remove, and click on Remove. (see screenshot below step 4)
B) Repeat step 9A for any other permission entries you would like to remove for this object.
C) When finished, click on the Apply button. (see screenshot below step 4)
NOTE: If you get a Access is denied message, then it means that you will need to take ownership of this object first and repeat the steps above.
D) Go to step 10 or 11 below for what you would like to do.10. To Add Permission Entries to ObjectThat's it,
NOTE: This step is if you want to add permission entries (users or groups) to this object that will have explicit (<not inherited>) permissions.A) Click on the Add button. (see screenshot below step 4)11. To Allow or Deny Permissions for a User or Group
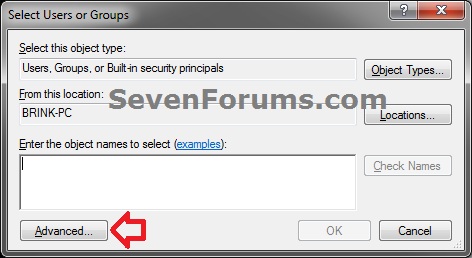
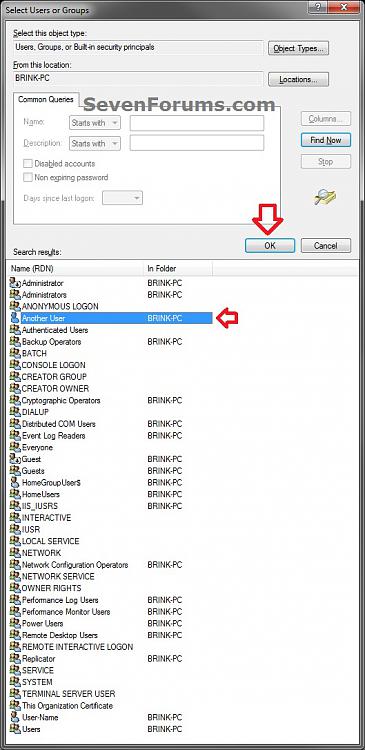
B) Click on the Advanced button. (see screenshot below)C) Click on the Find Now button. (see screenshot below)D) In the bottom pane under Search results, select the user(s) and/or group(s) that you want to add and click on OK. (see screenshot below)
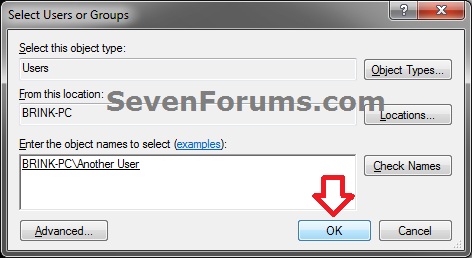
NOTE: You can press and hold the CTRL key to select more than one listed item.E) Click on OK. (see screenshot below)F) Repeat steps 10A-10E for any other explicit permission entries you would like to add for this object.
G) When finished, click on the Apply button. (see screenshot below step 4)
NOTE: If you get a Access is denied message, then it means that you will need to take ownership of this object first and repeat the steps above.
H) Go to step 11 below.A) Select a listed permission entry that has <not inherited> under the Inherited From column, and click on Edit. (see screenshot below step 4)
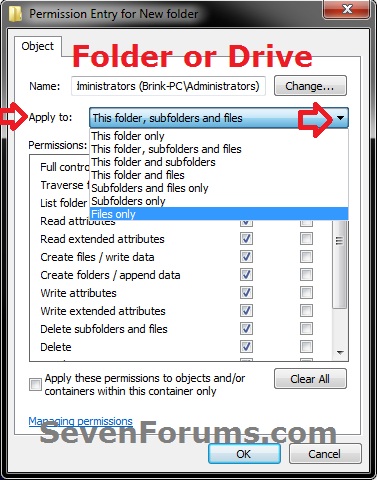
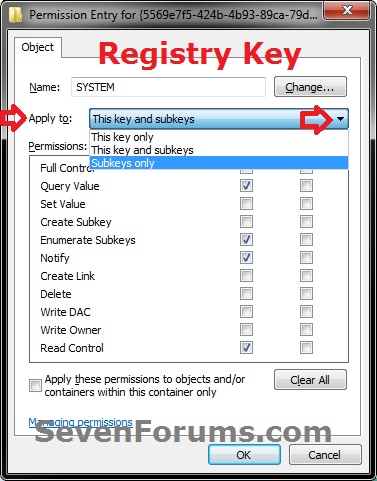
NOTE: Permission entries that are inherited will need to be have their permission settings changed from the object's parent instead, or remove them (step 6) and add explicit permission (step 10) entries to set for this object instead.B) Select the Apply to drop down menu item for how you would like to apply the permissions for this permission entry. (see screenshots below step 11E)12. If you like, check the Replace all child object permissions with inheritable permissions from this object box, and click on Apply. (see screenshot below step 4)
NOTE: You will not be able to select a Apply to item for a file object.
C) Check the Allow or Deny boxes for the items that you want to allow or deny permissions for the selected user or group (permission entry). (see screenshots below step 11E)
Note
- In most cases, Deny overrides Allow unless a folder is inheriting conflicting settings from different parents. In that case, the setting inherited from the parent closest to the object in it's full path will have precedence.
- Be sure to not deny permissions to or remove your user account for this object. Doing so could prevent you from having access to it.
- Be sure to not deny permissions to the Everyone group for this opbject. This will also include your user account.
- Be sure to not deny permissions to or remove TrustedInstaller, LOCAL SERVICE, RESTRICTED, SERVICE, or SYSTEM permission entries if listed. Doing so will prevent Windows from having access, and could cause Windows to not run properly afterwards.
- Checking the Full Control item will also check all items under either Allow or Deny.
D) If you like, depending on what you selected in step 11B, check the Apply these permissions to objects and/or containers within this container only box.
NOTE: This would be to apply only to say subfolders and files in this folder.
E) Click on OK. (see screenshots below)F) Click on Apply. (see screenshot below step 4)
NOTE: If you get a Access is denied message, then it means that you will need to take ownership of this object first and repeat the steps above.
NOTE: When checked, all permissions entries on this now parent object will replace (update) those on its descendant child objects (ex: subfolders, files, or subkeys). If left unchecked, permissions on each object, whether parent or its descendant, can be unique.A) Click on Yes. (see screenshot below)B) The Replace all child object permissions with inheritable permissions from this object check box will now automatically clear again by default, but it was still applied for these permission changes. (see screenshot below step 4)13. When finished, click on OK. (see screenshot below step 4)
14. If open, click on OK. (see screenshot below step 2C)
15. Click on OK. (see screenshot below step 2B or 3B)
Shawn Brink
Related Tutorials
- How to Audit User Access to Shared Folders on Your Computer
- How to Add or Remove the Security Tab from Properties in Windows 7
- How to Restore TrustedInstaller as Owner of a File in Vista and Windows 7
- How to Create a Take Ownership Shortcut in Windows 7
- How to Take Ownership of a Item in Vista and Windows 7
- How to Add or Remove User Accounts from Groups in Windows 7 and Vista
- How to Create and Delete a User Group in Windows 7 and Vista
- How to Add or Remove Users and Groups from "User Rights Assignment"
- How to Allow or Prevent Users and Groups to Take Ownership
- How to Enable or Disable Users from Connecting a USB Storage Device in Windows
- How to Turn Public Folder Sharing On or Off in Windows 7
- How to Turn Password Protected Sharing On or Off in Windows 7
Permissions - Allow or Deny Users and Groups
-
-
-
New #3
So what can you do if you have stupidly applied the deny write, modify, change permissions under everyone and created a system restore point for the wrong hard drive?
I applied these changes to my external hard drive that i am sharing on my network with all my music on it. Now i cannot add new music to it and keeps saying access denied.
after typing this i realised that i had changed the permission for the drive itself, but found that when changing the security settings for subfolders for applying the security change to allow write permission it keeps coming up with access denied. any ideas?
-
New #4
Hello Chobun, and welcome to Seven Forums.
You could do a system restore at boot using a restore point created before you made these permission changes to undo them.
Hope this helps,
Shawn
-
New #5
I've gone to permissions for my external hard drive and there's not a tab for security. What to do now?
-
New #6
Hello Shanson, and welcome to Seven Forums.
What file system (ex: FAT32 or NTFS) was your external HDD formatted with? If is not using the NTFS file system when it was formatted, then you will not have a Security tab available.
-
New #7
Distinct possibility it was FAT32. If reformatting as NTFS is a possibility, would backing up files on external drive be needed or would they remain untouched/harmed if I reformat?
-
New #8
Yep, you would need to backup anything that you did not want to lose on the HDD before formatting it. Formatting the HDD will delete everything on it.
-

Permissions - Allow or Deny Users and Groups
How to Allow or Deny Permissions to Users and GroupsPublished by Brink
Related Discussions








 Quote
Quote