Creating a Media-less Recovery / Installation Partition

CerealKiller

New member
Local time
12:50 AM
Messages
4
Location
Brisbane, Australia
After purchasing my new Student Version of Windows 7 Professional I was keen to do a full system format, and start fresh. I no longer had a need for the Dell Recovery Partition which contained Vista (and a decent amount of bloatware), so I removed all partitions from my disk to start with a blank 180GB HDD.

I thought to myself, if I am going to start fresh I might as well do things right and mimic Dell’s setup with a recovery partition of my own. Now to be fair, this isn’t an extremely wild idea as there are plenty of manufacturers and software companies who provide such solutions very simple and easy. Everyone knows that Norton Ghost is fantastic, and Acronis TrueImage is right there with them. Of course you can simply run-up Imagex along with WinPE and sysprep a WIM to re-image your HDD at anytime for a free solution. However, all these solutions require that you have some sort of recovery media for boot time operation, and the Imagex solution isn’t for the faint of heart. Now I do a lot of travel, and I wanted a solution that didn’t require me to look after a bootable DVD or USB stick, and because I am working with a laptop I didn’t have second disk which I could boot from via BIOS settings. My recovery solution had to be a Primary Partition on my only HDD with boot time options (in case my system is completely rooted.)

This turned out to be quite the challenge, as Windows 7 / Vista no longer support the simple easy boot.ini file that allows you to manually adjust boot time parameters. Instead Windows 7 / Vista have moved onto some fancy form of bootsect / BCD (Boot Configuration Data) which is very difficult to edit manually. Thankfully all of my hard work paid off and I now have a self sufficient system with all the diagnostics and re-imaging tools I could ever need. And thanks to Windows 7’s new Backup and Restore options, I was also able to include a system image which contained all of my settings and applications so that I don’t have to sit through 10 hours of Windows Update again.

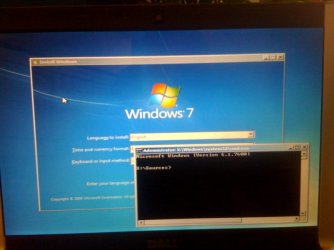
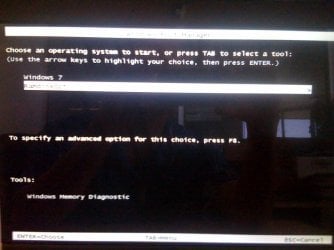
What I ended up with is a Primary partition on my HDD that is a full and complete bootable version of the Windows 7 installation media. When I choose this partition at boot time it is exactly as if I have inserted the Windows 7 Install DVD into my disk drive! I can utilise all of the tools in the Windows Recovery Console (which includes the option to restore from a previously created system image), or I can simply re-install Windows 7 from scratch - without affecting my restore partition or boot menu variables!

Hopefully this is useful to the community; personally it was exactly what I needed.

**Things to note**
I have yet to verify if this is possible with other versions / types of Windows 7. I started with the downloadable Windows 7 Professional Student Edition, and followed this guide to create a bootable .ISO from the files. I then extracted the contents of that .ISO to create my bootable partition. If you have any other version / type of Windows 7, please post in here and let us know if this works!

I did this on a 32-bit system, but I don’t see why a 64-bit system would differ.

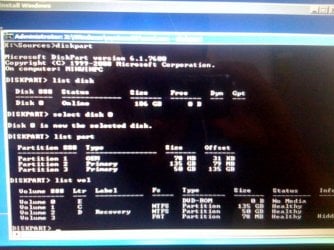
I manually created my partitions using DISKPART, in order to avoid the 100MB hidden partition that Windows creates automatically for use with ShadowCopy and BitLocker. I have no use for these features, and did not want the extra Primary Partition on my disk.

You must utilise only Primary Partitions. Logical or Extended Partitions will not work!

You must utilise Basic Disk. A Dynamic Disk will not work!

My apologies for the poor-quality photos!


Continue to the next post for the detailed tutorial....
 

My Computer My Computer

At a glance

Windows 7 Pro
Computer Manufacturer/Model Number
Dell XPS M1330
OS
Windows 7 Pro
Step 1.
Insert your Windows 7 Installation DVD and boot from it. When the first screen appears asking you for language and keyboard layout press “Shift + F10”. This will bring up a command prompt.
(See "Step1.jpg" attached.)


Step 2.
In the command prompt type ‘DISKPART’ to enter the DISKPART utility.
Type ‘list disk’ to see available hard drives.
Type ‘select disk [#]’ where the number is the disk that you want to install Windows.
Type ‘list part’ to see a list of partitions currently on the disk.

This is where we will delete all partitions that we no longer need. WARNING – You will lose all data that resides on these partitions. You may not be prompted with any “Confirm” dialogues as it is assumed if you are using DISKPART you are smart enough to know.

Type ‘delete partition [#]’ where the number is the partition you want to delete. Repeat this step until all partitions that you want to remove are gone.
(See Step2.jpg attached.)


Step 3.
We are now going to create all of the partitions that we will need on this disk. My disk consists of two Primary partitions. One is my C:\ drive where I will install Windows, and the other is my D:\ drive which I will name “Recovery”. I have decided to make my Recovery partition 50GB in size. This will accommodate the Windows 7 Install files, as well as a system image with all of my applications and Windows Updates applied.

I wanted my Windows 7 Partition to come first on the disk, so I need to create this partition first. Since I have a 180GB HDD, and I wanted a 50GB Recovery partition I created a 130GB partition first.

First make sure you have selected the correct disk. Type ‘select disk [#]’.

Type ‘create partition primary size=133120’ (The size here is in MB)

Now create the Recovery Partition

Type ‘create partition primary’. This will simply use up the rest of the remaining space, which was 50GB for me. To verify this has all worked properly you can again type ‘list partition’ and you should see your partitions, with a type of “Primary”. You can also type ‘list volume’, and you should see an “FS” of “RAW”.

Step 4.
Now that the partitions exist, we are going to format them both as NTFS.

Type ‘select partition [#]’ to select the first partition you created.
Type ‘format fs=ntfs label=”Windows 7” quick (The ‘label’ and ‘quick’ arguments are optional)

Now select the Recovery partition.

Type ‘select partition [#]’
Type ‘format fs=ntfs label=”Recovery” quick’

Again you can type ‘list partition’ and ‘list volume’ to verify.

Now we have finished playing with DISKPART. You can exit out of the command prompt and continue installing windows as normal. Be sure to select the correct partition when the installer asks you where to install. Simply leave the Recovery Partition alone for now; we will come back to it later.
(See Step4.jpg attached.)


Step 5.
Install Windows 7 as normal, making sure to install it to the correct partition (which you just created). Finish the install procedure and boot into Windows for the first time. Install all available Windows Updates. Activate your copy of Windows 7 to make it Genuine. Install any applications, drivers and/or files that you want to be part of your recoverable image. Adjust all of your settings in the Control Panel and generally configure any settings which you don’t want to have to re-do in the future. I also recommend that you Defragment your hard drive to optimize it as much as possible.

Step 6.
No we are going to begin working with the Recovery Partition. This step requires two things, A) Your Windows 7 Installation Disk and B) A copy of EasyBCD which you can download for free here: NeoSmart Technologies

Copy the ENTIRE contents of your Windows 7 Installation Disk onto your Recovery partition.

Install and run EasyBCD.


Step 7.
In EasyBCD you should only have a single entry in the Bootloader. It should look similar to the attached image at the very bottom of this post.

We are now going to add an entry to the Bootloader, so that we can boot from the Recovery Partition (which is – in effect – the Windows 7 Installation DVD!)

Navigate to the “Add Remove Entries” button on the left and select it.
Towards the bottom right, select the “WinPE” tab.
Change the Drop-Down menu for “Type” to “WIM Image (Ramdisk)”.
Name it anything you’d like. (I used “Install”)
In the path, select the Browse button and navigate to “D:\sources\boot.wim”.
Leave the “EMS Enabled” box unchecked, and press “Add Entry”.

Now your Bootloader should have 2 entries, and should look like the attached "Step7.3.gif".

You’re Done! In 7 easy steps, you have made a bootable partition out of the Windows 7 Installation Media! Next time you reboot, you will be prompted to choose which Partition you would like to boot from. After 30 seconds it will automatically choose your Windows 7 partition, and boot as usual. If you choose the other option “Ramdiskoptions”, it will act as if you have inserted your Windows 7 Install DVD!

P.S. – I don’t know why it is named “Ramdiskoptions” instead of “Install” as I specified, but I am not too concerned. If anyone figures out how to change this let us know!

Browse the rest of the attachments for screenshots!


Move onto the next post to customise things a bit further, including a System Image and adjusting bootloader timeouts.
 

Attachments

  • Step1.jpg
    Step1.jpg
    40.1 KB · Views: 305
  • Step7.3.GIF
    Step7.3.GIF
    78.7 KB · Views: 350
  • Step7.2.GIF
    Step7.2.GIF
    81.4 KB · Views: 385
  • Step7.1.GIF
    Step7.1.GIF
    3.7 KB · Views: 10,233
  • Step4.jpg
    Step4.jpg
    71 KB · Views: 288
  • Step2.jpg
    Step2.jpg
    49.9 KB · Views: 242
  • BootloadB.jpg
    BootloadB.jpg
    49.1 KB · Views: 266
  • BootloadA.jpg
    BootloadA.jpg
    49 KB · Views: 346
Last edited:

My Computer My Computer

At a glance

Windows 7 Pro
Computer Manufacturer/Model Number
Dell XPS M1330
OS
Windows 7 Pro
Create a System Image for recovering files and applications
Windows 7 now includes options for creating a full System Image so that you can restore from it in case your system becomes unstable. Unfortunately, in a normal install you would require the Windows 7 Install DVD in order to boot into the Recovery Console and deploy the image. Lucky for us, we have the Windows 7 Install DVD on a partition, so we can boot from that instead!

Navigate to your Control Panel and choose “Backup and Restore”.
On the left side choose “Create a System Image”.
Follow the prompts and place your system image on your Recovery Partition.

After copying the Windows 7 disk and creating my System Image, my Recovery Partition looks like the attached screenshot, "RecoveryDrive.gif"

If you want to deploy this, when you boot from your Recovery drive simply select “Repair” instead of “Install”. The Recovery Console will automatically locate the system image that you’ve created!

Modify the timeout value for the Bootloader
Open EasyBCD and navigate to “Change Settings”.
Here you can modify the bootloader timeout, the default OS and names / drive mappings.
I have set my timeout to 3 seconds so that it barely impacts my boot time.
(See "Step9.gif attached.)

Cheers mates, and thanks to SevenForums.com for tons of useful information that led me to this procedure! Hopefully my contribution is worthwhile, and I can give back to the community which helped me along my way!
 

Attachments

  • RecoveryDrive.GIF
    RecoveryDrive.GIF
    55.1 KB · Views: 321
  • Step9.GIF
    Step9.GIF
    99 KB · Views: 261

My Computer My Computer

At a glance

Windows 7 Pro
Computer Manufacturer/Model Number
Dell XPS M1330
OS
Windows 7 Pro
Man you are great....its pretty useful though i did not tried..but let me ask a simple question to continue further

"Copy the ENTIRE contents of your Windows 7 Installation Disk onto your Recovery partition"

what does that mean...can u plz explain...
more i m using the pirated win 7 to i hope it wont effect anything ???
 

My Computer My Computer

At a glance

windows 7
OS
windows 7
It literally means copy the entire disk contents.

Drop the DVD into your drive, right click on it and "Explore". The select everything (Ctrl + A), copy and paste to your recovery partition. (Ctrl + C , Ctrl + V)

Via a Command Prompt you can type the following (this example uses D:\ for your DVD drive, and R:\ for your recovery partition)

xcopy d:\* r:\ /H /Q /E
 

My Computer My Computer

At a glance

Windows 7 Pro
Computer Manufacturer/Model Number
Dell XPS M1330
OS
Windows 7 Pro
A simpler, though more expensive way:

Install Acronis True Image 2010.
Install the Acronis Recovery Manager.
Setup your backup schedule.
At boot time, Press F11 when prompted to do so, you're in the full Acronis recovery application.

You will have to Disable Defrag of Boot Files at Startup or every 3 days the F11 prompt disappears and you have to reinstall ARM.

Main advantage to doing it this way is you can restore to the last good backup you took rather then to a clean install state.


My Computer My Computer

At a glance

Windows 10 Pro X64Intel Quad Core i7-4770 @ 3.4Ghz16.0GB PC3-12800 DDR3 SDRAM 1600 MHzIntel Integrated HD Graphics
Computer type
PC/Desktop
Computer Manufacturer/Model Number
Lenovo IdeaCenter 450
OS
Windows 10 Pro X64
CPU
Intel Quad Core i7-4770 @ 3.4Ghz
Memory
16.0GB PC3-12800 DDR3 SDRAM 1600 MHz
Graphics Card(s)
Intel Integrated HD Graphics
Sound Card
Realtek HD Audio
Monitor(s) Displays
HP 22" LCD
Screen Resolution
1680 x 1050
Hard Drives
250GB Samsung EVO SATA-3 SSD
2TB Seagate ST2000DM001 SATA-2
1.5TB Seagate ST3150041AS SATA
Keyboard
Dell USB
Mouse
Lenovo USB
Internet Speed
Cable via Road Runner 3MB Upload, 30MB Download
Antivirus
Windows Defender, MBAM Pro, MBAE
Browser
Seamonkey
Other Info
UEFI/GPT
PLDS DVD-RW DH16AERSH
Thanx cerealkiller....but what does this mean....xcopy d:\* r:\ /H /Q /E
I mean Q, H, E ??? although now everything z clear.....
thnx again
Ztruker....thats a good way but its good to start from a clean setup rather than to restore....

regards,
 

My Computer My Computer

At a glance

windows 7
OS
windows 7

My Computers My Computers

  • At a glance

    7 X64i5 84002x8gb 3200mhz
    Computer type
    PC/Desktop
    OS
    7 X64
    CPU
    i5 8400
    Motherboard
    gigabyte b365m ds3h
    Memory
    2x8gb 3200mhz
    Hard Drives
    various
    PSU
    pure power 11 400w cm
    Case
    Coolermaster
    Cooling
    cryorig m9i
  • At a glance

    7x64g54008gb ddr4 2400
    Computer type
    PC/Desktop
    OS
    7x64
    CPU
    g5400
    Motherboard
    ga b365m ds3h
    Memory
    8gb ddr4 2400
    PSU
    xfx pro 450w
Looks like you actually have to install it to get the free key. Bummer, as I wanted to download it, get the key and save it for another time.
 

My Computer My Computer

At a glance

Windows 10 Pro X64Intel Quad Core i7-4770 @ 3.4Ghz16.0GB PC3-12800 DDR3 SDRAM 1600 MHzIntel Integrated HD Graphics
Computer type
PC/Desktop
Computer Manufacturer/Model Number
Lenovo IdeaCenter 450
OS
Windows 10 Pro X64
CPU
Intel Quad Core i7-4770 @ 3.4Ghz
Memory
16.0GB PC3-12800 DDR3 SDRAM 1600 MHz
Graphics Card(s)
Intel Integrated HD Graphics
Sound Card
Realtek HD Audio
Monitor(s) Displays
HP 22" LCD
Screen Resolution
1680 x 1050
Hard Drives
250GB Samsung EVO SATA-3 SSD
2TB Seagate ST2000DM001 SATA-2
1.5TB Seagate ST3150041AS SATA
Keyboard
Dell USB
Mouse
Lenovo USB
Internet Speed
Cable via Road Runner 3MB Upload, 30MB Download
Antivirus
Windows Defender, MBAM Pro, MBAE
Browser
Seamonkey
Other Info
UEFI/GPT
PLDS DVD-RW DH16AERSH
This worked awesome for me, ty for the advice. The Only question I have which i will probley find out any ways is if i boot from the restore partition will it reload the applications such as avg free and microsoft office that i put on, or should i do a back up of those files and save them to the restore partition
 

My Computer My Computer

At a glance

Windows 7 Professional
OS
Windows 7 Professional
This worked awesome for me, ty for the advice. The Only question I have which i will probley find out any ways is if i boot from the restore partition will it reload the applications such as avg free and microsoft office that i put on, or should i do a back up of those files and save them to the restore partition

NO.
Try this way.
Windows 7 OPK
But if you install AVG, it will be unusble.
 

My Computer My Computer

At a glance

ME/XP/Vista/Win7
OS
ME/XP/Vista/Win7
You don't need the full installer if you're going to store a WIn7 backup image in a Primary partition on the HD to reimage, just use the System Recovery Options placed on F8 Advanced Boot Options to "Recover Using an Image" and point the reimaging application to the stored image. If you have enough memory it will reimage the saved partitions. System Image Recovery

The image contains all of your programs, settings and any files you had when the image is created or updated. Backup Complete Computer - Create an Image Backup

Always store a copy of the image externally in case of HD failure.
 
Back
Top