Creating my own install dvd

Highlander

New member
Local time
8:59 PM
Messages
8
I apologize in advance if this subject had already been addressed.

As you all know, most new PCs come with a "RESTORE TO FACTORY IMAGE" set of DVDs, so when you are in trouble you use those DVDs and have a brand new system.

However, these "IMAGES" come full of junk.

What I want is to create my OWN IMAGE so, after instaling all my softwares and twicking WIN7 to my taste, if I ever want to reinstall i would get back to MY ORIGINAL image...

can you please help me?

Thanks in advance
 

My Computer

OS
W 7
Although not perhaps exactly what you are looking for the simplest way to achieve this is to make a system image of your running system.

This may be done via win7's own backup system or by use of one of many available 3rd party applications, both commercial and free.

Some of the 3rd party solutions will allow you to create this image directly to DVD or to transfer to DVD manually
 

My Computers

System One System Two

  • Computer type
    PC/Desktop
    Computer Manufacturer/Model Number
    ChillBlast - Custom to my design
    OS
    Windows 11 Pro x64 [Latest Release and Release Preview]
    CPU
    Ryzen 9 5950X, 3.8 - 5.2 MHz
    Motherboard
    Asus Prime X570-Pro
    Memory
    64GB [2 x 32GB] DDR4 3200MHz
    Graphics Card(s)
    4GB NVIDIA GEFORCE GTX 1650 Ti
    Sound Card
    On-board SPDIF to 5.1 System + HDMI [5.1 system]
    Monitor(s) Displays
    32" UHD 32 Bit HDR Monitor + 43" UHD 4K 32Bit HDR TV
    Screen Resolution
    2 x 3840 x 2160 @60Hz
    Hard Drives
    1TB M2 SSD OS, 500GB Fast Access SSD, 2 x 8TB Data + Various Externals from 1TB to 4TB, 10TB NAS
    PSU
    NZXT C750 80 PLUS Gold 750W Modular PSU
    Case
    Workstation Case [Matt Black]
    Cooling
    NZXT Kraken X63 280mm CPU Cooler +2x Quiet Case fans
    Keyboard
    Logitech Wireless MX Keys & K400 + others
    Mouse
    Logitech Wireless MX Master 3S
    Internet Speed
    920 MB Down 50 MB Up
    Antivirus
    BitDefender Total Security Pro
    Browser
    Chrome (always run latest Non-Beta)
    Other Info
    Also run ...
    Laptop - Quad 8GB - Windows 10 Pro x64
    Nexus 7 Android tablet x2
    Samsung 10.2" tablet
    Blackview TAB 8 4G Android Tablet c/w Keyboard
    Wacom Intuos Pro Medium Pen Pad
    Wacom Intuos Pro Small Pen Pad
    Wacom Expresskeys Remote
    Loopdeck+ Graphics Controller
    Shuttle Pro v2 Control
  • Computer type
    Laptop
    System Manufacturer/Model Number
    Dell XPS 17 10750H
    OS
    Windows 11 Pro x64 Latest RP
    CPU
    Intel I7 10750H 5.0GHz
    Motherboard
    Dell XPS
    Memory
    32GB [2x16GB] DDR4 2933 MHz
    Graphics Card(s)
    nVidia GTX1650Ti 4 GB GDDR6
    Sound Card
    Stock [Realtek] 4 Speaker
    Monitor(s) Displays
    17" IPS UHD+ Infinity Edge Touchscreen
    Screen Resolution
    3840 x 2400
    Hard Drives
    2TB M2 NVMe, 4TB External + various 500GB & 1TB External NVMe (also have access to spinner HDD from
    PSU
    Stock
    Case
    Stock XPS Aluminium & Carbon Fibre
    Cooling
    Stock - Active Fan Control
    Keyboard
    Backlit + Various Logitech
    Mouse
    Stock Track Pad + Logitech MX Trackball
    Internet Speed
    72 MB Down 18MB Up
    Browser
    Chrome
    Other Info
    Also run ...
    Laptop - Quad 8GB - Windows 10 Pro x64
    Nexus 7 Android tablet x2
    10.2" tablet
    Sony Z3 Android Smartphone
    Wacom Intuos Pro Medium Pen Pad
    Wacom Intuos Pro Small Pen Pad
    Wacom Expresskeys Remote
    Loopdeck+ Graphics Controller
    Shuttle Pro v2 Control Pad
    10TB NAS
Creating a System Recovery Disk in Windows 7: A step-by-step tutorial


Brien M. Posey
11.09.2009
Rating: -3.50- (out of 5)
spacer.gif

spacer.gif

Storage technology learning materials
spacer.gif
Digg This! StumbleUpon Del.icio.us
spacer.gif

spacer.gif

In a corporate environment, the IT staff isn't always responsible for backing up individual desktop computers. Even so, you may be able to benefit from creating a Windows 7 System Repair Disk. This disk, which is created through the Backup and Restore Center can be used to perform a bare-metal restore, and it can also be used for other diagnostic tasks. In this article, I will show you how to create and use a Windows 7 System Repair Disk that can be used for all of your Windows 7 systems.
The Backup and Restore Center
When you open the Backup and Restore Center, you will notice that the pane on the left contains options to create a system image (a system image is a type of backup that you can use to perform a bare-metal restore of Windows 7) and to create a System Repair Disk, as shown in Figure 1 below (click on image for full size).
Figure 1: The Backup and Restore Center
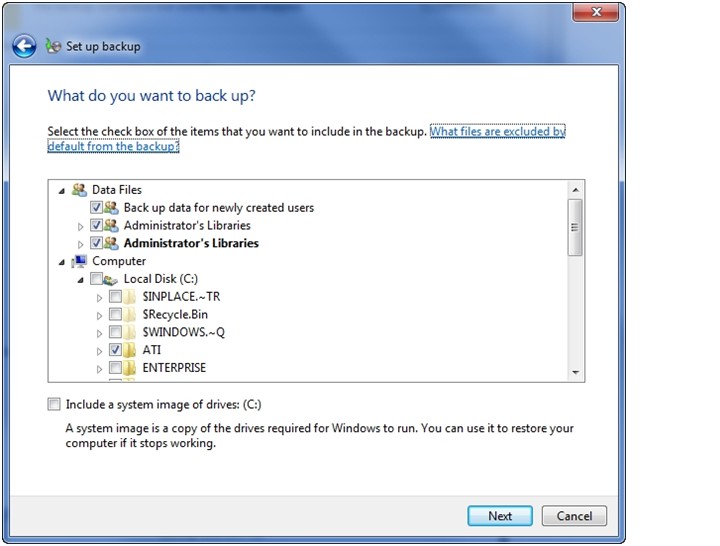
Windows Backup allows you to create a system image by clicking on the "Create System Image" link shown in Figure 1, but you can also include a system image within a regular backup. If you look at Figure 2 below (click on image for full size), you will notice that there is a checkbox at the bottom of the screen that you can use to include a system image as a part of your backup.
Figure 2: Including a system image within a regular backup
Windows Backup makes it easy to create either a standalone system image or to include a system image with a regular backup. But having a system image does you no good if you can't restore it. The reason why the option to create a system repair disk is located just below the option to create a system image (in Figure 1) is because you can use the system repair disk to restore your system image. There are actually several other things that you can use the system repair disk for. But before I show you what the system repair disk can be used for, let me show you how to create one. Ideally, it is good to have both a system image and a regular backup. You can use the regular backup to restore individual files and folders, while the system image is used for bare-metal recovery.
Creating a System Repair Disk
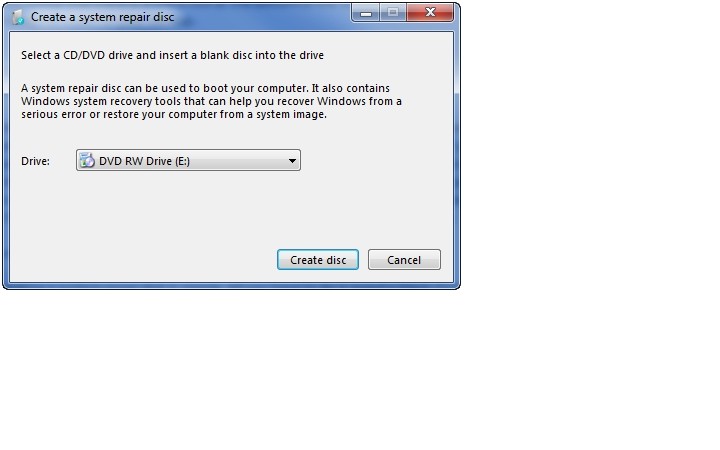
To create a system repair disk, insert a blank DVD into your computer, and then click the "Create a System Repair Disk" option found in the Backup and Restore Center. When you do, Windows will display the dialog box shown in Figure 3 below (click on image for full size). To complete the process, just select your DVD drive from the drop-down list and click the "Create Disc" button.
Figure 3: Creating a System Repair Disk
Using the System Repair Disk
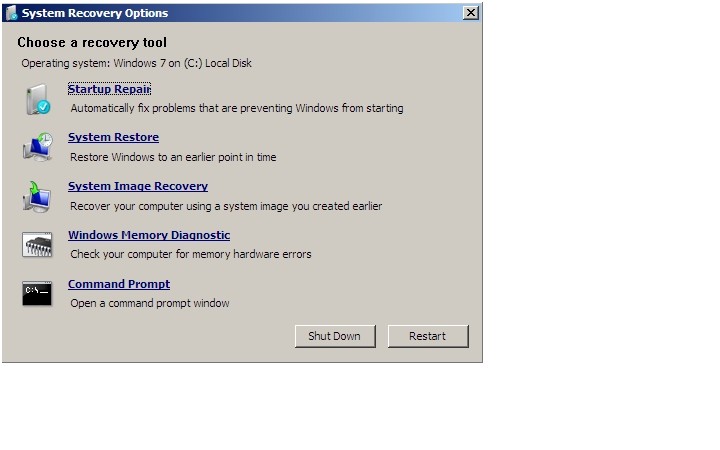
As I mentioned earlier, the system repair disk is designed to facilitate a bare-metal recovery. Windows 7 gives you the option of creating a system image as a part of the backup process. You can't restore that system image without a repair disk. Therefore, you don't even have to have Windows installed in order to use it. Simply insert the disk into a PC and boot from it. When you do, you will be taken to the System Recovery Options screen, shown in Figure 4 below (click on image for full size).
Figure 4: The System Recovery Options screen
Obviously, the option on this screen that tends to draw the most attention is the System Image Recovery option. This is the option that you would use if you wanted to restore a system image. In a corporate environment, however, it is much more likely that you would benefit from the other optionsbecause it is rare for corporations to back up individual workstations. Most of the time if a failure occurs, the workstation is simply re-imaged rather than restored.
The first option available to you is the Startup Repair option. Clicking on this option causes Windows to attempts to detect and repair any boot problems that may prevent Windows 7 from loading properly.
The second option on the list is the System Restore option. The system restore feature periodically takes snapshots of the Windows operating system. Snapshots are also automatically created prior to performing some tasks that make major changes to the operating system, such as installing a service pack. The idea is that if problems occur, you can roll the system back to an earlier point in time before the problem occurred. Sometimes though, when a problem does occur, it may be severe enough to prevent Windows from booting. Using the System Repair Disk gives you access to any available recovery points from outside of the Windows operating system.
For these three options, none of these disks need to be created beforehand. System recovery points are an internal Windows mechanism. The System Repair Disk just helps you to get to those recovery points if the system won't boot.
The second to the last option on the System Recovery Options screen is the Windows Memory Diagnostic option. My experience has been that if users suddenly start receiving the Blue Screen of Death, and no changes have recently been made to the operating system, then the problem is almost always caused by memory errors. Having a diagnostic utility that you can run from outside of the Windows operating system makes memory errors much easier to detect.
The last option is the Command Prompt option. Those who are familiar with DOS commands can use the Command Prompt to assess the state of the file system, extract data, or make repairs to the operating system.
Although the System Repair Disk is primarily thought of as a mechanism for restoring system image backups, it can also be used as a mechanism for diagnosing and repairing problems with the Windows operating system. This is especially useful when no system image exists or when you do not want to overwrite the operating system's current configuration with a previous system image.
About the author: Brien M. Posey, MCSE, has previously received Microsoft's MVP award for Exchange Server, Windows Server and Internet Information Server (IIS). Brien has served as CIO for a nationwide chain of hospitals and was once responsible for the Department of Information Management at Fort Knox. You can visit Brien's personal website at www.brienposey.com.
 

My Computer

Computer Manufacturer/Model Number
Black_Box (homebuilt)
OS
windows 7 RTM x64
CPU
Phenom II 965 Quad Core 3.4Ghz
Motherboard
Asus M4A79T Deluxe
Memory
Mushkin Blackline 8GB (4x2gb)
Graphics Card(s)
XFX Radeon 5970 Black Edition
Sound Card
onboard
Monitor(s) Displays
Dell 2408WPF-main Dell E248WFP-secondary
Screen Resolution
1920x1200-main 1920x1200-secondary
Hard Drives
OCZ Vertex Limited Edition 100GB (OS)
x1 WD Black Edition 500GB drive (Storage)
PSU
XFX 850w Black Edition (Modular)
Case
Mountian Mods H2go
Cooling
CoolITSystems ECO A.L.C.
Keyboard
Logitech MX 5500 wireless keyboard
Mouse
Razor Copperhead
Internet Speed
16Mb down/2Mb up Wowway Cable Internet
Perform a clean installation of Windows using those discs.

Then run PC Decrapifier to automatically seek and out and delete all bundleware. You can use Revo Uninstaller to remove all traces (registry and leftover files) of unwanted applications. Then, use Ninite or FreeNew to set up your most commonly-used applications in one fell swoop. When you're done customizing everything to your taste, you can backup everything using a System Image or any other desired method.

Windows 7: How to Create a System Image of a Hard Disk Partition or Windows 7 Partition

- Fred
 

My Computer

OS
Windows 7 Enterprise 64-bit
CPU
AMD Phenom II X4 3.0GHz
Motherboard
ASUS M5A97
Memory
8GB G-Skill Ripjaws DDR3 1333
Graphics Card(s)
PNY GeForce 460 GTX 1GB OC - Enthusiast Edition
Sound Card
VIA High Definition Audio
Monitor(s) Displays
Dell 19"
Screen Resolution
1280x1024
Hard Drives
1TB - Primary
160GB - Secondary
250GB - External backup for important files
PSU
OCZ Fata1ty 700W Modular PSU
Case
ASUS
Keyboard
Microsoft Wireless Keyboard 2000
Mouse
Microsoft Wireless Mouse 2000
Internet Speed
3 Mbps/768 kbps
A guy on another board who builds his own systems takes this approach. He does an image backup using Macrium Reflect. He puts a new HD in a USB docking station that is the same as the internal HD in his PC. He restores the Macrium image to the drive in the dock.

If his HD fails he opens the box and puts in the one from the docking station.

Of course since he built his own PC it's easy to R&R the HD. But if you have a spare optical drive bay you could put in one of the quick drive trays that lets you take 3 1/2" HD out and put a new one in with just latches.
 

My Computer

Computer Manufacturer/Model Number
HP Media Center
OS
Windows 7 32 bit
CPU
AMD 5200+ dual core
Memory
2 GB
Graphics Card(s)
NVidia GeForce 6150SE 128 MB
Monitor(s) Displays
CRT
Screen Resolution
1280x1024
Hard Drives
500 GB Sata internal :

SIIG USB 3.0 docking stations w/WD Caviar Black 6 Gb/s drives
Keyboard
PS/2
Mouse
PS/2 Wheel Mouse
Other Info
SIIG USB 3.0 PCIexpress card.
wow, thank you all for such speedy replies I will now see what works best for me.

Thanks again!
 

My Computer

OS
W 7
wow, thank you all for such speedy replies I will now see what works best for me.

Thanks again!

When you get set up please post what you did and how it came out so others can learn from your experience. :)
 

My Computer

Computer Manufacturer/Model Number
HP Media Center
OS
Windows 7 32 bit
CPU
AMD 5200+ dual core
Memory
2 GB
Graphics Card(s)
NVidia GeForce 6150SE 128 MB
Monitor(s) Displays
CRT
Screen Resolution
1280x1024
Hard Drives
500 GB Sata internal :

SIIG USB 3.0 docking stations w/WD Caviar Black 6 Gb/s drives
Keyboard
PS/2
Mouse
PS/2 Wheel Mouse
Other Info
SIIG USB 3.0 PCIexpress card.
In case you want to use Macrium, here is a little starter tutorial that I had posted for the purpose. If you choose DVDs for your image, Macrium creates them directly. You will see it is extra simple to do.
When you want to restore, you first insert the recovery CD which you should burn asap. Once the recovery program is loaded, the CD/DVD reader is opened and you can insert your image DVD(s). This does not always seem to work with the Windows7 native facility as some people have reported - so then you are stuck and cannot recover.
In any case, regardless which approach you choose, I recommend to test the whole cycle (image creation > recovery) on a small partition that you can easily create and copy some data into it. I usually just create a temporary 3GB partition for the purpose and copy any set of folders into it. After I took the image, I delete a couple of folders and proceed with the recovery. If the folders are back after the recovery, I know it has worked correctly. Just make sure you do NOT mark the partition as "active" during the recovery process ( the recovery program will ask the question).
 

My Computer

Computer Manufacturer/Model Number
HP, Dell, Gateway, Toshiba - 4 laptops and 2 desktops
OS
Vista, Windows7, Mint Mate, Zorin, Windows 8
CPU
from 1.6GHz Duo to i7
Monitor(s) Displays
2x HP w2207
Hard Drives
5x HDD, 7x SSD, 12x Externals
Keyboard
with trackball - no mices
Mouse
Trackball mice
Internet Speed
DSL 6000
Hi guys, I am now ready but before I proceed let me ask you one last naive question, these will be BOOTABLE dvds right? All I have to do is to use delete my partitions and restart the computer, is that correct?
 

My Computer

OS
W 7
Hi guys, I am now ready but before I proceed let me ask you one last naive question, these will be BOOTABLE dvds right? All I have to do is to use delete my partitions and restart the computer, is that correct?

If you refer to images, that's not how it works. The image will be written to an external disk, another internal disk, another internal disk partition or DVDs. When you want to recover, you load the CD with the recovery program that you burnt from the imaging program and tell it where the image resides. In case you burnt the image to DVDs, you give the DVD reader as reference. It will then load the recovery program from the CD, release the CD/DVD reader when it's done loading (takes only a minute or so) for you to put in the first DVD with the image (you will most likely have several image DVDs because of the size of the image). The recovery program then copies your image back to the partition that you told it to copy to. No need to delete that partition beforehand. The recovery program will ask you a few more questions like whether you want the image to be verified, whether you want to copy the MBR (recommended), etc. But it is no rocket science.
As I said before, try it out with a test partition so that you have no surprises with the real thing.
 

My Computer

Computer Manufacturer/Model Number
HP, Dell, Gateway, Toshiba - 4 laptops and 2 desktops
OS
Vista, Windows7, Mint Mate, Zorin, Windows 8
CPU
from 1.6GHz Duo to i7
Monitor(s) Displays
2x HP w2207
Hard Drives
5x HDD, 7x SSD, 12x Externals
Keyboard
with trackball - no mices
Mouse
Trackball mice
Internet Speed
DSL 6000
WOW!!!!

Hi guys, here I am, typing from my brand new image, lol...
Well, i took a few sensible steps first as i wanted it to be more of a long term solution.

I have reformated mu PC, and installed all I needed, then I ran the windows update etc...
Once my system was smoth and up to date i did the following:

1- made a system repair disk
2- made a system image disk (included data only from C:\)
3- to make sure there would be "no cheating" i deleted my C partition using my WIN7 install DVD
4- Reboted the PC with the SYS REPAIR disk wich asked me to insert the IMAGE disk.
5- the Image Disk was "copied" and the pc restarted as it was previously...

NEAT!

So far worked extremelly well and faster than a fresh install and saved me from going through all trouble customising to my taste, with my software, etc....
Actually this was so effective that i did no use ANY 3rd patry software. I had try the first optin and I must say that's all I needed!

THANK YOU ALL!!!
 

My Computer

OS
W 7
I just forgot to mention, so good it was my Firefox opened here at this page.... lol
 

My Computer

OS
W 7
Well, congratulations. Do I understand that you used Windows7 imaging? And how many DVDs did you need for the image?
 

My Computer

Computer Manufacturer/Model Number
HP, Dell, Gateway, Toshiba - 4 laptops and 2 desktops
OS
Vista, Windows7, Mint Mate, Zorin, Windows 8
CPU
from 1.6GHz Duo to i7
Monitor(s) Displays
2x HP w2207
Hard Drives
5x HDD, 7x SSD, 12x Externals
Keyboard
with trackball - no mices
Mouse
Trackball mice
Internet Speed
DSL 6000
In removing the crapware from your original installation, use Revo Uninstaller to get the hidden registry entries and files which uninstall sometimes leaves behind.

Most tech enthusiasts find a clean-copy installer with their version Win7 to clean reinstall without the crapware corruption which can occur even by uninstalling it. Activate using the OEM key on the WIN7 COA sticker on the computer.

The standard to use for whether you need a clean reinstall might be whether Win7 is instantaneous and never hangs, as we have come to expect after over a year's experience.

Any missing drivers or favorite apps can be found on the Support Downloads webpage for your model computer. Back up installed Drivers file in Windows>System32 to be sure.

This doesn't all need to be done overnight, it is a process that evolves as your knowledge and skills evolve. You are off to a very good start.
 
Congrats dude :thumbsup: The fact you did it with no third party software is awesome. How did you remove all the crapware that came on the original disc?
 

My Computer

OS
Windows 7 Enterprise 64-bit
CPU
AMD Phenom II X4 3.0GHz
Motherboard
ASUS M5A97
Memory
8GB G-Skill Ripjaws DDR3 1333
Graphics Card(s)
PNY GeForce 460 GTX 1GB OC - Enthusiast Edition
Sound Card
VIA High Definition Audio
Monitor(s) Displays
Dell 19"
Screen Resolution
1280x1024
Hard Drives
1TB - Primary
160GB - Secondary
250GB - External backup for important files
PSU
OCZ Fata1ty 700W Modular PSU
Case
ASUS
Keyboard
Microsoft Wireless Keyboard 2000
Mouse
Microsoft Wireless Mouse 2000
Internet Speed
3 Mbps/768 kbps

My Computer

Computer Manufacturer/Model Number
Custom
OS
Windows 7 Ultimate Signature Edition
CPU
Intel Core i7 Extreme 3.33GHz
Motherboard
EVGA X-58 SLI Classified
Memory
12GB DDR3
Graphics Card(s)
2x EVGA 285 2GB in SLI
Sound Card
Creative Labs X-Fi ExtremeGamer
Monitor(s) Displays
30" Viewsonic
Hard Drives
2x1TB Western Digital 7200RPM in RAID 0/1TB WD My Book External HDD
PSU
Thermaltake 1000w supporting quad SLI
Case
Thermaltake Armor Full Tower
Cooling
Thermaltake V1 CPU+DIY Liquid cooling
I used both PC decrapifier and Revo Uninstall....
My image had one DVD and another one for the SYS repaier.
My C drive ghad only 21 GB
 

My Computer

OS
W 7
I used both PC decrapifier and Revo Uninstall....
My image had one DVD and another one for the SYS repaier.
My C drive ghad only 21 GB

Awesome. I'm glad it all worked out for you :)
Enjoy your cleaner, faster system.

- Fred
 

My Computer

OS
Windows 7 Enterprise 64-bit
CPU
AMD Phenom II X4 3.0GHz
Motherboard
ASUS M5A97
Memory
8GB G-Skill Ripjaws DDR3 1333
Graphics Card(s)
PNY GeForce 460 GTX 1GB OC - Enthusiast Edition
Sound Card
VIA High Definition Audio
Monitor(s) Displays
Dell 19"
Screen Resolution
1280x1024
Hard Drives
1TB - Primary
160GB - Secondary
250GB - External backup for important files
PSU
OCZ Fata1ty 700W Modular PSU
Case
ASUS
Keyboard
Microsoft Wireless Keyboard 2000
Mouse
Microsoft Wireless Mouse 2000
Internet Speed
3 Mbps/768 kbps
Back
Top