Earlier Version of Windows - edit sub menu

Sherry0

New member
Local time
8:48 AM
Messages
7
I have a minimal installation of Windows XP here, since I had to install it before I could "upgrade" to Windows 7. In addition, I have partitions which contain an exact copy of my old Win2K and WinXP installations (using Paragon Hard Disk Manager).

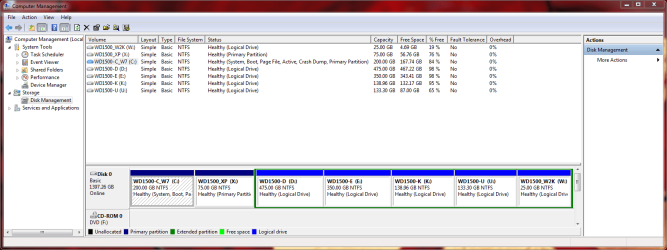
The OS Selections menu on boot up shows both "Windows 7" and "Earlier Version of Windows", but only Windows 7 shows in EasyBCD or msconfig when running on Windows 7. If I select "Earlier Version of Windows" I get another sub menu with my minimal WinXP, then 4 identical selections of "Microsoft WinXP", and finally one for the old Win2K and WinXP in their individual partitions. The first 5 boot successfully into my minimal WinXP. Neither of the last 2 will boot successfully, though I was hoping to eventually enable them using EasyBCD.

I tried running msconfig in WinXP. This does show the full set of secondary selections, but there is no option to remove any of the entries there. I cannot find a boot.ini file in any partition on the HDD. Where is this secondary selection menu hiding, and how do I get rid of the things there that are not functional?

Thanks for your help.
 

My Computer My Computer

Computer Manufacturer/Model Number
DIY
OS
Windows 7 Home Premium 64-bit
CPU
AMD Phenom II X4 965
Motherboard
Asus M4A89GTD Pro/USB3
Memory
2x2Gb
Hello Sherry0, welcome to Seven Forums!


Before we make any specific recommendations will you please post a snip/screen-shot of the entire disk management drive map with a full description as to which drive/partition is which, so we can see what you actually have going.

In the Windows start menu right click computer and click manage, in the left pane of the "Computer Management" window that opens click disk management and post a snip of that.


How to Upload and Post a Screenshot and File in Seven Forums
 

My Computer My Computer

Computer Manufacturer/Model Number
* BFK Customs *
OS
W 7 64-bit Ultimate
CPU
Intel Q9550 Yorkfield
Motherboard
ASUS P5Q Pro
Memory
8GB Dominator 8500C5D
Graphics Card(s)
ATI : XFX 5870
Sound Card
Realtek HD Audio 7-1
Monitor(s) Displays
1x 47" LCD HDMI & 3x 26" LCD HDMI
Screen Resolution
1920x1080P & 1920x1200
Hard Drives
1x 80GB Intel X25-M G2 SSD : 1x 500GB & 1x 640GB WD Caviar Black(s)
PSU
Corsair 620HX
Case
Cooler Master RC-690
Cooling
Tuniq Tower 120, 2x 140mm and 3x 120mm case fans
Keyboard
Microsoft 500
Mouse
Razer Diamondback 3G
Internet Speed
14 Mb/s
Other Info
1x Koutech 3Gb/s SATA HDD Hot Swap Rack
I use the computer for a variety of different activities, and prefer to segregate files/applications on separate partitions.

Y: is the original minimal WinXP on partition 1
C: is my current Win7 OS drive on partition 2
D:, E:, K: (partitions 3, 4, 5) are dedicated work partitions
U: (partition 6) is an archive of programs and data from the old computer
W: (partition 7) is the archive of my old, old computer's Win2K
X: (partition 8) is the archive of my old computer's WinXP.
There's currently some unallocated space between partitions 7 & 8 which will be merged into partition 8 so I can boot into WinXP with enough head space to occasionally run tests which require a native OS there.

I'm not exactly sure why the last two partitions will not boot. They should be clones of the original OS partitions from the old computer's HDD. I was planning to try to use the WinXP install media to run a repair on partition 8 to try to get it into bootable state. And if that works, do the same with the original install media for Win2K.

I'd like to get the boot manager issues fixed up before I do any additional configuration, but again, there does not seem to be a boot.ini file in sight, and msconfig on WinXP will not let me delete entries, or even rename them. It only lets me move them up/down in the list.

Thanks.
 

Attachments

  • CM_partitions.png
    CM_partitions.png
    41.4 KB · Views: 78

My Computer My Computer

Computer Manufacturer/Model Number
DIY
OS
Windows 7 Home Premium 64-bit
CPU
AMD Phenom II X4 965
Motherboard
Asus M4A89GTD Pro/USB3
Memory
2x2Gb
Hello Sherry.


You have so much going on, let's do this to see how it sorts out.

The boot repair utility is automated in Windows 7 now so the first thing to do is see if Windows 7 will repair the boot situation on its own.

First as outlined in Option One of this tutorial at the link below, assuming you have a Windows 7 installation disk or a created repair disk mark the Windows 7 partition as Active then run the 3 separate startup repairs with the separate restarts to write the system boot files to the Windows 7 partition.

Startup Repair - Run 3 Separate Times


BTW you don't have to actually have an earlier version of Windows installed to do a clean install of Windows 7, you just have to own it.

Do a Clean Install with a Upgrade Windows 7 Version


Be sure to post back here with an update.
 

My Computer My Computer

Computer Manufacturer/Model Number
* BFK Customs *
OS
W 7 64-bit Ultimate
CPU
Intel Q9550 Yorkfield
Motherboard
ASUS P5Q Pro
Memory
8GB Dominator 8500C5D
Graphics Card(s)
ATI : XFX 5870
Sound Card
Realtek HD Audio 7-1
Monitor(s) Displays
1x 47" LCD HDMI & 3x 26" LCD HDMI
Screen Resolution
1920x1080P & 1920x1200
Hard Drives
1x 80GB Intel X25-M G2 SSD : 1x 500GB & 1x 640GB WD Caviar Black(s)
PSU
Corsair 620HX
Case
Cooler Master RC-690
Cooling
Tuniq Tower 120, 2x 140mm and 3x 120mm case fans
Keyboard
Microsoft 500
Mouse
Razer Diamondback 3G
Internet Speed
14 Mb/s
Other Info
1x Koutech 3Gb/s SATA HDD Hot Swap Rack
I did the Startup Repair as suggested (3 times, even though it reported no problems after the first time). That removed the "Earlier Version of Windows" option from the main boot menu. Since I really don't need/want that, and it seems I would not have had the installation problems I had if I had done the initial install without checking the "Automatically activate Windows when I'm online", I removed my minimal WinXP install partition and made sure everything would reboot into Win7.

Then I removed and re-copied the WinXP partition from my old hard drive using Paragon's Hard Drive Manager, making sure the X: partition was a primary partition. It's now partition 2 on HDD 0. This reported scanning the drive for versions of Windows, and updating the partition letters in the system hive on HDD 0, partitions 0, 1 and 7. I wish I knew exactly where these "system hives" are located, but the result of this operation was the creation of a new entry in the main boot menu, with a secondary selection menu of
Windows XP on W:
Windows XP on X:
(Of course, it really is Windows 2000 on W:, and Windows XP on X:)

Note that I also copied ntdetect.com and ntldr into the root of the X: partition, based on other things I have read about dual-boot issues. Unfortunately, selecting either of these secondary options results in a black screen with text complaining that the following file is missing or corrupt.
System root \System32\ntoskrnl.exe
In fact, the file does exist in that location on both the Win2K and WinXP partitions.

Then I tried using EasyBCD to add another selection to the main boot menu. The details from that utility now show the following:

There are a total of 3 entries listed in the bootloader.

Default: Microsoft Windows 7
Timeout: 10 seconds
EasyBCD Boot Device: C:\

Entry #1
Name: Microsoft Windows 7
BCD ID: {current}
Drive: C:\
Bootloader Path: \Windows\system32\winload.exe

Entry #2
Name: Other Windows OS (scanned)
BCD ID: {873b7d02-4e8b-11e0-8a02-20cf307ed7e2}
Drive: X:\
Bootloader Path: \ntldr

Entry #3
Name: Windows XP (ezBCD)
BCD ID: {873b7d03-4e8b-11e0-8a02-20cf307ed7e2}
Drive: C:\
Bootloader Path: \NST\easyldr2

Unfortunately selecting this new option in the main boot menu does not boot WinXP either. This time what I get is the WinXP welcome screen for a few seconds, followed by the equivalent of a reset which results in the computer starting over from POST.

I don't need to boot Win2K, but I do need access to a native WinXP. I would rather not have the boot process dependent on EasyBCD tools. It seems I need to somehow edit these "system hives" but I have no idea how. Does bcdedit itself have access to these?

Thanks for your help.
 

My Computer My Computer

Computer Manufacturer/Model Number
DIY
OS
Windows 7 Home Premium 64-bit
CPU
AMD Phenom II X4 965
Motherboard
Asus M4A89GTD Pro/USB3
Memory
2x2Gb
Hi Sherry,

The system hive is in Windows\System32\Config.

I don't recommend digging around in there.

If we can see a new Disk Management screenie showing your present situation - we may be able to advise how to get a 7/xp dual boot going.

This bcd xp entry should be pointing at the system partition.

Name: Windows XP (ezBCD)

I assume you have named your system partition X from the earlier screenie.
 

My Computers My Computers

System One System Two

  • Computer type
    PC/Desktop
    OS
    7 X64
    CPU
    i5 8400
    Motherboard
    gigabyte b365m ds3h
    Memory
    2x8gb 3200mhz
    Hard Drives
    various
    PSU
    pure power 11 400w cm
    Case
    Coolermaster
    Cooling
    cryorig m9i
  • Computer type
    PC/Desktop
    OS
    7x64
    CPU
    g5400
    Motherboard
    ga b365m ds3h
    Memory
    8gb ddr4 2400
    PSU
    xfx pro 450w
If by "pointing at the system partition", you mean the Win7 system partition - that is still C:. It's the same general approach -
C: = Win7 system installation
X: = prior WinXP system installation (for dual-boot)
D:, E:, K: = segregated work
U: = archive old programs/data
W: = archive old Win2K installation
I've dropped the unnecessary Y: = minimal WinXP install, and both C: and X: are primary partitions.

I would rather not have my boot sequence permanently bound to EasyBCD. I prefer to get the EasyBCD programs (\NST\easyldr2) out of the mix, and I assume I will need to use the bcdedit command line to do this, which is fine as long as I understand what the commands are doing. Since the Paragon HDM seems to fish for Windows installations every time it alters the hard drive, it's looking like I will need to do the fixup any time I need to re-partition things again.

I'm still a little confused about how this all fits together. Seems it's still NTLDR doing the work for prior Windows systems, but there is no longer any boot.ini to hold the metadata. Can bcdedit, running from Win7, update the system hive which contains the secondary menu of prior windows versions, or is there something I will need to do from WinXP (assuming I can eventually get it to boot)?

In addition, the warning about needing to change the Registry as a workaround to avoid losing restore points when WinXP boots makes the dual-boot scenario seem fragile at best. Perhaps I should plan to keep the old WinXP box around and just use it (with the original OS installed) as my occasional test platform.

Guess I have to ask if Win7/WinXP dual-boot is really worth the trouble or risk?

I really appreciate the help.
 

Attachments

  • CM_partitions_2.PNG
    CM_partitions_2.PNG
    41.1 KB · Views: 21

My Computer My Computer

Computer Manufacturer/Model Number
DIY
OS
Windows 7 Home Premium 64-bit
CPU
AMD Phenom II X4 965
Motherboard
Asus M4A89GTD Pro/USB3
Memory
2x2Gb
Hi Sherry,

All your boot files need to be on C:

bootmgr and boot folder ( for win 7 ) are there already.

ntldr, ntdetect.com and boot .ini ( for xp ) also need to be on C.

The boot.ini entry needs to point at XP

like this: View attachment XP.zip

Extract the zip and copy all 3 files directly onto c: - overwrite if prompted.
 

My Computers My Computers

System One System Two

  • Computer type
    PC/Desktop
    OS
    7 X64
    CPU
    i5 8400
    Motherboard
    gigabyte b365m ds3h
    Memory
    2x8gb 3200mhz
    Hard Drives
    various
    PSU
    pure power 11 400w cm
    Case
    Coolermaster
    Cooling
    cryorig m9i
  • Computer type
    PC/Desktop
    OS
    7x64
    CPU
    g5400
    Motherboard
    ga b365m ds3h
    Memory
    8gb ddr4 2400
    PSU
    xfx pro 450w
To set up the bcd entry, open an elevated command prompt, and type, or copy and paste (press enter after each line )

bcdedit /delete {ntldr} /f

bcdedit /create {ntldr} -d "Windows XP"

bcdedit /set {ntldr} device boot

bcdedit /set {ntldr} path \ntldr

bcdedit /displayorder {ntldr} /addlast
 

My Computers My Computers

System One System Two

  • Computer type
    PC/Desktop
    OS
    7 X64
    CPU
    i5 8400
    Motherboard
    gigabyte b365m ds3h
    Memory
    2x8gb 3200mhz
    Hard Drives
    various
    PSU
    pure power 11 400w cm
    Case
    Coolermaster
    Cooling
    cryorig m9i
  • Computer type
    PC/Desktop
    OS
    7x64
    CPU
    g5400
    Motherboard
    ga b365m ds3h
    Memory
    8gb ddr4 2400
    PSU
    xfx pro 450w
OK, that explains a bit more about how this fits together. I can remove EasyBCD now since boot no longer depends on it.

I still can't get WinXP to successfully boot, though. It still seems to do a reset right after displaying the welcome screen. I can get it to boot into Safe Mode from the selections presented as a result of the Windows failure, but there is no keyboard or mouse after Windows starts. Safe Mode with logging seems to get stuck while loading drivers, so I have to conclude that there's a big enough difference in hardware between the old and new machines that the drivers in the old WinXP installation are not good enough.

I guess I'll just keep the old Dell 8100 around as a test machine with a minimal WinXP installed there. Simpler all around and no risk of damaging my Win7 when booting WinXP.

Thanks very much for your assistance.
 

My Computer My Computer

Computer Manufacturer/Model Number
DIY
OS
Windows 7 Home Premium 64-bit
CPU
AMD Phenom II X4 965
Motherboard
Asus M4A89GTD Pro/USB3
Memory
2x2Gb
Back
Top