How to Create Custom Start Orb Image

How to Create a Custom Start Orb

Before I begin, keep in mind this is my first tutorial ever published to SevenForums, I hope it meets the requirements and all that jazz, and that somebody finds it at least mildly helpful.
picture.php


Requirements and Tools

To begin with, you must have an image editing application, PhotoShop is one of the most powerful and widely known, but any application that works with bitmaps (BMP) and supports alpha trasparency layers will do just fine.

   Warning
Be sure to check your DPI settings before you continue; DPI settings (Dots Per Inch) in Windows determine the size that everything on your desktop displays, making text and buttons larger without changing the screen resolution.

You can generally see what DPI you're using by the size of your current Start Orb and Taskbar, below is an example of the same resolution with three DPI settings:

picture.php

However, if you're not sure and want to double check: Right click on your desktop and select Screen Resolution, in this windows, click the link labeled Make text and other items larger or smaller, as seen here:

picture.php

The next page displayed will show your currently selected DPI setting:

picture.php

Depending on your selected DPI, you will need to create a Start Orb using one of the following image sizes:

  • 100% DPI - use 54 x 162px
  • 125% DPI - use 66 x 198px
  • 150% DPI - use 81 x 243px
For the purpose of this tutorial, I will be working with the standard 100% DPI.


The Start Orb

Create a new image with the following settings:

picture.php

   Note
* To fit the standard DPI Windows 7 Start Orb, the picture size must be 54x162.
* The 'Resolution' setting is an interesting one; 100% DPI in Windows is 96DPI, I haven't found any difference between using 72 and 96, but some may prefer to stick to the same DPI as Windows itself uses. This is entirely up to you. Just keep in mind the higher the DPI, the larger the file size will be.
* Leave the Color Mode as RBG with 8 bits per channel.


With the new image window open, select the Fill tool and fill the background with black. At the same time, open the picture you want to use as the Start Orb next to it; as seen in the example below:

picture.php

   Note
In this example, I have also added guide lines to divide the image into three equal parts for my button states; first at 54px, and second at 108px.


The next step is to prepare the picture to be used as a Start Orb. Because we require transparency in the layer in order to calculate the alpha channel (explained later), we need the button you want to use without any colour or background behind it.

Select the button-to-be with whichever method you prefer, as seen below this is much easier when zoomed in to a decent level:

picture.php
   Note
Rather select too much than too little in this step, if you end up with a little bit extra background it can be trimmed later.


With your button-to-be selected, copy the selection to a new layer and hide the old layer. The keyboard shortcut ctrl + J is the quickest way to do this; this will take the selected area of the current layer and copy it to a new layer in the same image.

Once you have your Start Orb isolated on it's own layer, it's time to resize the image to a suitable size for your Start Orb. Right click on the top bar of the image and select Image Size, as seen below:

picture.php

   Note
Image Size will resize the image with it's contents - this we want.
Canvas Size will resize the canvas only, and making it smaller will crop the image - this we don't want.


When changing the image size, there are a few important points to keep in mind:

picture.php

   Warning
You will need to play with the image size here; this setting will affect the entire image size, not just the button. Try 54px width first, and if it's too big work your way down from there.

Check the Resolution setting for this image, and make sure that it matches the 72 pixels per inch you selected for the Start Orb earlier.


Once you are satisfied with the button size, drag the edited button to our original Start Orb image window and center it in one of the three 'blocks' as defined by the guide lines. You should end up with something similar to this:

picture.php

   Note
From resizing the image earlier, the edges tend to go slightly funny sometimes, in this case we still have a very thin piece of the border left here so it's fine. Now that you have the button at the size you want it, 'trim' the remaining border off in any manner you choose.

Depending on the picture being used, zooming in and using the Eraser tool with a 15px size and 50% brush hardness generally works well here


Once you have trimmed the Orb, it's time to duplicate it for the three button states. You should end up with three orbs, as seen below:

picture.php

   Note
Just a tip for keeping these orbs lined up properly:

1 - Start with the button in the top block, press ctrl + J to duplicate.

2 - Then hold shift and ctrl and press the down arrow 5 times.

3 - Hold ctrl, release shift and press the down arrow 4 times.

Wash, rinse, repeat. (or just do the steps again...)

Holding shift and ctrl moves your layer by 10 pixels, holding only ctrl moves by 1 pixel. The above method ensures your button shifts straight down by 54 pixels.


Now for the fun part, and a part I'm going to leave completely up to you; building your button states.
picture.php
The idea between the three button states is simple; top is static state, middle is mouse-over or hover state, and bottom is clicked state.

Try not do too much to the top orb, keep it simple. Give the middle orb a bit more attention to make it look nice (I like to think the orb is happy to see the mouse, so it starts glowing with a warm, fuzzy, omg-i-have-a-frie....... Uh, ok, ignore that comment). Apply some sort of 'pressed' look to the bottom button just to finish it off.

Your end result will look different to mine, but is an example of very simple orb button states using only Outer Glow, Inner Glow and Satin:

picture.php

   Note
Keep your layers on the right in the same order as the orbs in the image, top layer for top orb, bottom layer for botto orb, etc. It helps you see which layer is doing what and why and how and all that other jazz that people like..
   Warning
Don't let the effects go too far off the the sides! The taskbar isn't as big as the 54x162px Start Orb images will make you think... Try and keep the majority of your Orb within about 9 or 10 pixels of the border of each block. Below is an example of a 9px border around my Orb:

picture.php


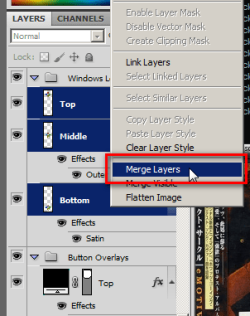
Now we need to merge all the Orbs into one layer in preparation for the Alpha layer; hold ctrl and click once on the name of each of your Orb layers to select them, do NOT select the background here as well. With the Orbs selected, right click and select Merge Visible, as seen here:

picture.php

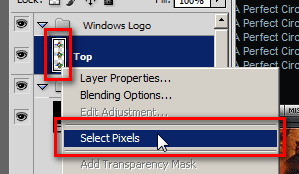
This will give you a single layer with all Orb button states and their unique effects on a single layer above the background. To prepare the Alpha layer, first select the contents of our Orb layer. Hold ctrl and click once on the preview for the Orb layer; take note of the mouse pointer change as you hold ctrl:

picture.php

   Note
If you did this correctly, you should see a selection indicator around all three Orb button states, as seen above.


Above the Layer pallet you should have a tab labelled Channels, click this now. Colour channels are used to store the amount of each primary colour each pixel contains in a RGB (Red Green Blue) image. Because we're greedy and these three aren't enough, we're going to create a fourth channel that doesn't store colour, but we want it anyway (it's really technical, just know that you need it).

Click the Create New Channel button at the bottom of this pallet, as seen below, PhotoShop will know what you want it to do:

picture.php

At this point, select the newly created Alpha 1 channel and look at your Orbs. Well, you can't see them, but it's fine for now. This layer will determine what parts of your BMP image Explorer shows (white areas) and which it hides (black areas) when the Orb is complete.

Switch to the Brush tool, set it to something decent like 100px at least, hardness doesn't matter here, and fill in as much as your can of your selection with white. Notice how the selection we made earlier follows the 'glow' effect of the orbs and only allows a certain amount of white to be 'painted' onto the Alpha channel? That's what gives the soft edges on your Start Orb later.

picture.php

   Warning
If you have hard edges on the alpha channel at this stage, unless it was intensional, you may want to go back to the point where the affects were applied to the orbs and the layers were merged to ensure you have the image you actually want....


At this point, you are essentially finished building your Start Orb. Select the RGB Channel again, deselect the Orbs selection, and switch back to the Layers pallet. If you are satsfied with your Orb, it's time to save it...
picture.php
Exciting times...

From the File menu, select Save, or just use ctrl + S keyboard shortcut. In the save dialog box, enter a funky name for your Start Orb, ensure that Alpha Channels is ticked, and hit Save.

picture.php

On the next step, ensure that you are saving a Windows bitmap and that it's being saved as 32 Bit;

picture.php


Final Step

Now that your orb is complete, you may use any Start Orb changer to set it as active on your taskbar. I recommend using the Win 7 Start Button Changer 2.6 by ~Kishan-Bagaria for this, but you can use any utility you prefer.

   Note
I would highly recommend using Kishan's app; version 2.6 has been updated to change the orb image for any and all DPI settings... You just need to make sure you use the correct size image for the DPI you're using. Remember:

100% DPI - use 54 x 162px
125% DPI - use 66 x 198px
150% DPI - use 81 x 243px


The Start Orb I created in this tutorial came out like this:

picture.php

Now go forth and conquer the world with your hot orbs!
picture.php
And remember to share them hey...? I've lost all my marbles, I need replacements.. It's like comfort food, but for my computer...

Please leave comments and tell me if I need to expand on certain areas or if I made a mistake.. As I mentioned at the top, this is my first tutorial ever, I'm open to constructive criticism. Hope you enjoy reading it as much as I enjoyed making it! Cheers..
picture.php


   Note
For those of you who don't have PhotoShop, you may also use GIMP to do this. If you're not sure on the GIMP equivalents for the functions used in this tutorial, check the Start Button - Create a Rectangular Start Button tutorial made by Tannim.


Last edited by a moderator:

My Computer

Computer type
PC/Desktop
OS
Win 10 x64 Pro x64 / Ubuntu 15.10 x64
CPU
Intel i7-4960X
Motherboard
Asus Rampage IV Black Edition
Memory
4x8GB Corsair Dominator Platinum @2400MHz 10-12-12-31
Graphics Card(s)
2x MSI GTX780Ti 3GB (SLI)
Sound Card
Onboard SupremeFX (Cirrus Logic CS4398)
Monitor(s) Displays
3x LG Cinema 27" IPS LED (27MP65)
Screen Resolution
[1920x1080]x3
Hard Drives
Crucial M500 120GB, Crucial M500 480GB, Toshiba DT01ACA200 2TB
PSU
CoolerMaster V1000
Case
Corsair Obsidian 750D
Cooling
ThermalTake Water 3.0 Extreme, 4xSP120, 3xAF120
Keyboard
Moshi Luna
Mouse
Logitech G700s / Roccat Tyon
Internet Speed
4Mb uncapped ADSL (Afrihost)
Antivirus
MS Security Essentials
Browser
Chrome... Duh. (:

My Computer

OS
window's 7
CPU
core 2 quad
Motherboard
gigabyte
Memory
2gb corsair
Graphics Card(s)
ati hd4850
Monitor(s) Displays
lg
Screen Resolution
1600 X 900
Case
power logic
Other Info
none of the spec above is accurate
:D This tutorial uses random google images skillz. Enjoy!!! XDD
Hi windowsapple, I've always preferred to create my own images for the Start Orb with a proper picture/photo editing program (and I think many other people do too) instead of using a 'wizard' type app like that.. But that's just personal preference.

Just a thought, but why don't you create a new tutorial covering that app instead of doing it as a comment here..? I think quite a few people, especially those that don't have PhotoShop or GIMP would find it very helpful. :D

Um, Brink put that here. Not me.
 

My Computer

Computer Manufacturer/Model Number
Mc Donald's
OS
Mc Donald OS Version Beta
CPU
Awesome Beef Patty
Motherboard
Lettuce (It's green!)
Memory
Pro 1 KB Memory
Graphics Card(s)
Tomato FX10
Sound Card
The Box
Monitor(s) Displays
Yummy 5-D Touch
Screen Resolution
20 x 20
Hard Drives
The Top Bun and the Bottom Buns
PSU
Um.
Case
The Box With Pics!
Cooling
That's Why i Have a Refrigerator
Keyboard
N/A
Mouse
N/A
Internet Speed
Same as McDonald's Wi-fi
Other Info
Note : This is not real. (Hope You Knew That)
:D This tutorial uses random google images skillz. Enjoy!!! XDD
Hi windowsapple, I've always preferred to create my own images for the Start Orb with a proper picture/photo editing program (and I think many other people do too) instead of using a 'wizard' type app like that.. But that's just personal preference.

Just a thought, but why don't you create a new tutorial covering that app instead of doing it as a comment here..? I think quite a few people, especially those that don't have PhotoShop or GIMP would find it very helpful. :D

Um, Brink put that here. Not me.
You mean your post...? Uh... Ok then, I'm slightly confused, but it's no problem.
picture.php
It was just a suggestion anyway..
 

My Computer

Computer type
PC/Desktop
OS
Win 10 x64 Pro x64 / Ubuntu 15.10 x64
CPU
Intel i7-4960X
Motherboard
Asus Rampage IV Black Edition
Memory
4x8GB Corsair Dominator Platinum @2400MHz 10-12-12-31
Graphics Card(s)
2x MSI GTX780Ti 3GB (SLI)
Sound Card
Onboard SupremeFX (Cirrus Logic CS4398)
Monitor(s) Displays
3x LG Cinema 27" IPS LED (27MP65)
Screen Resolution
[1920x1080]x3
Hard Drives
Crucial M500 120GB, Crucial M500 480GB, Toshiba DT01ACA200 2TB
PSU
CoolerMaster V1000
Case
Corsair Obsidian 750D
Cooling
ThermalTake Water 3.0 Extreme, 4xSP120, 3xAF120
Keyboard
Moshi Luna
Mouse
Logitech G700s / Roccat Tyon
Internet Speed
4Mb uncapped ADSL (Afrihost)
Antivirus
MS Security Essentials
Browser
Chrome... Duh. (:
Its ok. I'm confused too./ :P
 

My Computer

Computer Manufacturer/Model Number
Mc Donald's
OS
Mc Donald OS Version Beta
CPU
Awesome Beef Patty
Motherboard
Lettuce (It's green!)
Memory
Pro 1 KB Memory
Graphics Card(s)
Tomato FX10
Sound Card
The Box
Monitor(s) Displays
Yummy 5-D Touch
Screen Resolution
20 x 20
Hard Drives
The Top Bun and the Bottom Buns
PSU
Um.
Case
The Box With Pics!
Cooling
That's Why i Have a Refrigerator
Keyboard
N/A
Mouse
N/A
Internet Speed
Same as McDonald's Wi-fi
Other Info
Note : This is not real. (Hope You Knew That)
Do you have a download for that one you made in the tutorial? Great tutorial by the way
 

My Computer

Computer Manufacturer/Model Number
Dell
OS
Windows 7
Memory
4gb
Hard Drives
320gb
Do you have a download for that one you made in the tutorial? Great tutorial by the way
I don't have it with me here at work... But I might still have the files on my PC at home. I'll look tonight, if I do I'll post it here for you tomorrow.
 

My Computer

Computer type
PC/Desktop
OS
Win 10 x64 Pro x64 / Ubuntu 15.10 x64
CPU
Intel i7-4960X
Motherboard
Asus Rampage IV Black Edition
Memory
4x8GB Corsair Dominator Platinum @2400MHz 10-12-12-31
Graphics Card(s)
2x MSI GTX780Ti 3GB (SLI)
Sound Card
Onboard SupremeFX (Cirrus Logic CS4398)
Monitor(s) Displays
3x LG Cinema 27" IPS LED (27MP65)
Screen Resolution
[1920x1080]x3
Hard Drives
Crucial M500 120GB, Crucial M500 480GB, Toshiba DT01ACA200 2TB
PSU
CoolerMaster V1000
Case
Corsair Obsidian 750D
Cooling
ThermalTake Water 3.0 Extreme, 4xSP120, 3xAF120
Keyboard
Moshi Luna
Mouse
Logitech G700s / Roccat Tyon
Internet Speed
4Mb uncapped ADSL (Afrihost)
Antivirus
MS Security Essentials
Browser
Chrome... Duh. (:
I've made my own orbs... well, cubes and I guess I might've done the sides a bit too big, even though I made the canvas size the right size. They came out looking great and I tested them, but unfortunately the top gets cut off and doesn't show past the top of the bar. You can take a look if you like. Any advise or help is appreciated =]
 

Attachments

My Computer

Computer Manufacturer/Model Number
Handmade Computer
OS
Windows 7 Ultimate
CPU
Intel Duo Quad Core
Motherboard
XFX nForce 750i Sli Motherboard (Extreme Black Edition)
Memory
1GB DDR2 RAM, 4GB ReadyBoost RAM
Graphics Card(s)
EVGA GeForce FX 5500
Sound Card
7.1channel Azalia (HAD)
Monitor(s) Displays
17" LCD
Hard Drives
150 GB Western Digital ATA
75 GB Seagate ATA
40 GB Seagate ATA
25 GB Western Digital ATA
PSU
HP 250Watt ATX Power Supply
Case
Ultra eTorque ULT33180 Mid-Tower ATX Case
Cooling
Socket 775 w/ Advanced Copper Base OEM CPU Fan
I've made my own orbs... well, cubes and I guess I might've done the sides a bit too big, even though I made the canvas size the right size. They came out looking great and I tested them, but unfortunately the top gets cut off and doesn't show past the top of the bar. You can take a look if you like. Any advise or help is appreciated =]
Just had a quick look at the PSD in the attached ZIP file; but before we get to that, one very important part I think you missed:
   Warning
Don't let the effects go too far off the the sides! The taskbar isn't as big as the 54x162px Start Orb images will make you think... Try and keep the majority of your Orb within about 9 or 10 pixels of the border of each block. Below is an example of a 9px border around my Orb:

picture.php
If you try and keep the edges of your button within these boundaries (about 9 to 10px from the background edges in a 54x162px size) then it'll fit better on your taskbar.

Other than that, when I checked the 'Channels' list, there was no Alpha channel. You missed a few steps though, I've attached some images below:

Step 1
Merge the layers of your button states (normal, hover, clicked) so they can be selected properly in the next step.

Step 2
Select the pixels for your button; either hold ctrl (or 'Command on a Mac) and click the layer preview, or right click the layer preview and click 'Select Pixels'.

Step 3
Create the Alpha layer (simply click the 'Add new layer' button) and paint it white.

After this it is vital that the image be saved as a 32-bit BMP, this should be automatically selected if you have the four required layers (Red, Green, Blue, Alpha), but double check when saving it anyway.
 

Attachments

  • Step 1.png
    Step 1.png
    41.1 KB · Views: 587
  • Step 2.png
    Step 2.png
    12.2 KB · Views: 1,652
  • Step 3.png
    Step 3.png
    23.4 KB · Views: 581

My Computer

Computer type
PC/Desktop
OS
Win 10 x64 Pro x64 / Ubuntu 15.10 x64
CPU
Intel i7-4960X
Motherboard
Asus Rampage IV Black Edition
Memory
4x8GB Corsair Dominator Platinum @2400MHz 10-12-12-31
Graphics Card(s)
2x MSI GTX780Ti 3GB (SLI)
Sound Card
Onboard SupremeFX (Cirrus Logic CS4398)
Monitor(s) Displays
3x LG Cinema 27" IPS LED (27MP65)
Screen Resolution
[1920x1080]x3
Hard Drives
Crucial M500 120GB, Crucial M500 480GB, Toshiba DT01ACA200 2TB
PSU
CoolerMaster V1000
Case
Corsair Obsidian 750D
Cooling
ThermalTake Water 3.0 Extreme, 4xSP120, 3xAF120
Keyboard
Moshi Luna
Mouse
Logitech G700s / Roccat Tyon
Internet Speed
4Mb uncapped ADSL (Afrihost)
Antivirus
MS Security Essentials
Browser
Chrome... Duh. (:
Do you have a download for that one you made in the tutorial? Great tutorial by the way
I don't have it with me here at work... But I might still have the files on my PC at home. I'll look tonight, if I do I'll post it here for you tomorrow.
And unfortunately I don't still have the image I used for the orb I made with this tutorial, I don't know where it went.. :( Sorry about that.
 

My Computer

Computer type
PC/Desktop
OS
Win 10 x64 Pro x64 / Ubuntu 15.10 x64
CPU
Intel i7-4960X
Motherboard
Asus Rampage IV Black Edition
Memory
4x8GB Corsair Dominator Platinum @2400MHz 10-12-12-31
Graphics Card(s)
2x MSI GTX780Ti 3GB (SLI)
Sound Card
Onboard SupremeFX (Cirrus Logic CS4398)
Monitor(s) Displays
3x LG Cinema 27" IPS LED (27MP65)
Screen Resolution
[1920x1080]x3
Hard Drives
Crucial M500 120GB, Crucial M500 480GB, Toshiba DT01ACA200 2TB
PSU
CoolerMaster V1000
Case
Corsair Obsidian 750D
Cooling
ThermalTake Water 3.0 Extreme, 4xSP120, 3xAF120
Keyboard
Moshi Luna
Mouse
Logitech G700s / Roccat Tyon
Internet Speed
4Mb uncapped ADSL (Afrihost)
Antivirus
MS Security Essentials
Browser
Chrome... Duh. (:
A very useful tutorial, l'll study it and make my own start button image. Thanks to the poster!
 

My Computer

OS
win7
A very useful tutorial, l'll study it and make my own start button image. Thanks to the poster!
My pleasure, glad you found it useful. :)
 

My Computer

Computer type
PC/Desktop
OS
Win 10 x64 Pro x64 / Ubuntu 15.10 x64
CPU
Intel i7-4960X
Motherboard
Asus Rampage IV Black Edition
Memory
4x8GB Corsair Dominator Platinum @2400MHz 10-12-12-31
Graphics Card(s)
2x MSI GTX780Ti 3GB (SLI)
Sound Card
Onboard SupremeFX (Cirrus Logic CS4398)
Monitor(s) Displays
3x LG Cinema 27" IPS LED (27MP65)
Screen Resolution
[1920x1080]x3
Hard Drives
Crucial M500 120GB, Crucial M500 480GB, Toshiba DT01ACA200 2TB
PSU
CoolerMaster V1000
Case
Corsair Obsidian 750D
Cooling
ThermalTake Water 3.0 Extreme, 4xSP120, 3xAF120
Keyboard
Moshi Luna
Mouse
Logitech G700s / Roccat Tyon
Internet Speed
4Mb uncapped ADSL (Afrihost)
Antivirus
MS Security Essentials
Browser
Chrome... Duh. (:
God Tut ZaLith. One thing confusing me though.
The emphasis on making sure the image you choose to paste in is the same as your base image at 72 pixels/inch I can understand. But why 72 pixels/inch when Windows perceives an image at 96 pixels/inch? Any of the clearer, or better looking start orbs I've downloaded from dA are made at 96 pixel/inch.
Or is the case of where size doesn't really matter?
 

My Computer

OS
windows 7 ultimate
God Tut ZaLith. One thing confusing me though.
The emphasis on making sure the image you choose to paste in is the same as your base image at 72 pixels/inch I can understand. But why 72 pixels/inch when Windows perceives an image at 96 pixels/inch? Any of the clearer, or better looking start orbs I've downloaded from dA are made at 96 pixel/inch.
Or is the case of where size doesn't really matter?

Thanks for the comments, and I'll admit that's not really something I thought about... I've been so used to PhotoShop defaulting to 72dpi for it's pictures, I made a tutorial that would work around those defaults.

I haven't really compared the two, but if using an image of 96dpi for the start orb makes as much differences as you're implying, I should really update this tutorial then...
picture.php
I'll do some tests tonight when I get home and see how much of a difference it makes. Thanks for pointing that out..

By the way, the emphasis wasn't really on always using 72dpi, but rather if you started with 72, to keep it at that. Switching dpi settings on an image after you've started working on it causes visual tearing and misaligned pixels. More noticeable on larger images, but it's an old habit for me to stick at the dpi I start at.
 

My Computer

Computer type
PC/Desktop
OS
Win 10 x64 Pro x64 / Ubuntu 15.10 x64
CPU
Intel i7-4960X
Motherboard
Asus Rampage IV Black Edition
Memory
4x8GB Corsair Dominator Platinum @2400MHz 10-12-12-31
Graphics Card(s)
2x MSI GTX780Ti 3GB (SLI)
Sound Card
Onboard SupremeFX (Cirrus Logic CS4398)
Monitor(s) Displays
3x LG Cinema 27" IPS LED (27MP65)
Screen Resolution
[1920x1080]x3
Hard Drives
Crucial M500 120GB, Crucial M500 480GB, Toshiba DT01ACA200 2TB
PSU
CoolerMaster V1000
Case
Corsair Obsidian 750D
Cooling
ThermalTake Water 3.0 Extreme, 4xSP120, 3xAF120
Keyboard
Moshi Luna
Mouse
Logitech G700s / Roccat Tyon
Internet Speed
4Mb uncapped ADSL (Afrihost)
Antivirus
MS Security Essentials
Browser
Chrome... Duh. (:
Thanks for the comments, and I'll admit that's not really something I thought about... I've been so used to PhotoShop defaulting to 72dpi for it's pictures, I made a tutorial that would work around those defaults.
Hmm. I'm always fighting it to switch to 300dpi, but I understand where you're coming from!
I haven't really compared the two, but if using an image of 96dpi for the start orb makes as much differences as you're implying, I should really update this tutorial then...
picture.php
I'll do some tests tonight when I get home and see how much of a difference it makes. Thanks for pointing that out..
It may just be down to the fact that the person(s) who made them at 96dpi's, they would still look better if they made them at 72dpi, or 16!
By the way, the emphasis wasn't really on always using 72dpi, but rather if you started with 72, to keep it at that......
You put that across very well in your Tut and I understand what you are getting at (mixed dpi formats). I hope you don't think I was criticising, or that it came across as I was, as I wasn't and if it reads that way, I apologise. It was just one of those niggling little brain stretchers that wouldn't leave me alone. I can now sleep easily, neighbours permitting!!
 

My Computer

OS
windows 7 ultimate
You put that across very well in your Tut and I understand what you are getting at (mixed dpi formats). I hope you don't think I was criticising, or that it came across as I was, as I wasn't and if it reads that way, I apologise. It was just one of those niggling little brain stretchers that wouldn't leave me alone. I can now sleep easily, neighbours permitting!!

Lol.. It's all good, I'm a big fan of constructive criticism, so any comments that make me think twice about something I've said makes me go do more research and make sure I know what I'm saying is correct..
picture.php
 

My Computer

Computer type
PC/Desktop
OS
Win 10 x64 Pro x64 / Ubuntu 15.10 x64
CPU
Intel i7-4960X
Motherboard
Asus Rampage IV Black Edition
Memory
4x8GB Corsair Dominator Platinum @2400MHz 10-12-12-31
Graphics Card(s)
2x MSI GTX780Ti 3GB (SLI)
Sound Card
Onboard SupremeFX (Cirrus Logic CS4398)
Monitor(s) Displays
3x LG Cinema 27" IPS LED (27MP65)
Screen Resolution
[1920x1080]x3
Hard Drives
Crucial M500 120GB, Crucial M500 480GB, Toshiba DT01ACA200 2TB
PSU
CoolerMaster V1000
Case
Corsair Obsidian 750D
Cooling
ThermalTake Water 3.0 Extreme, 4xSP120, 3xAF120
Keyboard
Moshi Luna
Mouse
Logitech G700s / Roccat Tyon
Internet Speed
4Mb uncapped ADSL (Afrihost)
Antivirus
MS Security Essentials
Browser
Chrome... Duh. (:
help please

can someone please convert this so i can use it as a start orb please? thanks much.

2h64nd5.jpg
 

My Computer

Computer Manufacturer/Model Number
Emachines
OS
Windows 7 Home Premium 64bit
ok, so i changed it attempting to fix the problem. still doesnt work. all i see is a bunch of fractals when i set it as the start orb. i dont know what i did wrong, can someone please help? also cant save it as 32bit on paint.NET, guessing that might be the problem. here is the image:
2dceuty.jpg


here is what i used, can someone please make a start orb for me using this image? greatly appreciated.
a44p4l.jpg

Sorry for the late reply, I don't remember seeing your message.... That image is going to be very difficult to work with for a start orb, looking at it right now in PhotoShop it's going to be a mission to try cut the background out and get any decent transparency going. Where did you get the picture from originally? Any bigger / higher quality versions perhaps?

As for Paint.net, I've never used it, so I'm not sure about it's capabilities.. GIMP is a good free photo editing program, and I know it supports saving to 32-bit BMP files. 32-bit is required to save the 4th 8-bit 'Alpha' channel with the image, this is the channel that saves the transparency information, which Windows then uses to determine which areas of the image are shown and which are not.
 

My Computer

Computer type
PC/Desktop
OS
Win 10 x64 Pro x64 / Ubuntu 15.10 x64
CPU
Intel i7-4960X
Motherboard
Asus Rampage IV Black Edition
Memory
4x8GB Corsair Dominator Platinum @2400MHz 10-12-12-31
Graphics Card(s)
2x MSI GTX780Ti 3GB (SLI)
Sound Card
Onboard SupremeFX (Cirrus Logic CS4398)
Monitor(s) Displays
3x LG Cinema 27" IPS LED (27MP65)
Screen Resolution
[1920x1080]x3
Hard Drives
Crucial M500 120GB, Crucial M500 480GB, Toshiba DT01ACA200 2TB
PSU
CoolerMaster V1000
Case
Corsair Obsidian 750D
Cooling
ThermalTake Water 3.0 Extreme, 4xSP120, 3xAF120
Keyboard
Moshi Luna
Mouse
Logitech G700s / Roccat Tyon
Internet Speed
4Mb uncapped ADSL (Afrihost)
Antivirus
MS Security Essentials
Browser
Chrome... Duh. (:
Back
Top