NTFS Permissions — View and Post
CONTENTS:
1. Have your file displayed in an Explorer window or on your Desktop.
2. Right-click the file, select Properties -> Security -> Advanced

3. Complete Steps 1 - 14 in the linked tutorial to upload the image.
:ar: Screenshots and Files - Upload and Post in Seven Forums
1. Open a Command Prompt (or Elevated Command Prompt if requested) at the target item�s directory. Follow Step 2 if you are unsure of how this is done, else continue with Step 3.
2. In the Command Prompt console, type out the below command, substituting �<directory path>� with the directory containing the file or folder you wish to view NTFS permissions for. The Command Prompt�s prompt string should update to reflect the new active path.

3. Enter the following icacls command, substituting �<item name>� with the target item you wish to view permissions for. The surrounding double quotes are mandatory if the file name of the item includes one or more space characters.

4. Right-click the Command Prompt window and select Mark, then hold Left-click and drag across the area displaying the Icacls output. Make sure all relevant text is highlighted then right-click anywhere within the Command Prompt window again to copy the selected text region to the clipboard.

5. After pasting the command�s output to your post, you may want to edit the text to avoid disclosing any personal information. If you decide to change the name of a user or a group here please make the change is consistent throughout your thread.
6. Highlight the pasted Icacls text and click the hash icon () in the toolbar to wrap the text in
B) reveals: DACL, owner, current username
NOTE: The output will be copied directly to the clipboard. All lines should be copy-pasted all together at once into the terminal.
C) reveals: security descriptor
NOTE: The output will be copied directly to the clipboard.
D) reveals: security descriptor, directory structure
NOTE: Entering this command will create a xml file on your desktop. This file should be zipped before uploading.
3. Conclude with Steps 5, 6, and 7 in Option Two as required.
How to View NTFS Permissions of a File or Folder in Windows
Information
NTFS is a high-performance file system designed for the Windows operating system. It is one of the most advanced file systems available, with support for file compression, encryption, auditing, file attributes, reparse points, hard links, large volumes (such as storage networks like RAID), transactional journaling, and an extensively detailed permission system.
NTFS permissions allow for the intricate tuning of uncountably many file security configurations. As such, it can be difficult to properly communicate these permissions.
This tutorial suggests ways one may go about to effectively communicate NTFS permission settings.
NTFS permissions allow for the intricate tuning of uncountably many file security configurations. As such, it can be difficult to properly communicate these permissions.
This tutorial suggests ways one may go about to effectively communicate NTFS permission settings.
CONTENTS:
- Option One: Post a Screenshot of the Security Tab
- Option Two: Using the Command Prompt and Icacls
- Option Three: Using PowerShell
OPTION ONE
Post a Screenshot of the Security Tab
1. Have your file displayed in an Explorer window or on your Desktop.
2. Right-click the file, select Properties -> Security -> Advanced
3. Complete Steps 1 - 14 in the linked tutorial to upload the image.
:ar: Screenshots and Files - Upload and Post in Seven Forums
OPTION TWO
Using the Command Prompt and Icacls
1. Open a Command Prompt (or Elevated Command Prompt if requested) at the target item�s directory. Follow Step 2 if you are unsure of how this is done, else continue with Step 3.
2. In the Command Prompt console, type out the below command, substituting �<directory path>� with the directory containing the file or folder you wish to view NTFS permissions for. The Command Prompt�s prompt string should update to reflect the new active path.
cd /d <directory path>3. Enter the following icacls command, substituting �<item name>� with the target item you wish to view permissions for. The surrounding double quotes are mandatory if the file name of the item includes one or more space characters.
icacls "<item name>"4. Right-click the Command Prompt window and select Mark, then hold Left-click and drag across the area displaying the Icacls output. Make sure all relevant text is highlighted then right-click anywhere within the Command Prompt window again to copy the selected text region to the clipboard.
5. After pasting the command�s output to your post, you may want to edit the text to avoid disclosing any personal information. If you decide to change the name of a user or a group here please make the change is consistent throughout your thread.
6. Highlight the pasted Icacls text and click the hash icon () in the toolbar to wrap the text in
Code:
tags.
[ATTACH]394637._xfImport[/ATTACH]
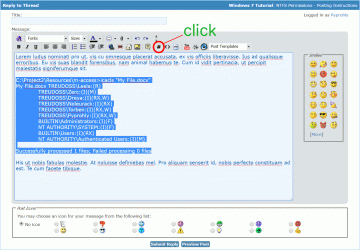
[SIZE="3"][B]7.[/B][/SIZE] Scroll down the page below your post content to a section labeled Additional Options and check Disable smilies in text.
[ATTACH]394635._xfImport[/ATTACH]
[anchor]option3[/anchor][option="OPTION THREE"]Using PowerShell[/option]
[SIZE="3"][B]1.[/B][/SIZE] Open a [URL="https://www.sevenforums.com:80/tutorials/27758-windows-powershell.html"][B]Windows PowerShell[/B][/URL] session.
[SIZE="3"][B]2.[/B][/SIZE] Enter one of the listed commands.
A) reveals: DACL
[B][COLOR="Red"]NOTE:[/COLOR][/B] [I]The output will be copied directly to the clipboard[/I].
[code](Get-Acl "[COLOR="red"]C:\path\to\item[/COLOR]").Access | Format-Table -AutoSize | Out-String -Width 4096 | foreach{$_.Trim("`r`n")} | clipB) reveals: DACL, owner, current username
NOTE: The output will be copied directly to the clipboard. All lines should be copy-pasted all together at once into the terminal.
Code:
$a = (Get-Acl "[COLOR="red"]C:\path\to\item[/COLOR]")
({
	param($x)
	'Me: ' + [System.Security.Principal.WindowsIdentity]::GetCurrent().Name
	'Itm Path: ' + (Convert-Path $x.Path)
	'Itm Owner: ' + $x.Owner
	''
	$x.Access | ft id*,f*,is*,in*,p* -g a* -a | Out-String -Width 4096 | %{$_.Trim("`r`n")}
}).Invoke($a) | clip
Tip
Avoid using these last two options as they require special knowledge or tools to interpret.
C) reveals: security descriptor
NOTE: The output will be copied directly to the clipboard.
Code:
(Get-Acl "[COLOR="red"]C:\path\to\item[/COLOR]").Sddl | clipD) reveals: security descriptor, directory structure
NOTE: Entering this command will create a xml file on your desktop. This file should be zipped before uploading.
Code:
Get-ChildItem -r "[COLOR="red"]C:\path\to\item[/COLOR]" | Get-Acl | Export-Clixml "$env:UserProfile\Desktop\aclfile.xml"3. Conclude with Steps 5, 6, and 7 in Option Two as required.
Attachments

Last edited by a moderator:
")