Solved Windows 7 Ultimate 64 Bit - Installation Problems

Galton

New member
Local time
9:06 AM
Messages
9
For two days I have been working at upgrading My Toshiba Laptop L855D 64bit from
Windows 7 Home Premium to Windows 7 Ultimate. I have purchased a DVD and I have a license key.

First time the computer tell me to go to Anytime Upgrade to do this, I went there and the computer tells me that it cannot use my key to input another key. After three times I gave up.

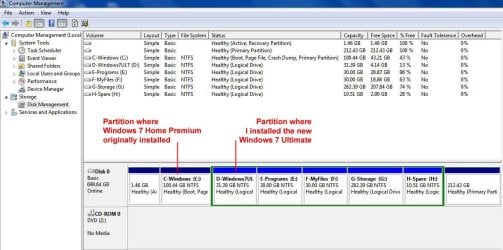
I decided to do a new install in a new partition, that worked OK even if I had to go and fish some drivers from the old installation.
The problem is that I would have to do a lot of work to add all the programs settings etc.

Now at the boot menu I have two items "Windows 7" and "Windows 7" the first is the New Installation and the second is the Old Installation, they both work.

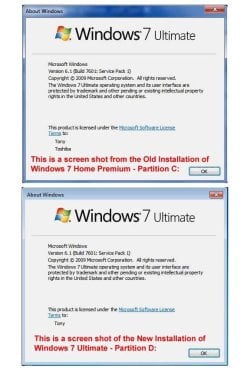
To my surprise when I started the second item that should be "Window 7 Home Premium" it shows instead instead "Windows 7 Ultimate" and once it starts, if I launch SIW (This is a very good System Information Tool) it says that the system is:

___________Copied from Report ______________________________________________
TONY-PC (TOSHIBA Satellite L855D)
Windows 7 Ultimate
Name: Windows 7 Ultimate x64 Service Pack 1
Features Terminal Services in Remote Admin Mode, 64 Bit Edition, Media Center Edition, Multiproc...
Edition Type: Ultimate
Edition ID: X15-39644
Key Type: Retail
EULA: Retail
SKU: Ultimate Edition
Language: English
Safe Mode: No
Activation Status: Required
License Status OOBGrace [Windows Operating System - Windows(R) 7, RETAIL channel]
Genuine: Yes
Remaining Grace Period: 42000 (29 Days, 4 Hours, 0 Minutes)
________________End ______________________________________________________

Even says that I have 29 days to activate.

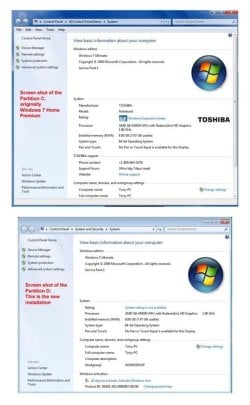
My question is this: as I was doing the new installation in drive D: - did install also update the files in drive C: where the original Windows 7 Home Premium was?

If this is the case How can I test to make sure I have Ultimate on C: partition
and if that is the case can I delete the D: partition?
 

My Computer

Computer type
Laptop
Computer Manufacturer/Model Number
Toshiba L855D
OS
Windows 7 Home Premium 64 bit
CPU
AMD Quad
Memory
8GB
Graphics Card(s)
ATI
Hard Drives
750GB
Antivirus
Avast
Browser
IE 8.0 Firefox
Can you post a screen shot of Windows Disk Management and a picture of the Window 7 Ultimate DVD?

Did you buy the disk online?
 

My Computer

Computer type
PC/Desktop
Computer Manufacturer/Model Number
Ignatz Special; 4 speed manual gearbox; factory air conditioning; one of one
OS
Windows 7 Home Premium SP1, 64-bit
CPU
Intel Skylake i5-6600K, not overclocked
Motherboard
AsRock Z170M Extreme 4, micro ATX
Memory
8 GB HyperX DDR4-2666 (2 x 4 GB)
Graphics Card(s)
none; graphics are integrated on CPU
Sound Card
onboard: Realtek ALC1150; external: USB Behringer UF0-202
Monitor(s) Displays
Dell S2340M 23 inch IPS
Screen Resolution
1600 x 900
Hard Drives
System: Crucial MX100 series SSD, 128 GB;
Data: Samsung Spinpoint 103SJ, 1 TB;
Backup: WD Caviar Green WD30EZRX-00D8PB0, 3 TB
PSU
Rosewill SilentNight 500 watt fanless, semi-modular
Case
Antec Solo II
Cooling
Noctua NH-U12S; Noctua F12 intake, Noctua S12A exhaust
Keyboard
Microsoft 200 6JH-00001 USB
Mouse
Dell or Microsoft optical wired; USB
Antivirus
Microsoft Security Essentials and Malwarebytes Premium
Browser
Pale Moon
Other Info
All fans PWM; speeds at idle: CPU circa 500 rpm; intake circa 600 rpm; exhaust circa 600 rpm; CPU temps 27 idle and 47 C load in a warm room (27 C/81 F) when running Intel Extreme Tuning Utility stress test.
You should be able to insert a retail key into Windows Anytime Upgrade - How to - Windows 7 Forums.

Try again.

Otherwise if you installed Win7 correctly from boot, whichever one you choose will boot as C as intended.

Try booting the other OS to see if it is your old one. Then try Anytime Upgrade again. Let us know exactly what happens including any error message.

If this fails we can tell you how to remove the old Win7 when you are ready, once we see the Disk Mgmt screenshot.
 
I have uploaded some pictures
1-Windows 7 Disc.jpg (as requested by gnatzatsonic)

2-Disk Manager.jpg
This shows the two partitions
C: where originally Windows 7 Home Premium was installed.
D: where I installed Windows 7 Ultimate.

3-AboutScreen.jpg
Shows both About Screens for the two installations

4-BasicInfo.jpg
Shows the two screen for Basic Information for the two installations.

My original question was:
Is there a way for me to test the installation on Partition C:
that originally was Home Premium and that now shows as Ultimate,
so I can be sure that this actually is Windows 7 Ultimate.


Regarding the suggestion of (gregrocker) to "try again Anytime Updates"
I will not be able to, since "Anytime Updates" it is no longer on my system,
not in the old on C: partition nor in the new in D: partition.

Could this be an indication also that the Home Premium Version got updated?

Another indication is that on the installation on Partition C: in the Control Panel, the Icon for "Bitlocker" shows up. I understand this should only be available in the Pro and Ultimate.

Another thing that leads me to believe the the installation on partition D: also updated Partition C: is the fact that when I installed on D: I did not tick on the box to be activated automatically so on the previous post it was showing (Remaining Grace Period: 42000 (29 Days, 4 Hours, 0 Minutes)).
Yesterday I installed by mistake Virtual PC in drive C:, and a little later it was showing 1 day before Automatic Activation, so for curiosity I switched to the installation on partition D: and in there was showing the same thing. So I had to go into both Registry to change the bit from 0 to 1 and now I still have 27 days. It seem Installing Virtual PC on C: changed the registry for both installations.

So my question remain the same:
How can I test the installation on Partition C: to be sure it is Windows 7 Ultimate?

Thank you! For any help you can come up with.
 

Attachments

  • 1-Windows 7 Disc.jpg
    1-Windows 7 Disc.jpg
    135.1 KB · Views: 2
  • 2-DiskManager.jpg
    2-DiskManager.jpg
    96.6 KB · Views: 1
  • 3-AboutScreen.jpg
    3-AboutScreen.jpg
    67 KB · Views: 2
  • 4-BasicInfo.jpg
    4-BasicInfo.jpg
    50.6 KB · Views: 2

My Computer

Computer type
Laptop
Computer Manufacturer/Model Number
Toshiba L855D
OS
Windows 7 Home Premium 64 bit
CPU
AMD Quad
Memory
8GB
Graphics Card(s)
ATI
Hard Drives
750GB
Antivirus
Avast
Browser
IE 8.0 Firefox
It's not possible that installing Win7 to D could have also upgraded C to Ultimate. But it is possible that the Anytime Upgrade actually worked on C.

You were booted into C when you took the screenshot of Disk Mgmt, as signified by the Boot label on the C partition showing it is the presently booted partition. Did you look to see if your programs are still present, which would confirm that you did successfully Anytime Upgrade?

If so then do you even need D? You can delete it in Disk Mgmt, then recreate a Logical data partition there again.

Once that's determined we need to make sure the Active partition also holds the System flag which confirms that it is booting Win7. Right now the 1.46gb is marked Active but there is no System flag. So I would run Startup Repair - Run 3 Separate Times to see if it shows up. We can also help you move the System boot files to C if you want to recover into C the 1.46gb which is useless now anyway.
 
Thank you for the good news.

Yes on my C: partition everything is working OK, all programs and files are all there missing nothing.
As you say, one of the three times I run the "Anytime Updates" it must have worked even if gave me a negative.

Yes I am going to delete the D: partition, as matter of fact to test it out, I hid partition D: from the operating system and I can still boot from drive C: and everything is working OK.

I am going to run the Startup Repair - Run 3 Separate Times after imaging the C: partition.
I will post again as soon I will have time to run this routine.

Yes I would appreciate if you can help me move the boot files to C: and recover the 1.46gb.
I always wondered what was that for.

Thank you again.
 

My Computer

Computer type
Laptop
Computer Manufacturer/Model Number
Toshiba L855D
OS
Windows 7 Home Premium 64 bit
CPU
AMD Quad
Memory
8GB
Graphics Card(s)
ATI
Hard Drives
750GB
Antivirus
Avast
Browser
IE 8.0 Firefox
It was part of Toshiba's Recovery most likely, made bootable so Recovery can boot when called. But it isn't large enough to house all of Recovery files so it must have been resized smaller or a companion Recovery partition was deleted.

To move the System boot files to C in order to recover the 1.46 gb space, back up a Win7 system image: Backup Complete Computer - Create an Image Backup

Follow these steps to move Bootmgr - Move to C:\ with EasyBCD - Windows 7 Forums

Download Partition Wizard CD ISO, rightclick on file to Burn to CD using Windows Image Burner. Boot CD, rightclick on 1.46 to Delete, click OK. Then right click on C to Resize, drag left border of C all the way to the left side of hard drive, click OK, Apply steps.

In some cases you may need to run Startup Repair again when resizing on the Boot sector.

You have a large partition at the right end of the HD which needs a drive letter assigned to be useable, or you can resize any of the other partitions using the space following How to extend partition easily with Partition Wizard - video help. This cool feature allows you to add or subtract space to/from any partition using another partition's free space, even if they are not contiguous. Use the boot disk to be safest.
 
Result for Repair Startup - 3 separate times

I just run the routine in "Startup Repair - Run 3 Separate Times" and the result are good.
this is the new screen capture of Disc Manager.

1-Disk Manager.jpg

Tomorrow I will run the routine you indicated in your last post to move the files from the
(Recovery Partition) - Yes this is a Stub from Toshiba, after I created recovery Discs I deleted the
partition holding the recovery files.

The large 231gb partition is hidden to Windows this is my Acronis Secure Zone where I do daily Incremental automatic backups for two weeks and then I start again.
This is additional to the full backups to the external drive also done every two weeks.

There is one more thing that I need to ask. Every time I insert my Windows 7 Ultimate disk in the ODD this message comes up.

3-Disc not compatible.jpg

This message come up but everything keeps on working, I just did the three Repair Start.
Any idea why this message?

Thank you.
 

My Computer

Computer type
Laptop
Computer Manufacturer/Model Number
Toshiba L855D
OS
Windows 7 Home Premium 64 bit
CPU
AMD Quad
Memory
8GB
Graphics Card(s)
ATI
Hard Drives
750GB
Antivirus
Avast
Browser
IE 8.0 Firefox
If in doubt burn a new disk for your licensed version from Clean Reinstall - Factory OEM Windows 7.

What files do you think you need off the 1.46gb OEM partition? Remember that drivers are in the WIn7 installer, via Windows Updates and then any missing are found on the Toshiba Support Downloads page for your model. Drivers disks or stored drivers are outdated when they ship.

Once you're satisfied you don't need anything you can delete the partition and recover the space using Partition Wizard to Resize Partition - Video Help. Use the bootable disk which has never failed while the Home version and all other disk managers besides Disk Mgmt can fail with data loss. Be sure to back up a System image of C first.
 
Everything OK

I run the last routine you suggested and here is the screen shot of Disk manager now
every think is running fine.

5 LastDiskManager.jpg

The reserved partition is gone, I deleted the second installation of Ultimate in partition D:
and now I have some more space.

I like to thank you for helping me through all this.
You people are great.

I will mark this as resolved.
 

My Computer

Computer type
Laptop
Computer Manufacturer/Model Number
Toshiba L855D
OS
Windows 7 Home Premium 64 bit
CPU
AMD Quad
Memory
8GB
Graphics Card(s)
ATI
Hard Drives
750GB
Antivirus
Avast
Browser
IE 8.0 Firefox
You still have 212 gb going unused in the partition on the far right. To be able to use it rightclick on it in Disk Management or Partition Wizard to assign a drive letter.

You can also easily distribute that space to/from any of the other partitions by rightclicking on the partition you want to expand/shrink to Extend, the choose space from the empty partition: How to extend partition easily with Partition Wizard - video help.
 
212 gb unused space

The 212 gb unused space at the end of the drive is only invisible to Windows, it is actually Acronis Secure Zone this is a hidden area where I do automatic daily incremental backups, followed every two weeks by a Full Backup to an external drive.

Thank you.
 

My Computer

Computer type
Laptop
Computer Manufacturer/Model Number
Toshiba L855D
OS
Windows 7 Home Premium 64 bit
CPU
AMD Quad
Memory
8GB
Graphics Card(s)
ATI
Hard Drives
750GB
Antivirus
Avast
Browser
IE 8.0 Firefox
Back
Top