How to Uninstall Internet Explorer 9
InformationWarningBe Careful!
Make sure you revert any/all customizations made to Internet Explorer 9 prior to uninstalling it to prevent any issues from occuring.
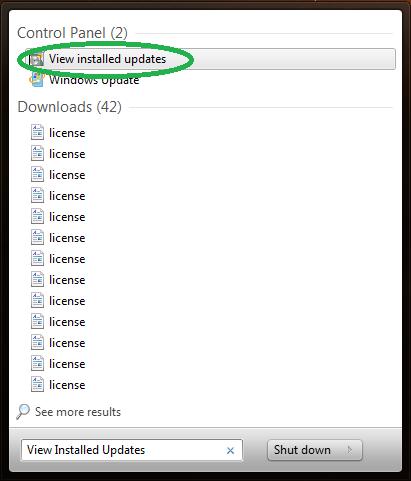
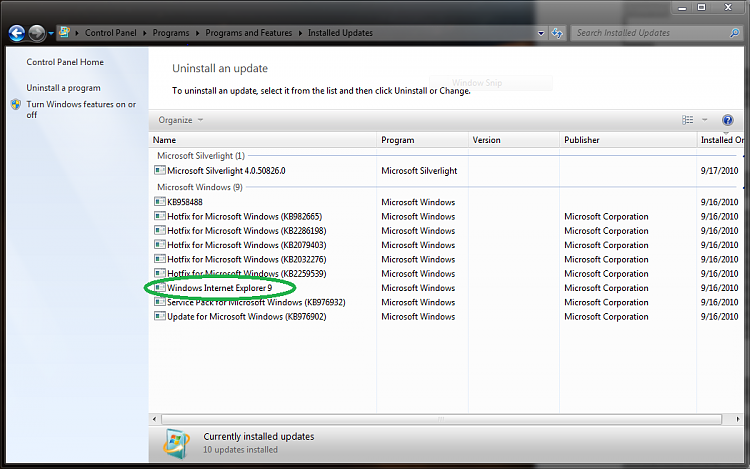
Step 1: Open the Start Menu, then type View Installed Updates and press enter. Step 2: Search for Windows Internet Explorer 9 in the list, and double click on it.
NOTE: It could take a moment for the entire list to load. Step 3: Click on Yes when prompted to uninstall it or not. It should start uninstalling it then. Step 4: Once you have completed step 3, click on the Uninstall a program link in the left pane. Step 5: If you like, you might also consider hiding this Windows Update to prevent it from being reinstalled.
Once you've done that, you are finished!
Related Tutorials
- How to Install or Uninstall Internet Explorer 10 (IE10) in Windows 7
- How to Uninstall IE11 in Windows 7 to Restore Previous Version of Internet Explorer
- How to Force Internet Explorer to Always Have the Menu Bar Turned On or Off by Default
- How to Pin and Unpin Websites from IE9 to the Taskbar or Start Menu
- How to Put the Menu Bar Always on Top in Internet Explorer
- How to Turn "Show tabs on a separate row" On or Off in IE9 and IE10
- How to Turn Windows 7 Features On or Off
Internet Explorer 9 - Uninstall
-
New #1
It leaves the feedback tool installed after IE9 being uninstalled. Might want to add that in there.
Uninstallation of IE9 and flash square
-
-
-
New #4
DarkNovaGamer,
Good job
-
New #5
Help me.It says
"Your system Administrator has disabled Installed Updates."While it is my own personal PC.Then who is admin?
-
New #6
I installed IE9 RTM and now want to remove it and return to IE8.
I followed the instructions up to point 2. ( Wasn't very far was it.) I couldn't find Internet Explorer in the list presented. There are no restore point shown in System Restore other than a Windows Update dated today.
What should I try now?
-
New #7
Hello jsquareg,
Could you post a screenshot of your View Installed Updates window showing what you have listed in it?
When you installed IE9 RTM, did it finish installing and was working properly afterwards?
-
New #8
-
New #9
Great news jsquareg. It sounds like you may not have clicked on the "View installed updates" link while in "Programs and Features". It's the only thing I can think of for why you did not see it previously.Last edited by Brink; 09 Apr 2011 at 09:57.
Related Discussions


 Quote
Quote