

How to Create a Bootable Rescue USB Flash Drive for Macrium Reflect
InformationIn order to restore a Macrium image when your Windows operating system cannot be started, you are required to boot from a rescue CD, which holds a compact Linux operating system. The Linux operating system on this rescue CD allows you to quickly browse the disks and partitions of your PC, and select the image you wish to restore.
Within Macrium reflect, there is no direct way to create a bootable USB drive, but there is a very simple workaround to create bootable rescue USB drives. This tutorial will show you how to do that, so you can forgo the stack of rescue CD's sitting on your desk. If you manage Macrium images for multiple computers, you will find this technique extremely useful.
This tutorial is based on Macrium Reflect Free Edition Version 4.2 Build 3141
Requirements:
You will need the following in order to create a bootable rescue USB drive:-
1. A USB flash drive
2. YUMI Multiboot USB Creator
Open Macrium Reflect as normal, and then from the menu, select the option Other Tasks > Create Rescue CD.
The 1st panel of the Rescue CD Wizard will be be displayed as shown below:
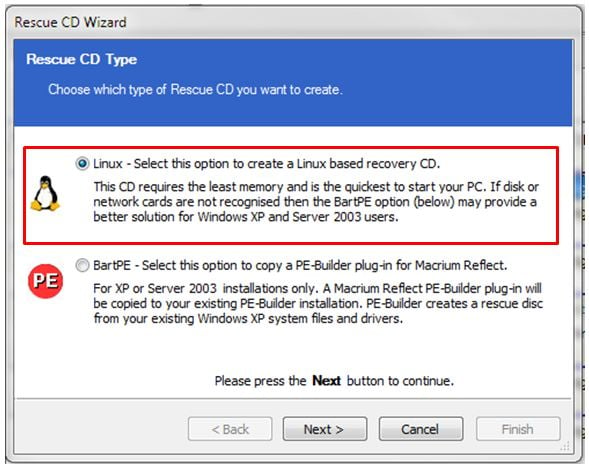
The default option is Linux. Accept that by clicking on Next, and proceeding to the 2nd panel of the Rescue CD Wizard.
From the pull-down list, select the option Create ISO image file, as shown below:
Click Finish, and now provide a name and location for the rescue ISO file that is about to be created, as shown below:
WarningDo not include spaces in the ISO name or YUMI will fail to boot from it.
Once the file has been saved, close Macrium Reflect as normal.
Download YUMI Multiboot USB Creator to your desktop - its a single executable that requires no installation.
Insert the USB flash drive you want to use, into an available USB port on your computer.
Open YUMI by double-clicking it, and when prompted by Windows UAC, click Yes. You will be prompted to accept the Licence Agreement. Click I Agree to proceed.
Now follow thse steps and refer to the image shown below:
1. From the drop-down list, select the letter of the USB you wish to use.
2. The USB drive is required to be formatted as FAT32. If this is not the case, check the format option, which will format the entire USB drive before copying any information to it. If the USB drive is already formatted as FAT32, ignore this option.
3. In the distribution box, scroll to the very bottom and hlighlight the Try an Unlisted ISO.
4. Click Browse to locate and select the rescue ISO you create previously.
5. Now click Create to create the bootable rescue USB drive.
If you opted to format the USB drive, please take careful note of the warning panel that appears, and is shown below. Click Yes to proceed.
The rescue ISO file will now be copied to the USB drive. If successful, you will see the progress panel as shown below:
Click Next to proceed. You will be prompted if you wish to add more ISO's/Distros. Click No to close this pop-up, and then click Finish to exit YUMI.
You have now created a Macrium Bootable Rescue USB and can safely remove the USB drive.
One of critical elements of imaging, is to ensure that you can boot from the rescue USB drive. In fact, the same holds true if you choose to use the traditional bootable rescue CD method.
To do this, turn off your computer, plug in your USB drive and reboot your computer as normal. During the POST screen, press the DEL key repeatedly to enter your BIOS, and then find the setting that allows you to boot from a USB drive and place it first in the device boot sequence. Alternatively, during POST keeping pressing the F8 function key to bring up the one-time boot menu, and then select the USB device from that menu.
Once the PC boots from the USB device you will see the YUMI boot menu, as shown in the example below:
If you select the option called Directly Bootable ISO's you will then be presented with the rescue ISO you created earlier. In the example shown below, I have a choice of 4 rescue ISO files (refer to the tip below):
Once you select that ISO, the Linux operating system will boot the ISO, and then allow you to select the Macrium image to restore, as shown in this example below:
Tip
If you manage multiple computers, you can add as many Macrium rescue ISO's as you require. I manage 4 different computers and each one's rescue item is bootable from a single USB flash drive - refer to the image above.
If you already have a YUMI multiboot USB drive with other ISO's and/or distros on it, simple add the Macrium rescue ISO's as normal. This makes for a very handy USB toolkit.
I hope you find this tutorial useful, and remember : you saw it first at Sevenforums.
Regards,
Golden
NoteSpecial thanks to kado897 who provided the information for capturing the YUMI screens.
MACRIUM REFLECT - Create Bootable Rescue USB Drive
-
New #1
Good Job
This looks like it should be handy.
Do you have any recommendations/suggestions for other bootable ISOs that could be included?
I'd Rep you, but apparently I'm not allowed to.
-
New #2
No worries Lehnerus - thanks. :)
My personal favorites are:
- Several flavours of Linux ISO (Debian, Mint12, Ubuntu 10.04 LTS)
- Windows 7 installation ISO
- MiniTool Partition Wizard Home Edition v7.0 ISO
- F-Secure Rescue CD ISO
When you select which ISO you want from that scrollable list, YUMI has a little link that takes you straight to the download link for the ISO you selected - very handy.
-
-
New #4
Nice tutorial golden. It looks like that is for V4. V5 allows you to create the USB directly without YUMI but I think it is better to use something like YUMI so that you can include other recovery tools.
-
New #5
Hi Kado,
Thanks. Correct, this is for V4. I wondered about V5, thanks for pointing that out...do you know whether it can write multiple rescue ISO's to the same USB, or whether you need a single USB per rescue ISO?
Regards,
Golden
-
New #6
It just allows the one and, I have just checked, only for the PE disk. I also used the YUMI route even for the PE disk.
-
New #7
Thanks Kado. I'll also make bold the version that I based this on to make it more clearer it was in V4.
-
-
MACRIUM REFLECT - Create Bootable Rescue USB Flash Drive
How to Create a Bootable Rescue USB Flash Drive for Macrium ReflectPublished by Golden


 Quote
Quote
Related Discussions