

How to Enable or Disable File and Folder "Last Access Time" in Windows
InformationThe Last Access Time attribute is the date and time a file or folder was last accessed in Windows.
Last Access Time updating is enabled by default in XP. In order to save system resources, it is disabled by default in Vista, Windows 7, and Windows 8.
This tutorial will show you how to enable or disable the last access time attribute in Windows to show the date and time of when each file and folder was last accessed.
You must be logged in as an administrator to be able to do the steps in this tutorial.
WarningOn older or slower systems, enabling Last Access Time could cause a performance decrease due to the increased overhead of Disk I/O.
TipIf you like while using "Details" folder view in Windows Explorer, you could add the "Date Accessed" column to make viewing the last access time of files and folders easier, and to be able to sort by "Date Accessed" if you like. This can also be helpful while doing searches.
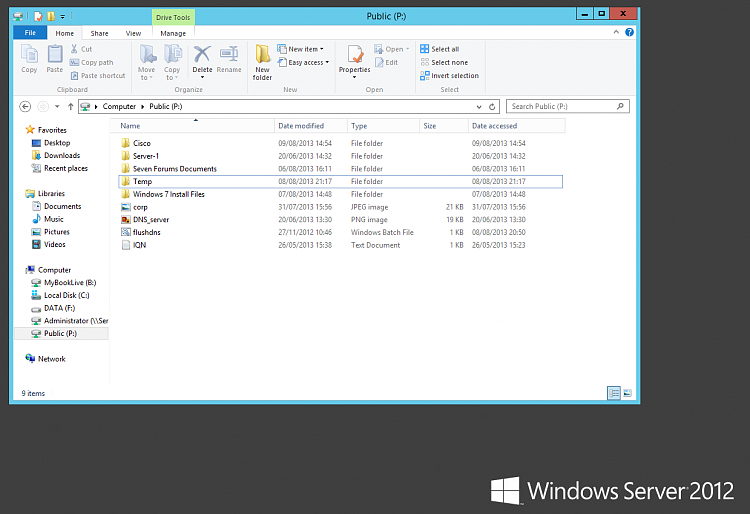
EXAMPLE: Last Accessed Time
NOTE: This is an example when you right click on a file or folder, click on Properties, and look at the Accessed details in the General tab.
OPTION ONETo Enable or Disable "Last Access Time" using a REG File Download
1. Do step 2 or 3 below for what you would like to do.
2. To Enable "Last Access Time"
A) Click/tap on the Download button below to download the file below.3. To Disable "Last Access Time"
B) Go to step 4 below.
NOTE: This is the default setting.
A) Click/tap on the Download button below to download the file below.4. Save the .reg file to the desktop.
B) Go to step 4 below.
5. Double click/tap on the downloaded .reg file to Merge it.
6. If prompted, click/tap on Run, Yes (UAC), Yes, and OK.
7. Restart the computer to apply.
8. When finished, you can delete the downloaded .reg file if you like.
OPTION TWOTo Enable or Disable "Last Access Time" in a Command Prompt
1. Open an elevated command prompt.That's it,
NOTE: For Windows 8, see also: Elevated Command Prompt - Open in Windows 8
2. Do either step 3 or 4 below for what you would like to do.
3. To Enable "Last Access Time"
A) Copy and paste the command below in the the command prompt, press Enter, and go to step 5 below.4. To Disable "Last Access Time"
fsutil behavior set disablelastaccess 0
NOTE: This is the default setting.
A) Copy and paste the command below in the the command prompt, press Enter, and go to step 5 below.5. Close the elevated command prompt.
fsutil behavior set disablelastaccess 1
6. Restart the computer to apply.
Shawn
Last Access Timestamp - Enable or Disable in Windows
-
New #1
Do these steps work in Windows Server 2008/2012?
-
New #2
I think it does... Ran the reg file and this is the output after reboot

Auditing who accesses a share may also be of use for a server environment - Audit (log) Access to Shared Folders
Josh :)
-
-
-
-
New #6
"On older or slower systems, enabling Last Access Time could cause a performance decrease due to the increased overhead of Disk I/O."
Now I know my computer is fast, but when you say it increases the overhead would this somehow cause the hard disk to constantly run more? Like would this decrease its life?
-
New #7
Hello Andrew,
It will indeed increase disk I/O access and wear and tear on the HDD some. If you don't need to have "last access time", then it would be best to leave it disabled to save unneeded wear and tear. In the big picture, it's not going to decrease the life span of the HDD by much if you do need it though. :)
-
New #8
Ok thank you :) I would like to have it on for security purposes, just not if it was going to cause my hdd to fail quicker. Didn't want it constantly seeking. Thanks for the information.
-
New #9
You're welcome. I suppose that you could monitor your disk activity in Resource Monitor to see if you notice much difference to see if it's worth leaving enabled or not.

Last Access Timestamp - Enable or Disable in Windows
How to Enable or Disable File and Folder "Last Access Time" in WindowsPublished by Brink


 Quote
Quote

Related Discussions