How to Use Windows DVD Maker in Windows 7
InformationThis will show you how to open and use Windows DVD Maker in Windows 7 to create and burn a pictures and videos DVD that you can watch on a computer or on a TV using a regular DVD player. You can also customize the DVD menu style and text before you burn the DVD.
See also: Burn a DVD-Video disc with Windows DVD Maker
NoteWindows DVD Maker is only available in the Windows 7 Home Premium, Professional, Ultimate, and Enterprise editions.
The N and KN editions of Windows 7 have all the features that normally come with each individual Windows 7 edition, except for Windows Media Player 12 and related programs, such as Windows Media Center or Windows DVD Maker.
The N editions of Windows 7 allow you to choose your own media player and software required to manage and play CDs, DVDs, and other digital media files. If you choose to use Windows Media Player 12, downloading it, along with related software, is free.
Here's How:1. Insert a blank DVD into your DVD drive, then click on Burn a DVD video disc using Windows DVD Maker in the AutoPlay dialog box when it appears. (see screenshot below) ORThat's it,
2. Open the Start Menu, click on All Programs, and click on the Windows DVD Maker shortcut. (see screenshot below)
NOTE: The Windows DVD Maker EXE file path is C:\Program Files\DVD Maker\DVDMaker.exe. 3. If displayed, click on the Choose Photos and Videos button. (see screenshot below)
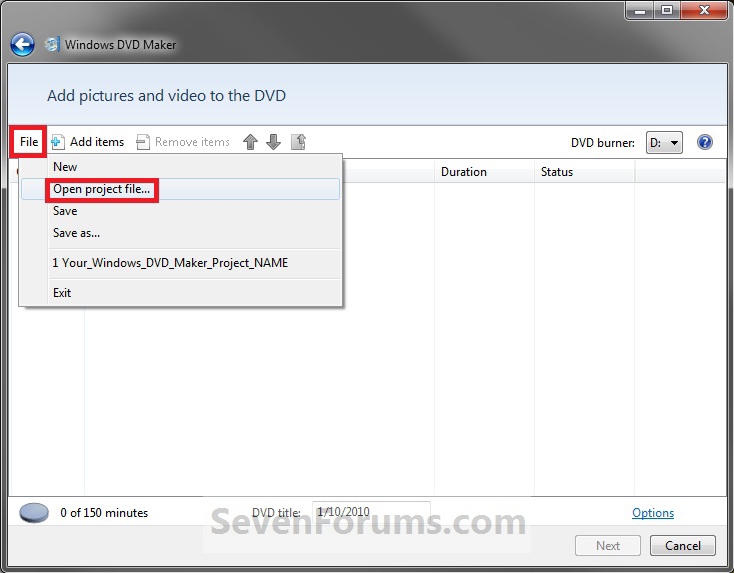
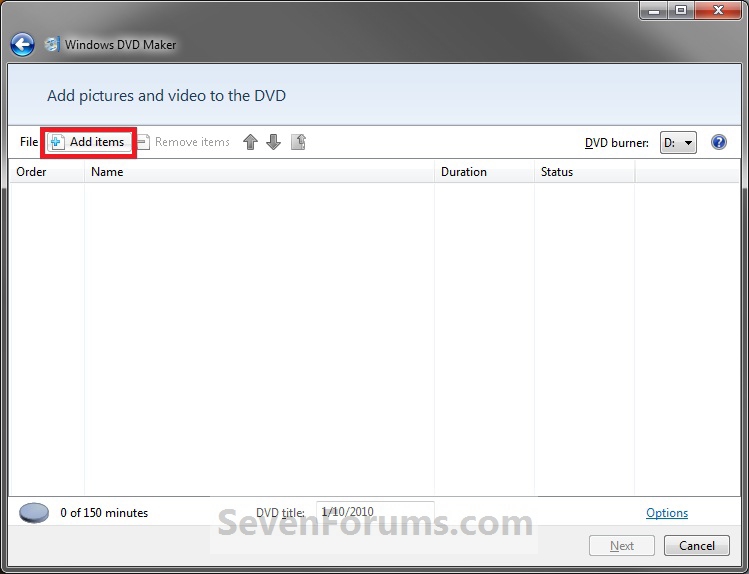
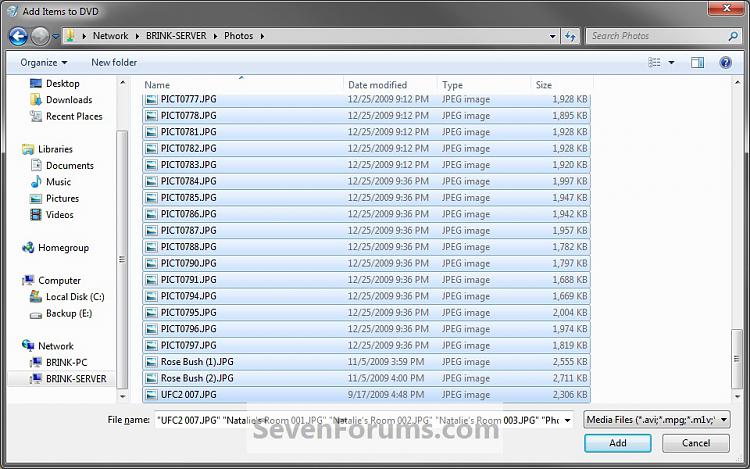
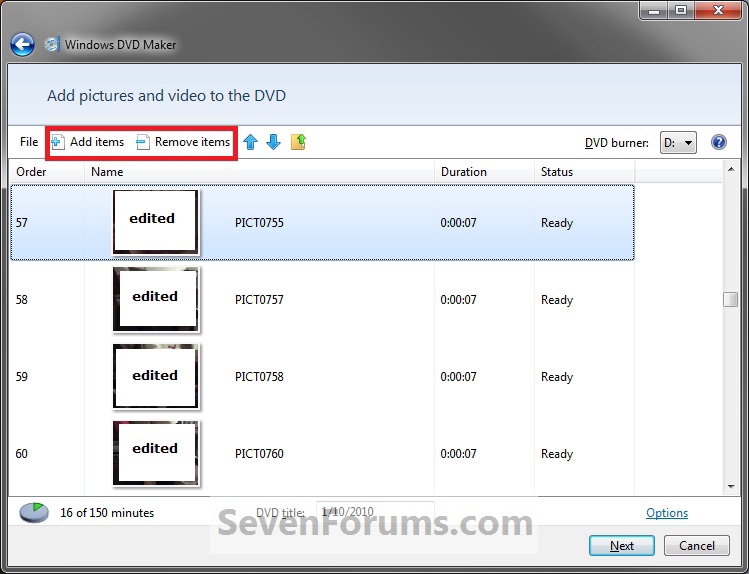
NOTE: If you do not want to see this window again the next time you open Windows DVD Maker, then check the Don't show this page again box. 4. To Add and Remove Pictures and VideoA) If you have an existing msdvd project file that you want to open and finish, then click on File and Open project file. Navigate to the folder that contains a Windows DVD Maker project file (.msdvd file extension) that you want to use to create your DVD, select the project file, and then click on Open. (see screenshot below)B) Click on Add items, then navigate to and select the videos and pictures that you want to add to your DVD, and then click on Add. (see screenshots below)5. To Arrange the Play Order of Added Items
C) Continue to Add items or Remove items until you have finished. (see screenshots below)NoteA) Select a added item that you want to move, then either click on6. To Change the DVD Video Optionsarrows to move that item up or down in the play order. (see screenshot below)
NOTE: You can also drag and drop them up and down the order list. B) At the upper right corner, select the drive letter for your DVD burner in the drop down arrow menu. (see screenshot above)A) Click on the Options link. (see screenshot above)7. Click on Next. (see screenshot below step 5A)
B) Select the settings that you want to use to create your DVD with, then click on OK when done. (see screenshot below)Note
- Choose DVD playback settings. Select one of the following options, depending on how you want your DVD to play:
- If you want the DVD menu to display when the disc is inserted into a DVD player, click Start with DVD menu.
- If you want the video to play automatically when the disc is inserted in a DVD player and show the menu at the end, click Play video and end with DVD menu.
- If you want the video to play automatically and loop continuously, click Play video in a continuous loop. You will still be able to view the menu if you press the Menu button on the remote control for your DVD player.
- DVD aspect ratio. This option lets you determine if a slide show on the DVD is displayed at a 4:3 (standard) or 16:9 (widescreen) aspect ratio. The aspect ratio is expressed as the relation of the width to the height of the slide show. When deciding which aspect ratio to choose, consider the aspect ratio for the monitor or TV on which your slide show will be played.
- Video format. This option lets you choose the video format that will be used for the video on your DVD. The options are NTSC and PAL. Most of the time you will not need to change this setting. However, you might need to change it if you plan to share your DVD with friends or family who live in a part of the world that uses a different video format. The video format that is selected by default is based on the
"Region and Language" settings in Control Panel.- DVD burner speed. This option lets you select the speed to burn your DVD. The default is Fastest. Some DVD burners won't burn at full speed if you're using certain kinds of DVDs. If you have a problem burning a disc, try selecting Medium or Slow.
- Temporary file location. If you want to change the storage location for temporary files that are created when making a DVD, click Browse, select the new folder location, and then click OK. For the best results when choosing a temporary file location, choose a folder on a hard disk drive partition that has at least 5 gigabytes (GB) of available disk space and a fast write speed.
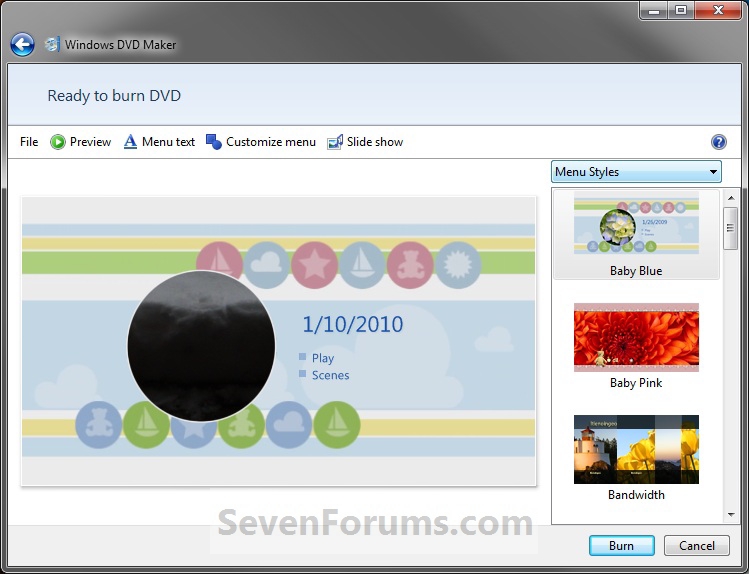
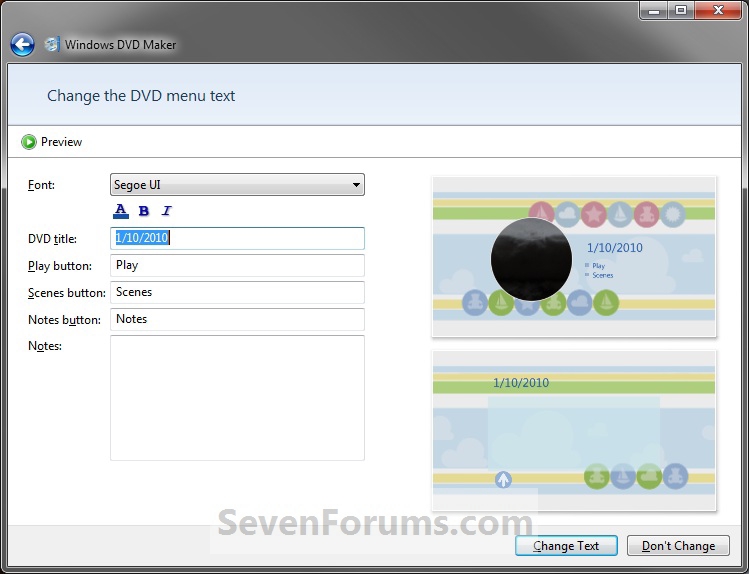
8. Select a Menu Style that you want to use for your DVD. (see screenshot below) 9. To Change the DVD Menu TextA) Click on Menu text on the toolbar. (see screenshot above)10. To Customize the DVD Menu Style
B) Now do one or more of the following below that you would like to do. (see screenshot below)
NOTE: The Notes button and Notes page only appear on the DVD if you include information in these fields.
- Click the Font box, and then select the font for the menu text.
- Click the Font Color (A), Bold (B), or Italic (I) buttons to select the font color and formatting.
- In the DVD title box, type the title that you want to use for your DVD.
- In the Play button box, type a label for the button people can click to play your DVD.
- In the Scenes button box, type a label for the button that people can click to view the different scenes on the DVD.
- In the Notes button box, type a label for the button that people can click to view any notes you enter for the DVD.
- In the Notes box, type any notes that you want to appear on your DVD.
C) A static preview of your changes appears in the preview pane on the right side of the screen. (see screenshot above)
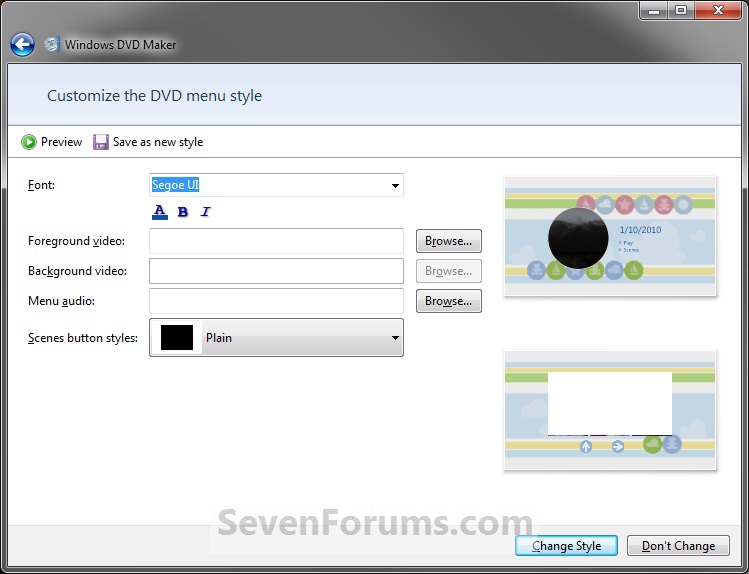
D) To preview the DVD menu and see how it looks, click on Preview. Click on OK when you're done previewing the DVD. (see screenshot below) E) When done making changes, click on Change Text to save the text changes and to return to the previous page. (see screenshot below step 9B)A) Click on Customize menu on the toolbar. (see screenshot below step 8)11. To Choose the Settings for a Slide Show on the DVD
B) Now do one or more of the following below that you would like to do. (see screenshot below)
- Click the Font box, and then select a font.
- Click the Font Color (A), Bold (B), or Italic (I) buttons to select the font color and formatting for your DVD menu text.
- If you select a menu style with both foreground and background video options, near the Foreground video box, click Browse, locate the video or picture that you want to appear in the foreground, and then click Add.
- To have a picture or video appear as the background for the main DVD menu, near the Background video box, click Browse, locate the video or picture that you want to appear in the background, and then click Add.
- If you want music to play while the DVD menu is displayed, near the Menu audio box, click Browse, locate the audio file (such as an MP3 or WMA file) that you want to use, and then click Add.
- Click the Scenes button styles box, and then select the shape for the scenes buttons on your DVD.
C) To preview the DVD menu and see how it looks, click on Preview. Click on OK when you're done previewing the DVD. (see screenshot below 9D)
D) When done making changes, click on Change Style to save your changes and to return to the previous page. (see screenshot above)A) Click on Slide show on the toolbar. (see screenshot below step 8)12. To Save your Windows DVD Maker Project
B) Now do one or more of the following below that you would like to do. (see screenshot below)
- Click Add music, find the music files (such as MP3 or WMA files) that you want to use, and then click Add. Depending on the length and settings for the slide show, you might want to add additional music. To do so, add another music file.
- If you added more than one audio file and you want to change the order in which the music files play in the slide show, click an audio file that you want to move, and then click Move up or Move down.
- To remove an audio file from the list, in the Music for slide show list, select the audio file, and then click Remove.
- To make the slide show and music last the same amount of time, select the Change slide show length to match music length check box. The amount of time each picture displays is shown next to Picture length.
- To specify the duration for each picture to display in the slide show, clear the Change slide show length to match music length check box (if it's selected), and then click the amount of time (in seconds) in the Picture length list for each picture to display.
- To choose the kind of transition you want to use between pictures, select a transition type from the Transition box.
- To add pan and zoom effects to the pictures you include in your slide show, click Use pan and zoom effects for pictures.
C) If you want to see the slide show as it will appear when you play your DVD, click Preview, and then click the slide show. Click OK when you're done previewing. (see screenshot below step 9D)
D) When done making changes, click on Change Slide Show to save your changes and to return to the previous page. (see screenshot above)
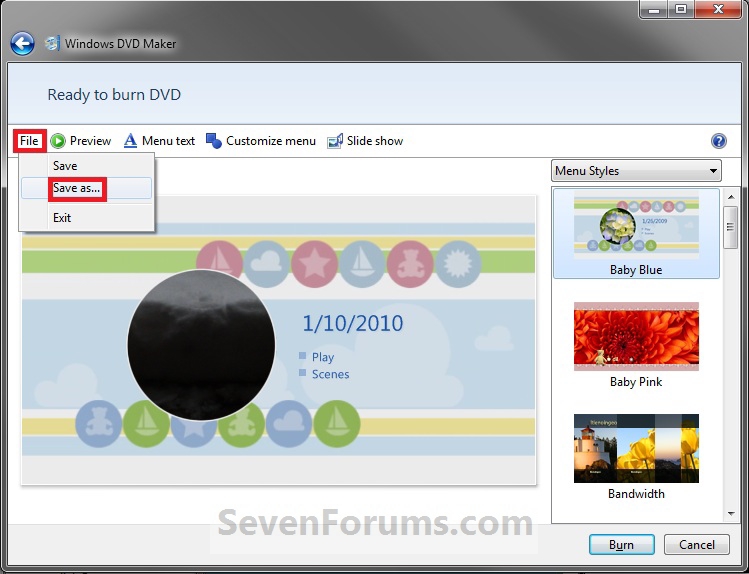
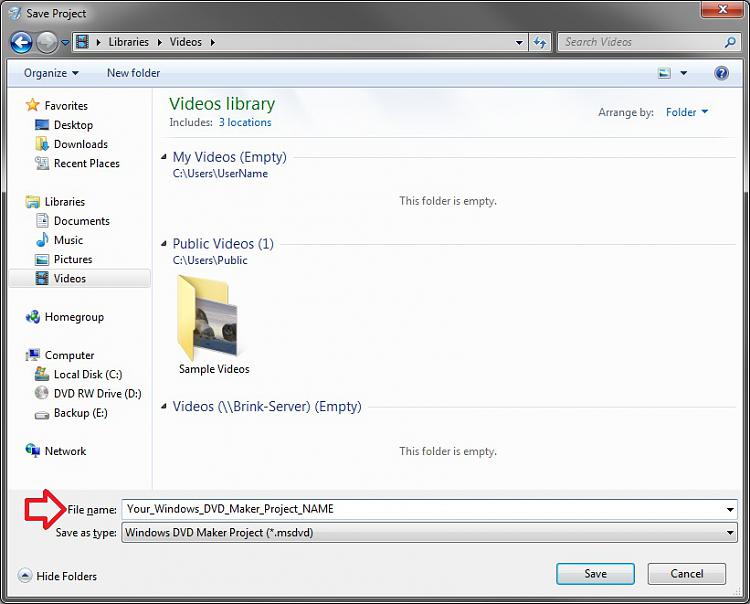
NOTE: This will allow you to save this current Windows DVD Maker project as a msdvd file that you can open in step 4A above to either finish the project later, make more changes, or burn another DVD using this project. You can also do this at any point while creating your project.A) Click on File and Save as. (see screenshot below) B) Navigate to where you want to save your project at, type in a name for your project, then click on Save. (see screenshot below)13. To Burn your DVDA) If you have not already, place a blank DVD in your DVD drive. If the AutoPlay opens, you can just close it.14. When done, close Windows DVD Maker.
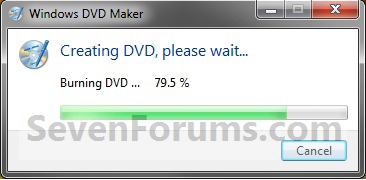
B) Click on the Burn button at the bottom right corner. (see screenshot below) C) You will now see this below. The time it takes to burn your DVD depends on a few things, such as the amount of video you added to the DVD, your computer system resources, as well as your DVD burner. D) When it's finished burning your DVD, you can do one or more of the following below that you would like to do. (see screenshot below):
- To make another copy of the current DVD, remove the burned DVD, insert a new recordable DVD, and then click Make another copy of this DVD.
- To close the page, click Close.
Shawn
Windows DVD Maker - How to Use
-
New #1
Got a question about adding music. When I try to add a couple of songs to a slide show, it shows the length of the songs as thousands of minutes. When you select "change slide show length to match music length" it shows each slide will be last about 37,000 seconds and I get an error saying the show is too long to burn to a DVD. Songs are in a .wav format and normal length of about 4-5 minutes.
Edit: Figured out it works if the audio is in .wma format.Last edited by berean; 04 Jul 2010 at 09:32.
-
-
New #3
can I play these wmv format on my stand alone dvd player via hdtv
-
-
New #5
I converted flv files to wmw files. It took a long time to burn- but I did it. I used Win7 DVD Maker. I am not sure if I need to convert files? Also, this worked with a +R disk. Not sure how I can speed up the encoding and burning process- any suggestions? Thank you- Also, the dvd player did playback -R from someone else- so unsure whether to stick to + or -R.
-
New #6
Most DVD players sill support playing + or - DVDs, but double check your DVD player's specs to be sure though.
Unfortunately, other that the size of the file, the horsepower of your CPU and DVD burner speeds is what determines how long the encoding will take.
-
New #7
Thank You- It worked w/ +R - burning the disc and playing it on TV. The dvd manual said it supported most formats. Since I got a clean copy and it played- I'll buy a spindle of +R's. I see that it takes a long time to encode and burn. Just one last thing- do I need to convert everything to wmv on Win7DVD Maker?
-
New #8
You're welcome.
No, you can use any audio format (file extension) that Windows Media Player supports playing in Windows DVD Maker.
-
New #9
Okay so I made a goodbye video for a friend and I wanted to know if there was a way to add a picture in front of a video without it automatically getting sent to the file for pictures. It isn't too important I just wanted to tell her that my video blooper was coming up.
Related Discussions











 Quote
Quote