Trouble formatting hd, system partition

jklein

New member
Local time
10:11 AM
Messages
5
I've got three HD's: c: is windows, g: is a storage drive, and e: is an external storage drive.

In the last month or so at startup, windows has tried to run a checkdisk on G: but it fails every time. I'm trying to figure out how to format G: because its giving me endless trouble.

I backed it up, went to computer management, and was given the "Windows cannot format the system partition on this disk" error.


How do I move the system partition to c: so I can format g:?

I've read some threads that seem similar where people suggest using BCDEDIT--is that what I should be doing?


thanks for the help!
joe


EDIT: Also, I'm no expert, so I have no idea how in the hell system files got onto my storage drive in the first place...
 

Attachments

  • hds.PNG
    hds.PNG
    21.9 KB · Views: 283

My Computer

OS
Windows 7 Ultimate x64
Welcome to Windows Seven Forums.

You have two partitions (C and G) marked as active when only your Windows drive C should be active as it is the boot partition.

You need to deactivate the G drive: How to deactivate an active partition?

Once you've done that you should be able to format your G drive.
 

My Computer

Computer Manufacturer/Model Number
HP Pavilion Elite 495UK
OS
Windows 7 Ultimate SP1 64-Bit
CPU
Intel Core i7 870 @ 2.93GHz
Motherboard
MSI 2A9C (CPU1)
Memory
8Gb Dual-Channel DDR3 @ 664MHz
Graphics Card(s)
nVidia GeForce GTX 460 1024MB dedicated RAM
Sound Card
Realtek HD Audio
Monitor(s) Displays
HP2310i
Screen Resolution
1920 x 1080
Hard Drives
1x1954GB Hitachi HDS22020ALA 330 (RAID), 1x1954GB Hitachi External for backup and storage
PSU
460W
Case
HP Elite
Cooling
Air cooled
Keyboard
Logitech K750 solar-powered keyboard
Mouse
Logitech Wireless M180 mouse
Internet Speed
2Mb
Other Info
Pure Avanti Flow Internet Radio with iPod Dock, 64Gb iPod, HP USB Speakers, Sony MDR-V500 Headphones, Sony Vaio F-Series Laptop
Wonderful, that did it! Thank you!!

Joe
 

My Computer

OS
Windows 7 Ultimate x64
Ooops never mind, that didn't solve it at all. It did make it so that I could format, but I decided to reboot first just in case, and now it won't boot at all.... is there a way to undo what I just did?
 

My Computer

OS
Windows 7 Ultimate x64

My Computer

Computer Manufacturer/Model Number
HP Pavilion Elite 495UK
OS
Windows 7 Ultimate SP1 64-Bit
CPU
Intel Core i7 870 @ 2.93GHz
Motherboard
MSI 2A9C (CPU1)
Memory
8Gb Dual-Channel DDR3 @ 664MHz
Graphics Card(s)
nVidia GeForce GTX 460 1024MB dedicated RAM
Sound Card
Realtek HD Audio
Monitor(s) Displays
HP2310i
Screen Resolution
1920 x 1080
Hard Drives
1x1954GB Hitachi HDS22020ALA 330 (RAID), 1x1954GB Hitachi External for backup and storage
PSU
460W
Case
HP Elite
Cooling
Air cooled
Keyboard
Logitech K750 solar-powered keyboard
Mouse
Logitech Wireless M180 mouse
Internet Speed
2Mb
Other Info
Pure Avanti Flow Internet Radio with iPod Dock, 64Gb iPod, HP USB Speakers, Sony MDR-V500 Headphones, Sony Vaio F-Series Laptop
This is why Win7 HD should always be plugged into DISK0. The installer looks for the first Active partition to place the boot files, in this case a data HD.

Boot your Win7 DVD Repair console or REpair CD, accept any offered Repair. If Win7 doesn't start, boot back in to run Startup Repair repeatedly to start Win7 if it remains marked Active. If not, check it is still active using free Partition Wizard bootable CD, or Diskpart from the DVD/Repair CD Command Prompt. Partition - Mark as Active

System Repair Disc - Create
 
Ok so I'm back into my computer, I got it to boot by using the repair DVD. But now I'm back to where I was--the repair switched G: back to "active".

Maybe this is a dumb question, but is it possible to change the system volume from G: to C: without reinstalling windows?

That's really all I want--I'll reinstall windows if that's the only option, but I'd rather not if I don't have to.

Thanks for all the help
Joe
 

My Computer

OS
Windows 7 Ultimate x64
Yes, the procedure is to unplug G and swap it's data cable to C, while keeping it set as first HD to boot in BIOS setup.

Next mark C active using methods I posted earlier, then run Startup Repair repeatedly with reboots until Win7 starts on its own. It should now be System Active in DIsk Mgmt.

Power down to plug the cable previously plugged into C into G so it is now Disk1 instead of DIsk0. Use the same method used to mark C Active to instead mark G Inactive, making sure G doesn't get set first to boot in BIOS.
 
Ok so I'm back into my computer, I got it to boot by using the repair DVD. But now I'm back to where I was--the repair switched G: back to "active".

Maybe this is a dumb question, but is it possible to change the system volume from G: to C: without reinstalling windows?
There is only supposed to be one "active" partition on any given hard drive. That is THE partition on THAT drive which the BIOS will boot to is asked to boot to THAT drive. And how does the BIOS know which hard drive should be booted to? To whichever of your hard drives is specified as "hard disk #1" in the hard drive list in the BIOS setup.

There is a second list present in BIOS setup, for "boot device sequence", which for example might specify (1) USB device, (2) floppy diskette, (3) CD/DVD drive, and then (4) hard disk, or something like that, as the "boot device sequence". If you have a bootable media inserted into any of those bootable devices, then they will be examined by the BIOS at machine boot time and whichever bootable media is encountered first, using the prescribed search "boot sequence" list order, that will be the device from which booting actually occurs on that particular boot. That's how you can boot from a recovery CD or the Win7 installation DVD, or a standalone bootable USB drive or Partition Wizard's standalone bootable CD, or a floppy disk DOS, etc.


Ok, if you don't have a bootable USB drive inserted, and you don't have a bootable floppy diskette inserted, and you don't have a bootable CD/DVD inserted, then the BIOS WILL BOOT TO HARD DISK #1, specifically the "active partition" on that hard drive.

In your case, there's nothing wrong with actually having both C and G marked as "active". That isn't your problem. Your problem is that your BIOS setup needs to have the Win7 C drive set to be the "hard disk #1". And yes, that partition on that drive must also be marked "active" as it currently is. So what you do with your other G partition (also currently marked "active") is really irrelevant, if your BIOS points to the drive containing C as the "hard disk #1". This is the ultimate setup you want: the drive containing C as "hard disk #1" in the BIOS, and the C partition marked "active". Whatever else you have on any other drive and/or partitions is not significant, although having other partitions marked as "active" accomplishes nothing.

In your case this probably came from a machine that "evolved" over time, perhaps with WinXP installed at one time on what now is just a G "data" drive for you. Since WinXP was on it and thus had to be bootable, it had to be (a) "hard disk #1" at that time so that the BIOS went there at boot time, and (b) was "active" so that WinXP would be booted. I'm guessing this is what it used to be like, and the additions we now see (i.e. that you have a second internal hard drive plus an external drive) came later... when you installed Win7.

That's precisely why the Win7 boot manager files got placed onto your now-G drive/partition when you installed Win7, because (a) that drive was still "hard disk #1 for the BIOS, and (b) that partition was the "active" partition on the drive. Once the Win7 boot managers placed here are kicked off at boot time, they know that the real Win7 is over on the other now-C drive and go there to finish the Win7 boot process. If you had first changed "hard disk #1" in the BIOS to the now-C drive before you installed Win7 on what I am guessing was a brand new empty hard drive purchased and added as part of your Win7 upgrade project, the Win7 installation would have created a 100MB "system reserved" primary/"active" partition on this new now-C drive for use in housing the boot manager files, and then created a second primary partition into which it then installed the real Win7 OS. Your G-drive would have been gone from the boot-related picture and you would not have been prevented it from being formatted.


Now, the story's not over quite yet.

Since you had your current G drive as "hard disk #1" and that partition (which I'm guessing used to be WinXP, and thus the "active" partition on that drive), when you installed Win7 as a second OS on the new second drive (what is now C, on the "active partition" on that hard drive), Win7 placed its boot manager files on what currently is the G partition, which used to be the WinXP bootable OS partition... because (a) that hard drive was still set as "hard disk #1" in the BIOS, and (b) that partition was still marked as "active".

And that's how booting occurs on your system currently. BIOS boots to G where boot manager files are, and the boot manager knows the real Win7 is over on C, so that's where it goes to complete the boot process and initiate Win7.

So you are currently using that G partition on that hard drive as if it were the little "100MB system reserved partition" Win7 normally creates on a single-drive machine. Same effect, except that instead of having a little 100MB "system reserved" partition (marked "active", on "hard disk #1" of the BIOS) for the boot manager files to start the boot process, you're using a 2GB partition to hold those boot manager files as well as data.

And unless (1) you move the boot manager files off of G and over to C (using the triple-repair method alluded to by others, or EasyBCD), and then also (2) change "hard disk #1" in the BIOS to point to your hard drive containing C, you will not really eliminate G as the current BOOT PARTITION (i.e. (a) "active partition" on (b) "hard disk #1 in the BIOS") which makes it illegal to be FORMAT'ed.


To summarize, given your current setup you want to make your C partition "bootable" directly, both the "active" partition on that hard drive and also containing the Win7 boot manager files. This can be done using triple-repair, or EasyBCD. In other words, it is possible to place the boot manager files WITHIN the Win7 partition itself... you don't actually need the small "100MB system reserved" partition, although a from-scratch Win7 install will do that.

And you want to make that hard drive containing C be "hard disk #1" in the BIOS.

This will free your G partition on that hard drive to be fully formatted back to zero. It will no longer be part of the system boot process, which is why it currently cannot be formatted.


===>> boot manager files go into the "active" partition on "hard disk #1" per the BIOS. Only that one single "active" partition MUST BE PRIMARY. All other partitions can either be "logical" (inside of the one allowed "extended partition" on a drive) or "primary".

A hard drive is allowed to have up to four "primary" partitions total (including that one tiny 100MB "system reserved" partition, is you have it). No more than four "primary" partitions are allowed.

If one of those four allowed "primary" partitions is instead configured to be an "extended partition" (thus now limiting the other real "primary" partitions to just three), then inside of that "extended partition" you can now define ANY NUMBER OF "LOGICAL" PARTITIONS. ANY NUMBER OF LOGICAL PARTITIONS inside of the one "extended partition" (which itself is one of the four allowed "primary" partitions on the drive)!!

Only the "active" partition on "hard disk #1" MUST be "primary", and that's where boot manager files go.

All other partitions (including bootable OS partitions for Win7 and WinXP) can themselves be "logical" partitions (with no limit on number inside of the one "extended partition" allowed on a hard drive), or "primary" partitions subject to the maximum of four total on a hard drive . There are no functional differences between "logical" and "primary" partitions, other than what I've explained above as far as location and number. In fact, other than on the "hard disk #1" which needs at least one "primary" partition marked "active", no other hard drives require ANY "primary" partitions.

If you want, you can even define nothing but "logical" partitions on all secondary internal and external hard drives, which means their total drive capacity will be set up simply as one single "extended partition" (i.e. the only partition on the drive, which will be "primary" and used as the "extended partition" for that drive), where every one of your L1, L2, ..., Ln "logical" partitions will be sub-defined inside of that one "extended partition" using 100% of the drive.

Obviously, because all "logical" partitions are within the one single "extended partition" allowed on a hard drive, all "logical" partitions must be adjacent to each other... although obviously unallocated free space between "logical" partitions is also allowed WITHIN the interior of the "extended partition". Unallocated free space within the "extended partition" that separates defined "logical" partitions within the "extended partition" has nothing to do with any other unallcoated free space outside of the "extended partition", thus separating the up-to three remaining other "primary" partitions on the drive.

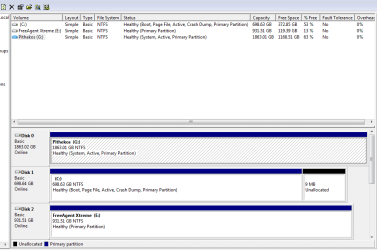
For example, here's my machine setup (from the perspective of Win7). Note that there is only one "primary" partition, which is "active" and also "hard disk #1" for the BIOS (and shows as Disk 0 and drive letter "O" to DISKMGMT and Win7). That is actually my WinXP partition, where the Win7 boot manager files live (actually, I've replaced them with the EasyBCD boot manager files), which then boots to Win7 which is on the "logical" partition C (partition P3 on the same physical drive).

harddrives.jpg


==>> you can use Disk Management to do most basic partition work and reconfiguring. But for absolute maximum flexibility, reliability, and capability, you should absolutely use Partition Wizard.

You should also download the ISO for standalone bootable PW, and burn it to bootable CD. The standalone version is required for certain operations involving the "active" or bootable partitions, and for other very significant "surgery" operations on drives and partitions.
 
Last edited:

My Computer

Computer type
PC/Desktop
Computer Manufacturer/Model Number
Home-built, two systems (1) and (2)
OS
Windows 7 Pro x64 (1), Win7 Pro X64 (2)
CPU
i5-3350p 3.1Ghz/6MB-cache (1); E8400 3.0Ghz/6MB-cache (2)
Motherboard
ASUS P8Z77-V Pro (1); ASUS P5Q3 (2)
Memory
8GB PC3-12800 DDR3 (1); 4GB PC3-10600 DDR3 (2)
Graphics Card(s)
ATI HD7750 (1), (see TV cards); ATI R7 250 (2)
Sound Card
Realtek ALC892 HD Audio (1); Realtek ALC1200 HD Audio (2)
Monitor(s) Displays
Eizo HD2441W LCD, Eizo S2433W (1); Eizo 24" S2433W (2)
Screen Resolution
1920x1200, 1920x1200 (1); 1920x1200 (2)
Hard Drives
(1) 1TB SATA-II (7200RPM), 2x2TB SATA-III (7200RPM), 250GB SATA-III (10000RPM) for OS; 2x2TB external USB 3.0

(2) 320GB SATA-II (7200RPM), 750GB SATA-II (7200RPM), 150GB SATA-II (10000RPM) for OS; 2TB external USB 3.0
PSU
Nesteq ECS-6001 600W (1); Nesteq ECS-5001 500W (2)
Case
Acousti-Case 360 (1) and (2)
Cooling
Noctua NH-U12P SE2 for CPU, 2x120mm case fans (1) and (2)
Keyboard
IBM PS/2 (1) and (2)
Mouse
Logitech MX Revolution wireless (1); Microsoft wired (2)
Internet Speed
100mbps down / 10mbps up
Antivirus
Microsoft Security Essentials; Malwarebyte Anti-Malware Pro
Browser
Firefox
Other Info
Ceton InfiniTV 4-tuner cablecard-enabled TV card as well as Hauppauge HVR-2250 OTA/ATSC 2-tuner TV card in (1), running under Win7 WMC
Got it!!

Thanks everyone for all the valuable info and suggestions.


Here's how I did it step-by-step:


  1. Use BCDedit to move Bootmgr to C
    Code:
    [B]bcdedit /set {bootmgr} device partition=C:[/B]
  2. Change the HD# of C: to "1" in BIOS
  3. Shutdown and unplug G:
  4. Boot and check disk management to make sure C: is now "system" volume
  5. Shutdown and reattach G:
  6. Restart and voila!


Thanks again!
 

My Computer

OS
Windows 7 Ultimate x64
Got it!!

Here's how I did it step-by-step:

  1. Use BCDedit to move Bootmgr to C
    Code:
    [B]bcdedit /set {bootmgr} device partition=C:[/B]
  2. Change the HD# of C: to "1" in BIOS
  3. Shutdown and unplug G:
  4. Boot and check disk management to make sure C: is now "system" volume
  5. Shutdown and reattach G:
  6. Restart and voila!
Excellent! The two key steps of course are (1) get the hard drive on which your intended "active" partition is located to be HD#1 in the BIOS, and then (b) be sure the Win7 boot manager files are located in that "active" partition.

And it is only THAT ONE SINGLE PARTITION, the "active" partition on HD#1, which MUST be a "primary" partition.

ALL OTHER PARTITIONS ON THIS OR OTHER DRIVES CAN BE "LOGICAL" OR "PRIMARY", subject to the previously discussed limit of no more than FOUR "PRIMARY" PARTITIONS on a hard drive. If one of those four "primary" partitions is treated as the "extended partition", then any number of "logical" partitions can be sub-defined inside it. So then there would be a limit of THREE true "primary" partitions on that drive, one "extended partition" (which is also "primary") on that drive, and ANY NUMBER of "logical" partitions sub-defined inside of the "extended partition".


And as you've now demonstrated, the Win7 boot manager files can really be in any of three different locations:

(1) in the 100MB "system reserved" partition which is created by a fresh Win7 install on a brand new empty drive and marked as "active", with the real Win7 system partition created as a second partition (normally using the rest of that drive, unless you countermand the default during the early install steps).

(2) in some other already "active" partition currently marked as HD#1 in the BIOS, such as an existing WinXP bootable system partition on the same or different hard drive, when you install Win7 as a second Windows OS in an environment in which an existing Windows OS is discovered (by the Win7 installer examining the "active" partition on HD#1). In such a situation the Win7 installer replaces the WinXP boot manager in that "active" partition on that HD#1 with the new Win7 boot manager, and also installs the "menu" of bootable OS's you will see at boot time. The menu points to both the existing WinXP system in that very same "active" partition on HD#1, and also points to the newly installed Win7 system (which can either be in another logical/primary partition on the same physical hard drive as WinXP's "active" partition, or it can be in a logical/primary partition on some other physical hard drive).

(3) in the Win7 system partition itself (if that partition is both "active" and resides on HD#1), manually placed there by BCDEdit, or the "triple REPAIR" method, or also by the highly recommended product named EasyBCD. In other words, the 100MB "system reserved" and "active" partition on HD#1 is not really needed to facilitate booting to Win7 in a single OS environment. All that is really needed is to make sure that the Win7 boot manager files are located inside the "active" partition on HD#1 (whichever Windows OS resides in that "active" partition on HD#1), and that can be done using any of the three methods shown above... although I would always vote for using EasyBCD (i.e. its "bootloader setup" screenshot in the above gallery) as (a) it is GUI and easy to understand, and (b) you cannot make a mistake because it is GUI and easy to understand.

In other words, EasyBCD can do exactly what BCDEdit can do... but with a GUI interface that is easy to understand. Note also that EasyBCD can install the WinXP boot manager files inside of the WinXP partition, if that is what is needed for a repair of a boot problem with WinXP. In other words it can reinstall either Win7 or WinXP boot manager into that partition, along with repairing the MBR on that drive to point to that partition.

EasyBCD: it's free, it's easy to use, and its' highly recommended. Can be downloaded from this page, using the "download" button at the BOTTOM OF THE PAGE, not the "download now" SPAM/driver-scan button at the top of the page.
 

My Computer

Computer type
PC/Desktop
Computer Manufacturer/Model Number
Home-built, two systems (1) and (2)
OS
Windows 7 Pro x64 (1), Win7 Pro X64 (2)
CPU
i5-3350p 3.1Ghz/6MB-cache (1); E8400 3.0Ghz/6MB-cache (2)
Motherboard
ASUS P8Z77-V Pro (1); ASUS P5Q3 (2)
Memory
8GB PC3-12800 DDR3 (1); 4GB PC3-10600 DDR3 (2)
Graphics Card(s)
ATI HD7750 (1), (see TV cards); ATI R7 250 (2)
Sound Card
Realtek ALC892 HD Audio (1); Realtek ALC1200 HD Audio (2)
Monitor(s) Displays
Eizo HD2441W LCD, Eizo S2433W (1); Eizo 24" S2433W (2)
Screen Resolution
1920x1200, 1920x1200 (1); 1920x1200 (2)
Hard Drives
(1) 1TB SATA-II (7200RPM), 2x2TB SATA-III (7200RPM), 250GB SATA-III (10000RPM) for OS; 2x2TB external USB 3.0

(2) 320GB SATA-II (7200RPM), 750GB SATA-II (7200RPM), 150GB SATA-II (10000RPM) for OS; 2TB external USB 3.0
PSU
Nesteq ECS-6001 600W (1); Nesteq ECS-5001 500W (2)
Case
Acousti-Case 360 (1) and (2)
Cooling
Noctua NH-U12P SE2 for CPU, 2x120mm case fans (1) and (2)
Keyboard
IBM PS/2 (1) and (2)
Mouse
Logitech MX Revolution wireless (1); Microsoft wired (2)
Internet Speed
100mbps down / 10mbps up
Antivirus
Microsoft Security Essentials; Malwarebyte Anti-Malware Pro
Browser
Firefox
Other Info
Ceton InfiniTV 4-tuner cablecard-enabled TV card as well as Hauppauge HVR-2250 OTA/ATSC 2-tuner TV card in (1), running under Win7 WMC
I gave you the steps which have been used hundreds of times here to successfully remove a Dual Boot and move the System boot files to Win7. All of this is automated now in Win7 Startup Repair and doesn't need dated DOS methods or lengthy dissertations.

If you'll post back another screenshot of your full Disk Mgmt drive map we can check that Win7 is correctly configured to be System Active Boot Primary NTFS and then you are good to go.
 
I gave you the steps which have been used hundreds of times here to successfully remove a Dual Boot and move the System boot files to Win7. All of this is automated now in Win7 Startup Repair and doesn't need dated DOS methods or lengthy dissertations.
Greg,

With all due respect, it is far simpler to simply go into the BIOS setup at machine boot time and change the hard disk sequence right there, than to open the computer and physically swap cables going to the two drives. That's just plain unnecessary, when the swap can be done in the BIOS itself.

The goal of this step is obviously the same, no matter how you accomplish it... namely to make the drive containing the C partition be HD#1 so that the BIOS goes there at boot time hunting for the "active" partition on that drive. But that's exactly why the BIOS setup provides that functionality, to make it possible to logically reconfigure the hard drives drives without requiring any physical rewiring, and most importantly being able to designate HD#1 which is crucial to the boot process.

Also, it's not really absolutely necessary to mark the G partition "not active" to prevent the BIOS from mistakenly trying to boot from it. The BIOS is never going to go to that drive at boot time, if the other drive is marked as HD#1 and there is an "active" partition on it.

Yes, it's poor form to have more than one "active" partition when you have multiple drives, and only THE one true boot partition should be marked "active". But there's no actual harm or risk of harm by residually leaving that old obsolete boot partition (which in my opinion, used to be his WinXP boot partition on that old drive, although he hasn't confirmed this) still marked "active".

I, like you, would probably change it to be "not active" to clean things up. But there's no actual harm or problem that will result from leaving it "active". It will simply never come into play if that drive is now HD#2.

Finally, his use of BCDEdit to install the boot manager files directly into the C (Win7 system partition) seems perfectly reasonable, as one of the several ways one can accomplish this goal. Your multiple-REPAIR approach also works. And EasyBCD also can do it really simply. There's not just one way.


I don't mind writing a "lengthy dissertation" when I feel it's necessary to explain something adequately, to someone else who is asking for assistance in solving a problem.

Why not share some detailed understanding through a few more words, so that the "student" gains real knowledge? Just providing the steps, A-Z, without explaining WHY or HOW or WHAT they are accomplishing, well I'd rather say a bit more.

But that's just me.
 

My Computer

Computer type
PC/Desktop
Computer Manufacturer/Model Number
Home-built, two systems (1) and (2)
OS
Windows 7 Pro x64 (1), Win7 Pro X64 (2)
CPU
i5-3350p 3.1Ghz/6MB-cache (1); E8400 3.0Ghz/6MB-cache (2)
Motherboard
ASUS P8Z77-V Pro (1); ASUS P5Q3 (2)
Memory
8GB PC3-12800 DDR3 (1); 4GB PC3-10600 DDR3 (2)
Graphics Card(s)
ATI HD7750 (1), (see TV cards); ATI R7 250 (2)
Sound Card
Realtek ALC892 HD Audio (1); Realtek ALC1200 HD Audio (2)
Monitor(s) Displays
Eizo HD2441W LCD, Eizo S2433W (1); Eizo 24" S2433W (2)
Screen Resolution
1920x1200, 1920x1200 (1); 1920x1200 (2)
Hard Drives
(1) 1TB SATA-II (7200RPM), 2x2TB SATA-III (7200RPM), 250GB SATA-III (10000RPM) for OS; 2x2TB external USB 3.0

(2) 320GB SATA-II (7200RPM), 750GB SATA-II (7200RPM), 150GB SATA-II (10000RPM) for OS; 2TB external USB 3.0
PSU
Nesteq ECS-6001 600W (1); Nesteq ECS-5001 500W (2)
Case
Acousti-Case 360 (1) and (2)
Cooling
Noctua NH-U12P SE2 for CPU, 2x120mm case fans (1) and (2)
Keyboard
IBM PS/2 (1) and (2)
Mouse
Logitech MX Revolution wireless (1); Microsoft wired (2)
Internet Speed
100mbps down / 10mbps up
Antivirus
Microsoft Security Essentials; Malwarebyte Anti-Malware Pro
Browser
Firefox
Other Info
Ceton InfiniTV 4-tuner cablecard-enabled TV card as well as Hauppauge HVR-2250 OTA/ATSC 2-tuner TV card in (1), running under Win7 WMC
There are two reasons that OP was advised to swap the data cables between C and G, leaving G unplugged during repairs while making sure C is set first to boot in BIOS:

1) The OS HD should always if possible be in DISK0 slot to avoid this exact problem where a data drive accidentally marked Active steals the System boot files during reinstall or Repair - when the installer looks for first Active partition to place the boot files.

2) Marking G Inactive to run the Repairs on Active C doesn't always work - repairs will simply default to former incorrect System partition G. If Repairs fail on C while G is detached (as can happen) you have the old configuration as a fallback so you know Win7 will start one way or the other.

You are correct that in some cases with a laptop where unplugging the HD is too hard and disabling not offered as an option in BIOS, marking Win7 Active while marking data partition Inactive, changing boot order then running Repairs is sometimes all that's practical. Be aware that more than once Win7 has stubbornly refused to claim its boot files from the data partition and OP has had to back up and wipe the data drive. Keep in mind that if Win7 still won't repair (as also can happen) that there is now no fallback, as there is with an unplugged data drive.

Again these steps are based on trial and error with hundreds of Dual Boot removals here, more than on all other help sites on the web put together. After Win7 release, we would sometimes help remove a dozen Dual Boots a day here.
 
Back
Top