Virtual Hard Drive VHD File - Create and Start with at Boot

How to Create a Windows 7 VHD at Boot to Start with from Boot


   Information
This will show you how to create a Windows 7 VHD file at boot on an existing installed OS's (ex: Vista or Windows 7) C: hard disk or partition to be able to natively boot from the Windows 7 VHD at startup in the Windows Boot Manager.

   Note
This tutorial uses an example that will create a C:\(file name).vhd file on the C: drive/partition at boot that is used to natively boot from at startup.

You will be able to create the VHD file on any partition or drive letter that you like though.

   Warning
All Vista, Windows 7, and Windows 8 (except Windows 8 RT) editions support booting from a VHD.

You must have either Windows 7 Ultimate, Windows 7 Enterprise, Windows 8 Pro, or Windows 8 Enterprise installed on the VHD to be able to boot from the VHD natively.


EXAMPLE: Windows Boot Manager
NOTE: You will be able to either select your currently installed OS (ex: Vista) or the VHD file (ex: Windows 7) in the Windows Boot Manager to start your computer with.
Boot_Manager.jpg
EXAMPLE: VHD file in your Current OS (ex: Vista)
NOTE: This is where the VHD file will be stored at on your currently installed OS (ex: Vista) to be used to boot from.
Example.jpg


OPTION ONE

To Create and Add the VHD to Boot From


1. Boot from your retail copy Windows 7 Ultimate or Enterprise installation DVD/USB, and do step 2 or 3 below for what you would like to do.
NOTE: To have Windows 8 on VHD, see instead: How to Create a Windows 8 VHD at Boot to Dual Boot with Windows 7 or Vista

2. When you are at the start of the Windows 7 installation screen, press the Shift+F10 keys, and go to step 4 below. (See screenshot below)
Setup.jpg
3. Boot into the command prompt from the Startup Recovery Options screen, and go to step 4 below. (See screenshot below)
NOTE: You will use OPTION TWO at that link.
Step1.jpg
4. In the command prompt, type diskpart and press Enter. (See screenshot below)
Step2.jpg
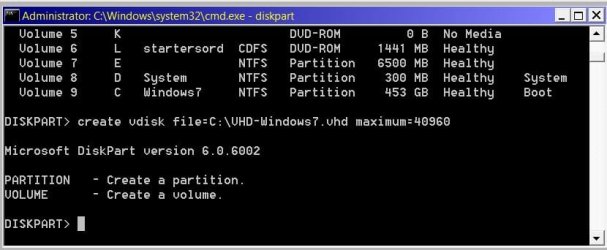
5. In the elevated command prompt, type list volume and press Enter. Make note of the drive letter for the volume that you want to create the VHD file on. (See screenshot below)
NOTE: This will allow you to see what the drive letters are for each volume. They are not always the same at boot as they are in Windows.
list-disk.jpg
6. Do either step 7 or 8 below for what type of VHD file you would like to create.

7. To Create a Fixed VHD File
NOTE: A fixed VHD file will allocate the entire maximum size (ex: 40GB) that you set below for the VHD file size.
A) In the command prompt, type the command below and press Enter.
NOTE: Substitute the C drive letter in the command below for what volume (step 5) you would like to create the VHD on.

Code:
[B]create vdisk file=[COLOR=red]C[/COLOR]:\[COLOR=red]VHD-Windows7[/COLOR].vhd maximum=[COLOR=red]40960[/COLOR][/B]

NOTE: You can substitute the VHD-Windows7 name with any name you would like for the VHD file instead. You can also substitute the maximum size of 40960 MB for the VHD to the maximum size you want instead in MB (1GB = 1024MB).
Step3.jpg
B) Go to step 9.
8. To Create an Expandable VHD File
NOTE: An expandable VHD file will only be as large as the amount of data that is saved in the VHD file, but still can get as large as the maximium size (ex: 40GB) that you set below. For example, using this option, the VHD file showed only 7GB instead of the full 40GB. Even though the VHD file is expandable, you may need to install Windows Virtual PC to have a program associated with VHD files to actual see only the smaller size instead of the larger size for the VHD file.
A) In the command prompt, type the command below and press Enter.
NOTE: Substitute the C drive letter in the command below for what volume (step 5) you would like to create the VHD on.

Code:
[B]create vdisk file=[COLOR=red]C[/COLOR]:\[COLOR=red]VHD-Windows7[/COLOR].vhd maximum=[COLOR=red]40960[/COLOR][/B] [B]type=expandable[/B]

NOTE: You can substitute the VHD-Windows7 name with any name you would like for the VHD file instead. You can also substitute the maximum size of 40960 MB for the VHD to the maximum size you want instead in MB (1GB = 1024MB).
9. In the command prompt, type the command below and press Enter. (See screenshot below)
NOTE: If you subsituted the VHD-Windows7 name in step 7 or 8, then you will need to use it here as well. Substitute the C drive letter in the command below for what volume (step 5) you would like to create the VHD on.

Code:
[B]select vdisk file=[COLOR=red]C[/COLOR]:\[COLOR=red]VHD-Windows7[/COLOR].vhd[/B]
Step4.jpg
10. In the command prompt, type attach vdisk and press Enter. (See screenshot below)
Step5.jpg
11. In the command prompt, type exit and press Enter. (See screenshot below)
Step6.jpg
12. Close the command prompt window. (See screenshot above)
A) If you used step 2 above, then click on Next, and go to step 13 below.

B) If you used step 3 above, then continue on to step 14 below.
13. Close the System Recovery Options window. (See screenshot below)
WARNING: You must close it only. Do not click on the Shut Down or Restart button.
Step7.jpg
14. Click on the Install now button. (See screenshot below)
Step8.jpg
15. Check the I accept the license terms box and click on Next. (See screenshot below)
Step9.jpg
16. Click on the Custom (advanced) option. (See screenshot below)
Step10.jpg
17. Select the available option with the unallocated space that is the same maximum VHD size (ex: 40GB = 40960MB) that you specified in step 7 or 8 above, and click on the Next button. (See screenshot below)
NOTE: If you see the Windows cannot be installed to this disk warning, then you can ignore it. Windows 7 will still install on the VHD file.
Step11.jpg
18. Finish doing a clean install of Windows 7.
NOTE: You will pick up at step 10 at that link to finish installing Windows 7 on the VHD file.

19. When you restart or start the computer, you will now have Windows 7 to select from at boot to start natively from the VHD file. (See the first example at top of the tutorial.)


OPTION TWO

To Delete the VHD and Remove from Boot List


1. To Remove OS VHD from Windows Boot Manager List
A) Delete the listed OS VHD from the Windows Boot Manager in msconfig.
2. To Delete the VHD File
A) In Windows Explorer, navigate to the VHD file that you have created in step 7 or 8 of OPTION ONE above (ex: C:\VHD-Windows7.vhd), right click on the VHD file and click on Delete.

B) Click on Yes to approve deletion.
That's it,
Shawn


Last edited:
Booting from vhd file created by WIN 7 BACKUP utility

I know there has not been any recent postings to this tutorial, but I thought I would see if I can get a response.

This tutorial pertains to a FRESH install of WIN 7 to a vhd to create a bootable vhd volume? I have a different situation where I already have a vhd that was created via the WIN 7 BACKUP utility some time ago. I successfully copied the vhd to my C drive & used EASYBCD to create a boot entry so that I could boot from the vhd. I completed that sucessfully & can boot into the old system setup. However, once the system prepares my desktop the START menu or even WINDOWS EXPLORER fails to appear. In the lower right corner the message that this WINDOWS system is not genuine appears.

That normally would not be a problem if I could get to the system properties to enter the proper authorization key, but it appears that I cannot get to the controls panel. Do I need to boot up in SAFE MODE (it does the same thing in SAFE MODE) or do something else?

HOPE that someone sees this. I have never booted from a vhd before so hopefully I am missing some minor procedure.
 

My Computer My Computer

At a glance

Windows 7 Home Prem 32 bit
Computer type
PC/Desktop
OS
Windows 7 Home Prem 32 bit
Hello betaupsilon, :)

That's correct. This tutorial is for when you create the VHD at boot and install Windows to it instead.

The tutorial below may be what you used instead.

http://www.sevenforums.com/tutorials/625-boot-vhd-using-windows-7-a.html

When Windows Explore fails to appear, you might see if you may be able to do this below to get it to do so:

1) Open Task Manager (CTRL+Shift+Esc)

2) Click on File (menu bar) in Task Manager

3) Click on Open, type explorer, and press Enter.
 

My Computer My Computer

At a glance

64-bit Windows 11 Pro for WorkstationsIntel i7-8700K OC'd to 5 GHz64 GB (4x16GB) G.SKILL TridentZ RGB DDR4 3600...ASUS ROG-STRIX-GTX1080TI-O11G-GAMING
Computer type
PC/Desktop
Computer Manufacturer/Model Number
Self built custom
OS
64-bit Windows 11 Pro for Workstations
CPU
Intel i7-8700K OC'd to 5 GHz
Motherboard
ASUS ROG Maximus XI Formula Z390
Memory
64 GB (4x16GB) G.SKILL TridentZ RGB DDR4 3600 MHz
Graphics Card(s)
ASUS ROG-STRIX-GTX1080TI-O11G-GAMING
Sound Card
Integrated
Monitor(s) Displays
2 x Samsung Odyssey G7 27"
Screen Resolution
2560x1440
Hard Drives
1TB Samsung 990 PRO M.2,
4TB Samsung 990 PRO PRO M.2,
TerraMaster F8 SSD Plus NAS
PSU
Seasonic Prime Titanium 850W
Case
Thermaltake Core P3
Cooling
Corsair Hydro H115i
Keyboard
Logitech wireless K800
Mouse
Logitech MX Master 4
Internet Speed
2 Gb/s Download and 100 Mb/s Upload
Antivirus
Malwarebyte Anti-Malware Premium
Browser
Google Chrome
Other Info
Logitech Z625 speaker system,
Logitech BRIO 4K Pro webcam,
HP Color LaserJet Pro MFP M477fdn,
APC SMART-UPS RT 1000 XL - SURT1000XLI,
Galaxy S23 Plus phone
Hello betaupsilon, :)

That's correct. This tutorial is for when you create the VHD at boot and install Windows to it instead.

The tutorial below may be what you used instead.

http://www.sevenforums.com/tutorials/625-boot-vhd-using-windows-7-a.html

When Windows Explore fails to appear, you might see if you may be able to do this below to get it to do so:

1) Open Task Manager (CTRL+Shift+Esc)

2) Click on File (menu bar) in Task Manager

3) Click on Open, type explorer, and press Enter.

The trick with the TASK MGR worked, but I encountered other problems. The system created a TEMP profile for me. I could not access My Documents or CONTROL PANEL either. Anyway, the tutorial link you listed above had the following statement:
tipsmall.png
Tip
You Must reset your VHD VirtualOS configuration like HAL type and driver configuration or your VHD will fail to boot!!! It must be cleaned of VirtualOS configuration correctly before windows 7 can boot your VHD!! ;)


I have not worked with a VirtualOS & the above link gives no references as to how to reset the configuration. Could this be the culprit & if so do you have any reference?

Thanks
 

My Computer My Computer

At a glance

Windows 7 Home Prem 32 bit
Computer type
PC/Desktop
OS
Windows 7 Home Prem 32 bit
It sounds like something may have gone wrong when setting it up.

You could delete it from BCD, and start over using the link I posted above to see if that may work better for you.
 

My Computer My Computer

At a glance

64-bit Windows 11 Pro for WorkstationsIntel i7-8700K OC'd to 5 GHz64 GB (4x16GB) G.SKILL TridentZ RGB DDR4 3600...ASUS ROG-STRIX-GTX1080TI-O11G-GAMING
Computer type
PC/Desktop
Computer Manufacturer/Model Number
Self built custom
OS
64-bit Windows 11 Pro for Workstations
CPU
Intel i7-8700K OC'd to 5 GHz
Motherboard
ASUS ROG Maximus XI Formula Z390
Memory
64 GB (4x16GB) G.SKILL TridentZ RGB DDR4 3600 MHz
Graphics Card(s)
ASUS ROG-STRIX-GTX1080TI-O11G-GAMING
Sound Card
Integrated
Monitor(s) Displays
2 x Samsung Odyssey G7 27"
Screen Resolution
2560x1440
Hard Drives
1TB Samsung 990 PRO M.2,
4TB Samsung 990 PRO PRO M.2,
TerraMaster F8 SSD Plus NAS
PSU
Seasonic Prime Titanium 850W
Case
Thermaltake Core P3
Cooling
Corsair Hydro H115i
Keyboard
Logitech wireless K800
Mouse
Logitech MX Master 4
Internet Speed
2 Gb/s Download and 100 Mb/s Upload
Antivirus
Malwarebyte Anti-Malware Premium
Browser
Google Chrome
Other Info
Logitech Z625 speaker system,
Logitech BRIO 4K Pro webcam,
HP Color LaserJet Pro MFP M477fdn,
APC SMART-UPS RT 1000 XL - SURT1000XLI,
Galaxy S23 Plus phone
OK, I got the same behavior using the CMD mode per the link you provided. The system seems to boot up just fine. I am then prompted to enter my password below my username. Then it seems to log me in & then the system starts "preparing my desktop". It is as if I am logging in for the 1st time & the system needs to load my personal settings into my environment. This might be expected since I have NEVER booted into a vhd. However, it seems it cannot load my settings & then creates a TEMP profile for me. Once this is done I cannot seem to access any documents, programs, or even CONTROLS PANEL.

So there must be something missing in the procedure to allow the system to recognize me as the USER. I am presuming all of the USER info does reside within the vhd. In fact, I know that it does because I can mount the vhd via DISK MGR & go to the USERS directory & see all of my info.

This is when I questioned if the issue on the VirtualOS configuration which the link you provided mentioned, but gave no specifics.
 

My Computer My Computer

At a glance

Windows 7 Home Prem 32 bit
Computer type
PC/Desktop
OS
Windows 7 Home Prem 32 bit

My Computer My Computer

At a glance

64-bit Windows 11 Pro for WorkstationsIntel i7-8700K OC'd to 5 GHz64 GB (4x16GB) G.SKILL TridentZ RGB DDR4 3600...ASUS ROG-STRIX-GTX1080TI-O11G-GAMING
Computer type
PC/Desktop
Computer Manufacturer/Model Number
Self built custom
OS
64-bit Windows 11 Pro for Workstations
CPU
Intel i7-8700K OC'd to 5 GHz
Motherboard
ASUS ROG Maximus XI Formula Z390
Memory
64 GB (4x16GB) G.SKILL TridentZ RGB DDR4 3600 MHz
Graphics Card(s)
ASUS ROG-STRIX-GTX1080TI-O11G-GAMING
Sound Card
Integrated
Monitor(s) Displays
2 x Samsung Odyssey G7 27"
Screen Resolution
2560x1440
Hard Drives
1TB Samsung 990 PRO M.2,
4TB Samsung 990 PRO PRO M.2,
TerraMaster F8 SSD Plus NAS
PSU
Seasonic Prime Titanium 850W
Case
Thermaltake Core P3
Cooling
Corsair Hydro H115i
Keyboard
Logitech wireless K800
Mouse
Logitech MX Master 4
Internet Speed
2 Gb/s Download and 100 Mb/s Upload
Antivirus
Malwarebyte Anti-Malware Premium
Browser
Google Chrome
Other Info
Logitech Z625 speaker system,
Logitech BRIO 4K Pro webcam,
HP Color LaserJet Pro MFP M477fdn,
APC SMART-UPS RT 1000 XL - SURT1000XLI,
Galaxy S23 Plus phone
You might see if you may be able to use the tutorial below for this to help.

User Profile Error - Logged on with a Temporary Profile

If it doesn't help, then you may need to start from scratch using the tutorial on the first page here instead.
I found the problem, but I don't know the fix. There is nothing wrong with the USER profile. What is wrong is when I boot from the vhd the drive letter is H, not C. I found this when attempting to enable the built in ADMIN acct as suggested in your link.

I will try to use the DISK MGR to reassign drive letters, but I am skeptical that it will be that easy. When I log onto the native system (not the vhd) the boot drive is C. When I boot from the vhd the drive letter is H. I will try DISK MGR & report back, but I doubt it will work since I could not access CONTROLS PANEL.

Do you have other advice?

Thanks
 

My Computer My Computer

At a glance

Windows 7 Home Prem 32 bit
Computer type
PC/Desktop
OS
Windows 7 Home Prem 32 bit
I will try to use the DISK MGR to reassign drive letters, but I am skeptical that it will be that easy. When I log onto the native system (not the vhd) the boot drive is C. When I boot from the vhd the drive letter is H. I will try DISK MGR & report back, but I doubt it will work since I could not access CONTROLS PANEL.

I could not access CONTROLS PANEL to get to DISK MGR so I tried CMD mode. I could not change the drive letter through the DISKPART since H is the boot drive.

My system is a multi-boot system & all of the systems boot with drive letter C. However, those systems reside on physical partitions not a vhd. There must be an extra step in bcdedit that is needed to get the drive letter correct.

Any thoughts?
 

My Computer My Computer

At a glance

Windows 7 Home Prem 32 bit
Computer type
PC/Desktop
OS
Windows 7 Home Prem 32 bit
I'm not sure what else to do other than start from scratch to get it correct. :(
 

My Computer My Computer

At a glance

64-bit Windows 11 Pro for WorkstationsIntel i7-8700K OC'd to 5 GHz64 GB (4x16GB) G.SKILL TridentZ RGB DDR4 3600...ASUS ROG-STRIX-GTX1080TI-O11G-GAMING
Computer type
PC/Desktop
Computer Manufacturer/Model Number
Self built custom
OS
64-bit Windows 11 Pro for Workstations
CPU
Intel i7-8700K OC'd to 5 GHz
Motherboard
ASUS ROG Maximus XI Formula Z390
Memory
64 GB (4x16GB) G.SKILL TridentZ RGB DDR4 3600 MHz
Graphics Card(s)
ASUS ROG-STRIX-GTX1080TI-O11G-GAMING
Sound Card
Integrated
Monitor(s) Displays
2 x Samsung Odyssey G7 27"
Screen Resolution
2560x1440
Hard Drives
1TB Samsung 990 PRO M.2,
4TB Samsung 990 PRO PRO M.2,
TerraMaster F8 SSD Plus NAS
PSU
Seasonic Prime Titanium 850W
Case
Thermaltake Core P3
Cooling
Corsair Hydro H115i
Keyboard
Logitech wireless K800
Mouse
Logitech MX Master 4
Internet Speed
2 Gb/s Download and 100 Mb/s Upload
Antivirus
Malwarebyte Anti-Malware Premium
Browser
Google Chrome
Other Info
Logitech Z625 speaker system,
Logitech BRIO 4K Pro webcam,
HP Color LaserJet Pro MFP M477fdn,
APC SMART-UPS RT 1000 XL - SURT1000XLI,
Galaxy S23 Plus phone
I'm not sure what else to do other than start from scratch to get it correct. :(
When you mean from scratch do you mean CLEAN install onto a blank vhd as in your tutorial or setup the vhd to boot correctly via bcedit? Although I have never used bootable vhd's I have heard boastings of how WINDOWS is flexible to boot several different systems using preexisting vhd's. As in my case the vhd is preexisting, not a fresh install. Are the claims I have seen misguided?
 

My Computer My Computer

At a glance

Windows 7 Home Prem 32 bit
Computer type
PC/Desktop
OS
Windows 7 Home Prem 32 bit
Correct, to use the tutorial on the first page to create a new VHD and install Windows 7 on for better results.

You're not misguided, but just something wrong with your current VHD.
 

My Computer My Computer

At a glance

64-bit Windows 11 Pro for WorkstationsIntel i7-8700K OC'd to 5 GHz64 GB (4x16GB) G.SKILL TridentZ RGB DDR4 3600...ASUS ROG-STRIX-GTX1080TI-O11G-GAMING
Computer type
PC/Desktop
Computer Manufacturer/Model Number
Self built custom
OS
64-bit Windows 11 Pro for Workstations
CPU
Intel i7-8700K OC'd to 5 GHz
Motherboard
ASUS ROG Maximus XI Formula Z390
Memory
64 GB (4x16GB) G.SKILL TridentZ RGB DDR4 3600 MHz
Graphics Card(s)
ASUS ROG-STRIX-GTX1080TI-O11G-GAMING
Sound Card
Integrated
Monitor(s) Displays
2 x Samsung Odyssey G7 27"
Screen Resolution
2560x1440
Hard Drives
1TB Samsung 990 PRO M.2,
4TB Samsung 990 PRO PRO M.2,
TerraMaster F8 SSD Plus NAS
PSU
Seasonic Prime Titanium 850W
Case
Thermaltake Core P3
Cooling
Corsair Hydro H115i
Keyboard
Logitech wireless K800
Mouse
Logitech MX Master 4
Internet Speed
2 Gb/s Download and 100 Mb/s Upload
Antivirus
Malwarebyte Anti-Malware Premium
Browser
Google Chrome
Other Info
Logitech Z625 speaker system,
Logitech BRIO 4K Pro webcam,
HP Color LaserJet Pro MFP M477fdn,
APC SMART-UPS RT 1000 XL - SURT1000XLI,
Galaxy S23 Plus phone
Correct, to use the tutorial on the first page to create a new VHD and install Windows 7 on for better results.

You're not misguided, but just something wrong with your current VHD.
Well that is simple enough. When the FRESH install occurs the MBR is modified such that the FRESH install is 1st on the BOOT MGR list & is now the default system.

It would seem to me that I should be able to execute the same BCDedit commands to achieve the same behavior for the preexisting vhd. After all, the vhd for the FRESH install is created prior to installation. I guess the question is do these commands have to be executed at the time when the system is placed on the vhd or can they be executed after the fact? If so, what are the commands & how?
 

My Computer My Computer

At a glance

Windows 7 Home Prem 32 bit
Computer type
PC/Desktop
OS
Windows 7 Home Prem 32 bit
If you wanted to do it like in the tutorial on the first page here, then you'll need to follow those steps.
 

My Computer My Computer

At a glance

64-bit Windows 11 Pro for WorkstationsIntel i7-8700K OC'd to 5 GHz64 GB (4x16GB) G.SKILL TridentZ RGB DDR4 3600...ASUS ROG-STRIX-GTX1080TI-O11G-GAMING
Computer type
PC/Desktop
Computer Manufacturer/Model Number
Self built custom
OS
64-bit Windows 11 Pro for Workstations
CPU
Intel i7-8700K OC'd to 5 GHz
Motherboard
ASUS ROG Maximus XI Formula Z390
Memory
64 GB (4x16GB) G.SKILL TridentZ RGB DDR4 3600 MHz
Graphics Card(s)
ASUS ROG-STRIX-GTX1080TI-O11G-GAMING
Sound Card
Integrated
Monitor(s) Displays
2 x Samsung Odyssey G7 27"
Screen Resolution
2560x1440
Hard Drives
1TB Samsung 990 PRO M.2,
4TB Samsung 990 PRO PRO M.2,
TerraMaster F8 SSD Plus NAS
PSU
Seasonic Prime Titanium 850W
Case
Thermaltake Core P3
Cooling
Corsair Hydro H115i
Keyboard
Logitech wireless K800
Mouse
Logitech MX Master 4
Internet Speed
2 Gb/s Download and 100 Mb/s Upload
Antivirus
Malwarebyte Anti-Malware Premium
Browser
Google Chrome
Other Info
Logitech Z625 speaker system,
Logitech BRIO 4K Pro webcam,
HP Color LaserJet Pro MFP M477fdn,
APC SMART-UPS RT 1000 XL - SURT1000XLI,
Galaxy S23 Plus phone
I got it to work.

In your tutorial you operate CMD mode in the WIN PE environment which is equivalent to the built in ADMIN acct. The other tutorial does not. It mentions to operate in the ELEVATED CMD mode, but this apparently is not good enough at least in my case. So logging into the built in ADMIN acct to execute the BCDedit commands will give the least hassles in booting into a preexisting vhd.

Maybe the other tutorial should be amended?
 
Last edited:

My Computer My Computer

At a glance

Windows 7 Home Prem 32 bit
Computer type
PC/Desktop
OS
Windows 7 Home Prem 32 bit
Shawn,
Now that I got my vhd's to boot OK I would like to repackage them into WindowsImageBackup file once again. Do you have any suggestions as to how to proceed? My first attempt failed so it is not exactly like imaging a system on a physical drive.
 

My Computer My Computer

At a glance

Windows 7 Home Prem 32 bit
Computer type
PC/Desktop
OS
Windows 7 Home Prem 32 bit
I'm not sure about that. :(
 

My Computer My Computer

At a glance

64-bit Windows 11 Pro for WorkstationsIntel i7-8700K OC'd to 5 GHz64 GB (4x16GB) G.SKILL TridentZ RGB DDR4 3600...ASUS ROG-STRIX-GTX1080TI-O11G-GAMING
Computer type
PC/Desktop
Computer Manufacturer/Model Number
Self built custom
OS
64-bit Windows 11 Pro for Workstations
CPU
Intel i7-8700K OC'd to 5 GHz
Motherboard
ASUS ROG Maximus XI Formula Z390
Memory
64 GB (4x16GB) G.SKILL TridentZ RGB DDR4 3600 MHz
Graphics Card(s)
ASUS ROG-STRIX-GTX1080TI-O11G-GAMING
Sound Card
Integrated
Monitor(s) Displays
2 x Samsung Odyssey G7 27"
Screen Resolution
2560x1440
Hard Drives
1TB Samsung 990 PRO M.2,
4TB Samsung 990 PRO PRO M.2,
TerraMaster F8 SSD Plus NAS
PSU
Seasonic Prime Titanium 850W
Case
Thermaltake Core P3
Cooling
Corsair Hydro H115i
Keyboard
Logitech wireless K800
Mouse
Logitech MX Master 4
Internet Speed
2 Gb/s Download and 100 Mb/s Upload
Antivirus
Malwarebyte Anti-Malware Premium
Browser
Google Chrome
Other Info
Logitech Z625 speaker system,
Logitech BRIO 4K Pro webcam,
HP Color LaserJet Pro MFP M477fdn,
APC SMART-UPS RT 1000 XL - SURT1000XLI,
Galaxy S23 Plus phone
Diskpart Query

Hi. After entering 'create vdisk file=C:\VHD-Windows7.vhd maximum=40960 I get ---
PARTITION - Create a partition.
VOLUME - Create a volume.

DISKPART>


??:confused: Do I need to install Windows virtual pc to continue? :banghead:
 

Attachments

  • Screenshot - 05_06_2019 , 00_13_11.jpg
    Screenshot - 05_06_2019 , 00_13_11.jpg
    35 KB · Views: 20

My Computer My Computer

At a glance

Vista Home Premium 32 bit
Computer type
PC/Desktop
OS
Vista Home Premium 32 bit
Hello Steve, and welcome to Seven Forums. :-)

Go ahead and post a screenshot showing your full drive layout in Disk Management to see if anything may stand out.

It looks like it's saying you need to create a partition or volume first.
 

My Computer My Computer

At a glance

64-bit Windows 11 Pro for WorkstationsIntel i7-8700K OC'd to 5 GHz64 GB (4x16GB) G.SKILL TridentZ RGB DDR4 3600...ASUS ROG-STRIX-GTX1080TI-O11G-GAMING
Computer type
PC/Desktop
Computer Manufacturer/Model Number
Self built custom
OS
64-bit Windows 11 Pro for Workstations
CPU
Intel i7-8700K OC'd to 5 GHz
Motherboard
ASUS ROG Maximus XI Formula Z390
Memory
64 GB (4x16GB) G.SKILL TridentZ RGB DDR4 3600 MHz
Graphics Card(s)
ASUS ROG-STRIX-GTX1080TI-O11G-GAMING
Sound Card
Integrated
Monitor(s) Displays
2 x Samsung Odyssey G7 27"
Screen Resolution
2560x1440
Hard Drives
1TB Samsung 990 PRO M.2,
4TB Samsung 990 PRO PRO M.2,
TerraMaster F8 SSD Plus NAS
PSU
Seasonic Prime Titanium 850W
Case
Thermaltake Core P3
Cooling
Corsair Hydro H115i
Keyboard
Logitech wireless K800
Mouse
Logitech MX Master 4
Internet Speed
2 Gb/s Download and 100 Mb/s Upload
Antivirus
Malwarebyte Anti-Malware Premium
Browser
Google Chrome
Other Info
Logitech Z625 speaker system,
Logitech BRIO 4K Pro webcam,
HP Color LaserJet Pro MFP M477fdn,
APC SMART-UPS RT 1000 XL - SURT1000XLI,
Galaxy S23 Plus phone
Back
Top