Here's the deal...
I bought a new hard drive that is a little bit faster and a more reliable brand than the original ... My original swap went just fine without a hitch (details on my process below), and I was running totally fine for a few days on my new hard drive.
So... now I decided I didn't need to save the data on my old drive anymore and I wanted to reformat it for use as an internal backup (it was old and slow but it still worked)... this is when things went a little wacky...
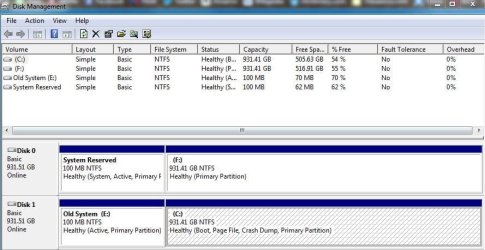
Because of my process, both HDs have nearly identical partitions including a "System Reserved" partition and a second bootable partition... but when Windows boots up with both HDs connected for some reason it is using the System Reserved partition from Disk 0 (my new HD), but assigning C: to the partition on Disk 1 (my old HD)... since this is then assigned as C:, I can't reformat it... So... How can I re-assign the C: back to the partition on Disk 0 in order to free up Disk 1 to be completely re-formatted?
In case it helps... this is a step by step of my whole process...
1. Before changing anything, I created a backup system image on an external drive
2. I removed the old HD and installed the new HD
3. I booted up using a Windows 7 repair disk
4. I restored the system image from the external drive onto my new HD
- At this point both drives were identical copies, but the old drive was physically removed.
5. I was working completely on the new drive for several days without any problems
- At this point System Reserved and C: both were assigned to the new HD in Disk 0
6. I decided to re-install my old HD as a secondary drive as Disk 1
7. Windows booted up OK with both HDs installed... but...
- Now the System Reserved in use is on Disk 0, and the boot drive (C") is on Disk 1... YIKES!
is on Disk 1... YIKES!
- I want to reassign the boot drive (C back to the partition in Disk 0 like it was earlier today!
I bought a new hard drive that is a little bit faster and a more reliable brand than the original ... My original swap went just fine without a hitch (details on my process below), and I was running totally fine for a few days on my new hard drive.
So... now I decided I didn't need to save the data on my old drive anymore and I wanted to reformat it for use as an internal backup (it was old and slow but it still worked)... this is when things went a little wacky...
Because of my process, both HDs have nearly identical partitions including a "System Reserved" partition and a second bootable partition... but when Windows boots up with both HDs connected for some reason it is using the System Reserved partition from Disk 0 (my new HD), but assigning C: to the partition on Disk 1 (my old HD)... since this is then assigned as C:, I can't reformat it... So... How can I re-assign the C: back to the partition on Disk 0 in order to free up Disk 1 to be completely re-formatted?
In case it helps... this is a step by step of my whole process...
1. Before changing anything, I created a backup system image on an external drive
2. I removed the old HD and installed the new HD
3. I booted up using a Windows 7 repair disk
4. I restored the system image from the external drive onto my new HD
- At this point both drives were identical copies, but the old drive was physically removed.
5. I was working completely on the new drive for several days without any problems
- At this point System Reserved and C: both were assigned to the new HD in Disk 0
6. I decided to re-install my old HD as a secondary drive as Disk 1
7. Windows booted up OK with both HDs installed... but...
- Now the System Reserved in use is on Disk 0, and the boot drive (C
is on Disk 1... YIKES!- I want to reassign the boot drive (C
back to the partition in Disk 0 like it was earlier today!My Computer
- Computer type
- PC/Desktop
- OS
- Windows 7 Professional 64bit
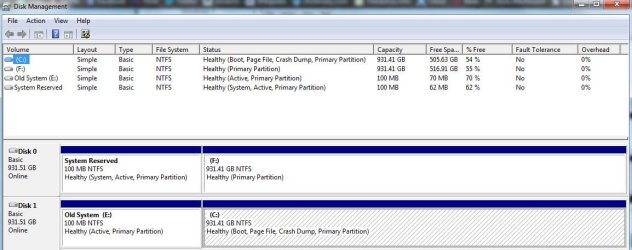
 Good outcome