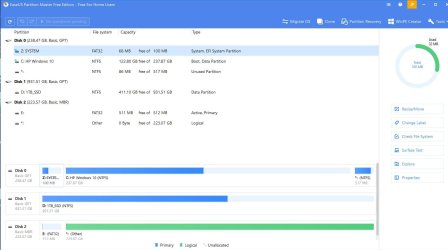
You've got a couple things messed up there. One is the wrong active partition, as SIW2 noticed. The other is the location of your System Reserved partition. That's what partition 1 ("101 MB Unallocated") is for.
(Yeah, I know you just tried to copy the same layout from Disk 0 to Disk 1, but Disk 0 got messed up somewhere in the past. It may be working now, but that D: partition is what used to be at the front. Since you're making a new clone, this is an opportunity to put things right again.)
It appears you're running Macrium from within Windows. To fix things, you'll need to boot from Macrium's external boot media (bootable CD or USB stick). So if you haven't done so yet, use Macrium to create its "Rescue" media before continuing. Once that's done, you can proceed.
First, delete partition F (Disk 1 partition 3). Then clone partition D only (Disk 0 partition 3) to Disk 1 partition 1 ("101 MB Unallocated"). These steps can be done from Macrium within Windows if you prefer. I'll assume the OS partition got properly cloned, so it shouldn't need to be recloned.
You should now have two partitions on Disk 1: a "System Reserved" followed by the 400 GB Windows partition, plus some leftover unallocated space.
Now shut down and physically remove the old HDD and move the new HDD into its place. You can also leave the two HDDs in place and just move the old HDD's cables to the new HDD, leaving the old HDD unconnected.
Finally, boot from the Macrium Rescue media, and follow Steps 11-15 in my
tutorial here. (That page was made for a different project, but we can pick it up from Step 11.)
(FYI, the "Fix Windows Boot Problems" option is not available from the Windows-based Macrium, so that's why you need to boot from the Macrium Rescue media instead.)
With only one HDD connected, Macrium should find only one Windows installation in Step 12. In Step 13, you should see both the System Reserved and Windows partitions. Select the System Reserved partition. Keep all defaults in Step 14, and finish. Remove the Rescue media and reboot from the hard drive.
(FWIW, Steps 13-14 take care of setting the correct partition active, so you shouldn't need to do that separately.)