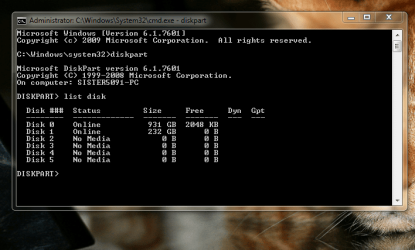
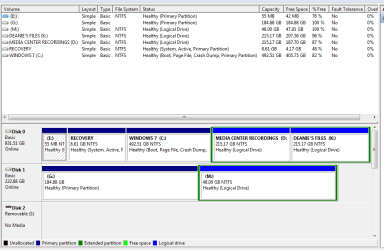
Ok. I think the DISKPART presentations you've shown are confusing, but the DISKMGMT image shows your two drives:
Disk0 (1TB) - 5 partition: E - 55MB (primary), Recovery (no letter) - 8GB (active + primary), C - 492GB (primary), D - 215GB (logical), K - 215GB (logical)
Disk1 (250GB) - unusable 232GB
Just a recommendation... when you run any of these utilities (e.g. DISKMGMT) if you will go to full-screen mode, and then spread the column separators so that all the text in each column is visible in the screenshot or the graphic presentation of the drive's partitions, it will much more readable and understandable to us.
Anyway, here's my recommendation:
(1) Download and install
[free] Partition Wizard Home Edition v5.2.
(2) Also
download the ISO image and burn the standalone boot CD version of Partition Wizard, which can be used conveniently when the functions you're performing cannot be completed while booted to the OS, but must be run outside of the OS.
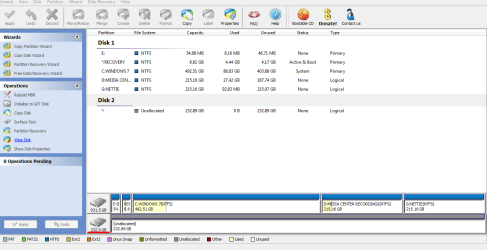
(3) Run Partition Wizard while under Win7 because work on this external drive (Disk1 for DISKMGMT, Disk 2 for Partition Wizard) can be run this way without any limitations.
Maximize the window to fill the screen, and spread the columns where information is shown, so that you can see all text in all columns. It's just much more readable that way.
(4) Select that external drive which will be titled "Disk 2" in the presentation, by clicking on the "Disk 2" title itself, not on any of the detail lines underneath it.
(5) When you select the drive itself (i.e. "Disk 2") on the left side of the screen you will see an available item under "Operations" named "delete all partitions". Select that "delete all partitions" and reply "yes" to the confirmation asking you if you want to delete all partitions.
This will add the "delete all partitions" operation to the queued list of operations now shown at the bottom-left corner of the screen. And the presentation for the contents of Disk 2" will now be modified to appear as if the entire 250GB (i.e. 232GB after formatting) space is now unallocated and fully available for partitioning.
(6) Push the APPLY button at the bottom left of the screen, to perform this one pending operation to "delete all partitions" on the external drive "Disk 2". This will perform and complete it, and the list of queued operations will be emptied.
(7) Select the "unallocated" space now appearing under the "Disk 2" title. Now, on the left side of the screen in the "Operations" section you will see the "create partition" item.
Select this "create partition" item, to bring up the "Create New Partition" window. The options on the window should be completely intuitive, and you can either allocate it completely as one partition or you can create two or more smaller partitions in the 232GB available space.
You use sliders and/or entered values to specify the size and location of the partition you're creating, and you can also install a label for the partition.
My suggestion is that you create the one or more partitions on this second drive as "logical" partitions instead of "parimary partitions. Functionally, they're essentially identical, but with "logical" partitions you don't have the "maximum of four primary partitions on a basic hard drive" to contend with. You have no limit on the number of "logical" partitions. Obviously if you only want to have one partition on this drive it doesn't really matter whether you use "logical" or "primary".
(8) When you push the OK button, the "create partition" operation will be queued in the list at the bottom-left corner of the screen.
You can now repeat the "create partition" process a second time if you want to build more than one partition into that 232GB drive. Pushing OK will add this second partition's create to the queued pending operation list.
Repeat again as required.
(9) When you're done, push the APPLY button in the lower-left, and the one or more partitions you want to create on the external hard drive will be created.
(10) You will get default drive letters assigned by this process. You can use Partition Wizard or Win7's DISKMGMT.MSC to change the drive letters to be whatever you want.
Again, if you use Partition Wizard to change the drive letters, you just select the partition from the list in the upper part of the screen or the graphic presentation in the lower part of the screen, and then select the "change drive letter" operation in the "Operations" group shown on the left side of the screen.
As before, push OK after you're finished setting things up, and you can repeat if you want to change another drive letter. All of these operations will again be queued into the pending operations list at the bottom-left corner.
Again, push APPLY, and the drive letter changes will occur.
(11) I don't think you will need to reboot Win7 in order to accomplish any of this. It can all be done and completed while Partition Wizard is running under Win7.
Worst case, you may be prompted to re-boot, but I honestly don't think this will happen for the operations I've listed above.
===>> PARTITION WIZARD is by far the easiest, most intuitive, most flexible, and most capable [free] 3rd-party utility to accomplish this type of function.
I believe the "delete all partitions" function of Partition Wizard should simply vaporize whatever's on that external drive, no matter what it is and no matter what about its current stat that's causing your mysterious problems for Win7's DISKMGMT or DISKPART.
Doesn't matter. Just use Partition Wizard to "delete all partitions" and start from scratch.
Partition Wizard. Download it, install it, use it. You won't be sorry.