Create the New Windows 7 System Reserved Partition Using Windows Disk Management
This information can be used to create the Windows 7 System Reserved partition after you have installed Windows using only Windows native disk management.
The main advantage of the System Reserved partition, it adds a link to WinRE (Windows Recovery Environment) to the F8 advanced boot options in Windows 7 that can be accessed during PC startup to repair startup errors if a Windows installer or a system repair disk isn't available for use; it also creates a central location to store the boot files needed to start Windows in a dual/multi boot situation and that makes it very easy to replace/remove a single OS when needed.
There must be at least one (1) Primary partition for creation/use as the System Reserved partition will not function as intended from an Extended partition; for further information on this requirement see Option Two #2 below.
Warning
As with anything that makes changes to the Windows structure there is always the chance for an error to occur, it would be advisable to make reliable backups to the media of your choice of any important data, i.e. pictures, music or documents, that you would not want to lose before you attempt any of the methods out-lined here, it is always better to be safe than sorry.
Let's get started!
Have a look at this tutorial before you start this for an alternative method.
System Reserved : Create for Dual Boot
Option One
Create the Windows 7 Syetem Reserved Partition
In the Windows start menu search box type diskmgmt.msc right click the entry and click "Run as Administrator" if you get a User Account Control (UAC) prompt enter your user credentials and click Yes.
1) In the disk management window and assuming you have created or already have unallocated space to start with, right click that space and click New Simple Volume then Next for the first "Wizard" dialog box.
click any image to enlarge

2) In the "Specify Volume Size" box type 200 for the size to create and click Next.
The reason for suggesting to create the System Reserved at 200MB instead of the new default of 100MB is an attempt to curb some of the issues we're now seeing with the partition being too small when dual/multi booting and it also being needed for use with the Windows 7 Backup and Restore and BitLocker programs.

3) In the "Assign Drive Letter" box do not assign a drive letter and click Next.

4) In the "Format" box at the "Volume Label" line type System Reserved and do not put a check/tic at the "quick" box and click Next

5) At the last "Completing" wizard dialog box click Finish to complete the process.
Option Two
Install a second Windows Operating System
1) Now if you want to install a second Windows OS using the remaining unallocated space it's a very easy process; create this partition in the same way you created the SysResv partition; when you get to the "Specify Volume Size" dialog box click Next to accept the offered size or you can choose to create a specific size; for this one you can assign the next available drive letter; then at the "Format" box you would use a Label (name) that you choose like Windows 7 or whatever you like and click Finish for the last "Wizard" dialog box.
click any image to enlarge

2) If there are already three (3) existing Primary partitions Windows will only create the fourth partition as an Extended partition, if you end up with an Extended/Logical drive, you can choose to do the Windows installation to the Logical drive and there will be no issues at all if you do and it can always be converted to a Primary partition at a later time if you choose.
For further information on the creation and use of Extended partition / Logical drives, have a look at this tutorial and its related links listed below.
System Reserved : Multi Boot from Logical Partitions
3) Strictly for demonstration purposes here, I'm going to use the free Partition Wizard bootable disk (PWBD) to convert the Extended to a Primary partition before the Windows installation so that I will have four (4) Primary partitions, for an out-line of the process see Option Four in this tutorial.
Partition Wizard : Use the Bootable CD


Method One: Install Windows 7 / Vista
1) The first thing is to mark the "System Reserved" partition as "Active" so Windows will know where to create the system volume, where the system boot files are stored; in Windows disk management right click the SysResv partition and click "Mark as Active" then Yes for the conformation dialog box, the third snip is what you will have.


2) Now insert the Windows install media into the Optical Disk Drive and restart the PC to set the first boot device as the ODD in the BIOS and install Windows 7 to the created "Windows 7" partition.
You will want to do a clean install choosing the "Custom (advanced)" not the "Upgrade" option, when you are presented with this "Where do you want ... " dialog box click to choose the created "Windows 7" partition and click next; do not use the installer to format anything.

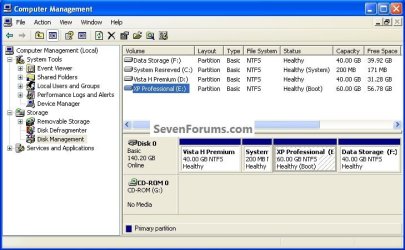
3) Here's the end result.

4) You will have to use EasyBCD from within Windows 7 to add an entry for Vista to the Windows boot (dual boot) menu but that's the easiest part of this process.


Method Two: Install Windows XP
The XP partition has to remain the system volume for the installation process or it will cause all sorts of issues that have to be corrected before XP will boot correctly in conjunction with the use of the "System Reserved" partition in a dual/multi boot configuration; this method is only possible using a Primary partition, it is not possible using an Extended/Logical drive.
1) Use the same methods above to create both the SysResv and a partition to install XP to; right click the created XP partition and click "Mark as Active" then Yes for the conformation dialog box.
click any image to enlarge

2) Now insert the Windows install media into the Optical Disk Drive and restart the PC to set the first boot device as the ODD in the BIOS and install Windows XP to the created "XP Professional" partition; do not use the installer to format anything.

When XP starts, these next steps have to be done and done in this order to get XP and whichever OS (Vista / Windows7) you're dual booting to boot correctly so you won't have issues later.
3) In Windows XP disk management, right click the "System Reserved" partition and click "Change Drive Letter" then in the dialog box that opens click "Remove" then Yes for the "Confirm" dialog box.

4) Now right click the SysResv partition and click "Mark as Active" then Yes for the "Disk Management" conformation dialog box; the second snip is what you should have.


5) Now put a Windows 7 / Vista full installer DVD or a created repair disk into the Optical Disk Drive (ODD) and restart the PC, at the BIOS select the ODD as the first boot device and run the 3 separate startup repairs with a system restart between each repair to create the boot files needed to start the dual boot to the "System Reserved" partition; information on the entire process can be viewed at these tutorials below.
Startup Repair - Run 3 Separate Times
How to Run a Startup Repair in Windows 7
6) One last step; you will have to use EasyBCD from within Vista / Windows 7 to add an entry for XP to the Windows boot (dual boot) menu to get back to XP but that's the easiest part of this process.


Enjoy
")
Related Tutorials
- System Reserved : Create for Dual Boot
- System Reserved : Multi Boot from Logical Partitions
- Advanced Boot Options
- Disk - Clean and Clean All with Diskpart Command
- SSD / HDD : Optimize for Windows Reinstallation
- DISKPART : At PC Startup
- Copy & Paste - in Windows Recovery Console
- Repair Install
- Partition Wizard : Use the Bootable CD
- Dual Boot : Create Partitions Using PWBD
- Partition : Recover Space Used by an Older OS
- Safe Mode
- How to Reset the Password of a User Account in Windows 7
Attachments
Last edited by a moderator: