Solved Win 7 plus Win 7 on 2 partitions?

merlincorp

New member
Local time
9:00 PM
Messages
31
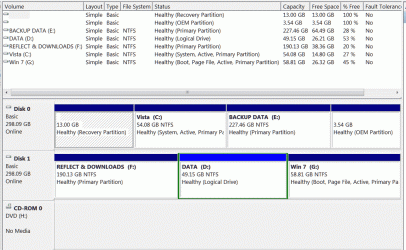
I have a laptop with a pair of 500Gb physical HDDs, each drive has 3 partitions. For the past 18 months I have been successfully running Vista (my original OS) on C: and Win 7 Home Premium installed on my G: partition on the 2nd physical drive. I think that Vista is irrelevant now and want to reclaim that partition space. I have also lately been having a few problems with progs on G:, which is a complex setup with many programs. No games or trivia, all business or graphic design apps.

I wondered if it might be possible to format C: and install a 2nd version of Win 7 Home on that partition too? This way I could take my time installing all my apps and revert to booting from G: when I need to do some productive work. A full install of programs takes about 3 days by the time all the tweaks and fine tuning are done. That's a lot of time for me to be non-productive, hence my idea of doing a new install in stages. Once finished I could then format the G: partition and reclaim the space for data, returning to a single boot system.

I thought I could use DualBootPro to manage which partition was selected as the default boot-up - seems a neat way of switching that.

I am just wondering if I am missing some fundamental issue that might screw everything up! Dual boot was never meant for 2 versions of the same OS. All input greatly appreciated!

Cheers
Adrian
 

My Computer

Computer Manufacturer/Model Number
Acer Aspire 8930G
OS
Microsoft Windows 7 Home Premium 32-bit, Service Pack 1
CPU
Intel(R) Core(TM)2 Duo CPU P8600 @ 2.40GHz
Motherboard
Acer Aspire 8930
Memory
4.00 GB, 3.00 GB usable
Graphics Card(s)
NVIDIA GeForce 9700M GT
Sound Card
(1) NVIDIA High Definition Audio (2) Realtek High Definiti
Monitor(s) Displays
18.4"
Screen Resolution
1920 x 1080
Hard Drives
(1) WDC WD3200BEVT-22ZCT0 (2) WDC WD3200BEVT-22ZCT0
hi merlincorp, and welcome to sevenforums,

dual-booting two 7's will work fine.

you won't even need dualbootpro or any extra software, you'll get a simple text-based boot menu to switch between os'es - of course, yours will list two 7's on it...

9098d1240933934-dual-boot-installation-windows-7-xp-example.jpg


you can then use something like the free easybcd to modify that boot-menu more to your liking...
 

My Computer

Computer Manufacturer/Model Number
mickey megabyte 1234
OS
ultimate 64 sp1
CPU
i5 2500K [email protected]
Motherboard
MSI P67A-GD53
Memory
8 gigs GSkill Ripjaws 1600
Graphics Card(s)
amd hd6950
Sound Card
creative x-fi gamer
Monitor(s) Displays
samsung 24"
Screen Resolution
1920x1080
Hard Drives
ocz vertex 2e 60 gig, samsung f3 1tb, buffalo 2tb ext
PSU
antec 550
Case
antec three hundred
Cooling
i'm a cooling fan
Keyboard
saitek eclipse ii
Mouse
logitech g3
Internet Speed
about 4 Mbps
Other Info
i love win7
Hello merlincorp, welcome to Seven Forums!


You don't need a 3rd party boot manager as you have/will have the OSs on separate Hard Disk Drives the simplest way would be a BIOS managed dual boot; but before we make any specific recommendations will you please post a snip/screen-shot of the entire disk management drive map with a full description as to which drive/partition is which, so we can see what you have going on.

In the Windows start menu right click computer and click manage, in the left pane of the "Computer Management" window that opens click disk management and post a snip of that.


How to Upload and Post a Screenshot and File in Seven Forums
 

My Computer

Computer Manufacturer/Model Number
* BFK Customs *
OS
W 7 64-bit Ultimate
CPU
Intel Q9550 Yorkfield
Motherboard
ASUS P5Q Pro
Memory
8GB Dominator 8500C5D
Graphics Card(s)
ATI : XFX 5870
Sound Card
Realtek HD Audio 7-1
Monitor(s) Displays
1x 47" LCD HDMI & 3x 26" LCD HDMI
Screen Resolution
1920x1080P & 1920x1200
Hard Drives
1x 80GB Intel X25-M G2 SSD : 1x 500GB & 1x 640GB WD Caviar Black(s)
PSU
Corsair 620HX
Case
Cooler Master RC-690
Cooling
Tuniq Tower 120, 2x 140mm and 3x 120mm case fans
Keyboard
Microsoft 500
Mouse
Razer Diamondback 3G
Internet Speed
14 Mb/s
Other Info
1x Koutech 3Gb/s SATA HDD Hot Swap Rack
I appreciate your advice and am glad this is not a crazy thing to do!

The easybcd program looks terrific.

Thanks
Adrian


hi merlincorp, and welcome to sevenforums,

dual-booting two 7's will work fine.

you won't even need dualbootpro or any extra software, you'll get a simple text-based boot menu to switch between os'es - of course, yours will list two 7's on it...

9098d1240933934-dual-boot-installation-windows-7-xp-example.jpg


you can then use something like the free easybcd to modify that boot-menu more to your liking...
 

My Computer

Computer Manufacturer/Model Number
Acer Aspire 8930G
OS
Microsoft Windows 7 Home Premium 32-bit, Service Pack 1
CPU
Intel(R) Core(TM)2 Duo CPU P8600 @ 2.40GHz
Motherboard
Acer Aspire 8930
Memory
4.00 GB, 3.00 GB usable
Graphics Card(s)
NVIDIA GeForce 9700M GT
Sound Card
(1) NVIDIA High Definition Audio (2) Realtek High Definiti
Monitor(s) Displays
18.4"
Screen Resolution
1920 x 1080
Hard Drives
(1) WDC WD3200BEVT-22ZCT0 (2) WDC WD3200BEVT-22ZCT0
You don't need a 3rd party boot manager as you have/will have the OSs on separate Hard Disk Drives the simplest way would be a BIOS managed dual boot; but before we make any specific recommendations will you please post a snip/screen-shot of the entire disk management drive map with a full description as to which drive/partition is which, so we can see what you have going on.

OK, I have hopefully attached the partition info screenshot. I always label the partitions so the function of each should be obvious.

I frequently take an image of my G:Win 7 partition using the excellent (free) Macrium Reflect program, so I actually don't need the 2 small partitions on Drive 0. I take it I could get rid of these? I use (free) Paragon Partition Manager for this kind of task. I hope these links may be of use to someone else.

Back to my plan of attack. I want to install Win 7 on the C: partition and take my time installing and configuring the many apps I have, this would take typically 3 days if I just focused on that task - but I can't spare the time all at once right now. So by switching between the existing G: Win 7 and the new C: Win 7 I can remain productive and fit in the new install as time allows. Once I have completed everything I will format G: and use that space for data.

I don't seem to be able to format C: from within the Disk Management console, but vaguely remember that is an option offered from the Win 7 installation disk? It's an OEM version of Win 7, I hope that's not gonna cause me any issues!

I just need an easy way to switch between booting from C: or G: at startup. I guess I can do that by labeling C: "New Win 7" or something obvious like that.

Cheers
Adrian
 

Attachments

  • partition-info.gif
    partition-info.gif
    53.8 KB · Views: 43

My Computer

Computer Manufacturer/Model Number
Acer Aspire 8930G
OS
Microsoft Windows 7 Home Premium 32-bit, Service Pack 1
CPU
Intel(R) Core(TM)2 Duo CPU P8600 @ 2.40GHz
Motherboard
Acer Aspire 8930
Memory
4.00 GB, 3.00 GB usable
Graphics Card(s)
NVIDIA GeForce 9700M GT
Sound Card
(1) NVIDIA High Definition Audio (2) Realtek High Definiti
Monitor(s) Displays
18.4"
Screen Resolution
1920 x 1080
Hard Drives
(1) WDC WD3200BEVT-22ZCT0 (2) WDC WD3200BEVT-22ZCT0
Hello again.


For the new install disconnect the Disk 1 Hard Disk Drive data cable from the motherboard; clean install the 'new' Windows 7 and do not enter an activation key when presented with that dialog box; that will give you 120 days to get things in order before you have to activate the new install.

Activation Trial Period - Extend Up to 120 Days


After the install is complete, power down the PC and reconnect Disk 1 to the mobo and then use the BIOS one-time boot menu hot-key specific to your mobo at PC startup to boot the older HDD/OS when needed.

Be sure to post back with any further questions you may have and to keep us informed.

  • Asus - F8
  • HP/Compaq - Esc
  • Sony - F2
  • Acer – F12
  • Gateway - F10
  • eMachnes - F10
  • Toshiba - F12
  • Dell - F12
  • IBM/Lenovo - the blue Thinkvantage button
 

My Computer

Computer Manufacturer/Model Number
* BFK Customs *
OS
W 7 64-bit Ultimate
CPU
Intel Q9550 Yorkfield
Motherboard
ASUS P5Q Pro
Memory
8GB Dominator 8500C5D
Graphics Card(s)
ATI : XFX 5870
Sound Card
Realtek HD Audio 7-1
Monitor(s) Displays
1x 47" LCD HDMI & 3x 26" LCD HDMI
Screen Resolution
1920x1080P & 1920x1200
Hard Drives
1x 80GB Intel X25-M G2 SSD : 1x 500GB & 1x 640GB WD Caviar Black(s)
PSU
Corsair 620HX
Case
Cooler Master RC-690
Cooling
Tuniq Tower 120, 2x 140mm and 3x 120mm case fans
Keyboard
Microsoft 500
Mouse
Razer Diamondback 3G
Internet Speed
14 Mb/s
Other Info
1x Koutech 3Gb/s SATA HDD Hot Swap Rack
Greg has an excellent idea to move the data from the Disk 0 and to do a complete wipe (secure erase) of the entire HDD prior to OS installation, for the best possible space to install Windows 7 to; have a look at Step One of this tutorial at the link below, be sure to look through Step Two #s 2 & 3 for partition creation options.


SSD / HDD : Optimize for Windows Reinstallation
 

My Computer

Computer Manufacturer/Model Number
* BFK Customs *
OS
W 7 64-bit Ultimate
CPU
Intel Q9550 Yorkfield
Motherboard
ASUS P5Q Pro
Memory
8GB Dominator 8500C5D
Graphics Card(s)
ATI : XFX 5870
Sound Card
Realtek HD Audio 7-1
Monitor(s) Displays
1x 47" LCD HDMI & 3x 26" LCD HDMI
Screen Resolution
1920x1080P & 1920x1200
Hard Drives
1x 80GB Intel X25-M G2 SSD : 1x 500GB & 1x 640GB WD Caviar Black(s)
PSU
Corsair 620HX
Case
Cooler Master RC-690
Cooling
Tuniq Tower 120, 2x 140mm and 3x 120mm case fans
Keyboard
Microsoft 500
Mouse
Razer Diamondback 3G
Internet Speed
14 Mb/s
Other Info
1x Koutech 3Gb/s SATA HDD Hot Swap Rack
Hello again.
For the new install disconnect the Disk 1 Hard Disk Drive data cable from the motherboard; clean install the 'new' Windows 7 and do not enter an activation key when presented with that dialog box; that will give you 120 days to get things in order before you have to activate the new install.

I appreciate your input, but I am extremely reluctant to open up my Acer laptop and fiddle about inside. If I make a balls of it I am in deep trouble as I am now living in the Philippines and getting any kind of decent hardware support is virtually impossible.

Is this step really necessary?

Thanks
Adrian
 

My Computer

Computer Manufacturer/Model Number
Acer Aspire 8930G
OS
Microsoft Windows 7 Home Premium 32-bit, Service Pack 1
CPU
Intel(R) Core(TM)2 Duo CPU P8600 @ 2.40GHz
Motherboard
Acer Aspire 8930
Memory
4.00 GB, 3.00 GB usable
Graphics Card(s)
NVIDIA GeForce 9700M GT
Sound Card
(1) NVIDIA High Definition Audio (2) Realtek High Definiti
Monitor(s) Displays
18.4"
Screen Resolution
1920 x 1080
Hard Drives
(1) WDC WD3200BEVT-22ZCT0 (2) WDC WD3200BEVT-22ZCT0
Using the BIOS to dual-boot as BFK suggests keeps the HD's independent to come and go as you please - which is exactly what you want when you're phasing one out.

If you want to get the cleanest install, move the data off the target HD and wipe it of all code. Here are tips to getting a purrfect install based on hundreds done here: http://www.sevenforums.com/installation-setup/125874-re-install-windows-7-a.html#post1086729

Thanks Greg, but this scares me ****less. I am a website designer, not a techie and I feel well outside my depth here. I do have some experience and I figured if I just focused on formatting the C:Vista partition and installing Win 7 on there I couldn't make a complete mess. Are the advantages to be gained by going the whole hog really worth the risk?

Thanks
Adrian
 

My Computer

Computer Manufacturer/Model Number
Acer Aspire 8930G
OS
Microsoft Windows 7 Home Premium 32-bit, Service Pack 1
CPU
Intel(R) Core(TM)2 Duo CPU P8600 @ 2.40GHz
Motherboard
Acer Aspire 8930
Memory
4.00 GB, 3.00 GB usable
Graphics Card(s)
NVIDIA GeForce 9700M GT
Sound Card
(1) NVIDIA High Definition Audio (2) Realtek High Definiti
Monitor(s) Displays
18.4"
Screen Resolution
1920 x 1080
Hard Drives
(1) WDC WD3200BEVT-22ZCT0 (2) WDC WD3200BEVT-22ZCT0
Hello again Adrian.


No mate, it's not necessary at all, you can just leave everything connected and you will get the Windows managed dual boot as mickey megabyte mentioned earlier and all will be fine and you still won't need a third party boot manager.

You could just format the Vista partition during install and do the install there with no issues.


I would give serious consideration to this though using the outline in Step Two #3 to create the new Windows 7 "System Reserved" partition and a 100GB partition to install the 'new' Windows to; this will make the new SysResv partition the system volume making it very easy to remove the 'old' Windows when the time comes.


Greg has an excellent idea to move the data from the Disk 0 and to do a complete wipe (secure erase) of the entire HDD prior to OS installation, for the best possible space to install Windows 7 to; have a look at Step One of this tutorial at the link below, be sure to look through Step Two #s 2 & 3 for partition creation options.


SSD / HDD : Optimize for Windows Reinstallation
 

My Computer

Computer Manufacturer/Model Number
* BFK Customs *
OS
W 7 64-bit Ultimate
CPU
Intel Q9550 Yorkfield
Motherboard
ASUS P5Q Pro
Memory
8GB Dominator 8500C5D
Graphics Card(s)
ATI : XFX 5870
Sound Card
Realtek HD Audio 7-1
Monitor(s) Displays
1x 47" LCD HDMI & 3x 26" LCD HDMI
Screen Resolution
1920x1080P & 1920x1200
Hard Drives
1x 80GB Intel X25-M G2 SSD : 1x 500GB & 1x 640GB WD Caviar Black(s)
PSU
Corsair 620HX
Case
Cooler Master RC-690
Cooling
Tuniq Tower 120, 2x 140mm and 3x 120mm case fans
Keyboard
Microsoft 500
Mouse
Razer Diamondback 3G
Internet Speed
14 Mb/s
Other Info
1x Koutech 3Gb/s SATA HDD Hot Swap Rack
Did you make your Vista REcovery Disks off that 13gb Recovery Partition so you have a path back to factory condition if ever needed?


If so, then you could consider deleting the Recov partition during install along with the C: Vista partition, create a New partition there to install Win7 using the Custom Install Drive Options shown here:
click to enlarge
Source: http://www.sevenforums.com/tutorials/1649-clean-install-windows-7-a.html

We can also help you borrow some space from your large data partition if you want the new C partition to be larger. Use free Partition Wizard bootable CD to Resize from the left.

As long as your new install to C is marked System Active then G can be deleted when ready in Disk Mgmt to create a new partition there or extend D into it.
http://www.sevenforums.com/tutorials/2670-partition-volume-extend.html

You may have to delete the old Win7 install's ghost Boot Menu listing in msconfig>Boot tab or using EasyBCD 2.0 to Edit Boot Menu.
 
I would give serious consideration to this though using the outline in Step Two #3 to create the new Windows 7 "System Reserved" partition and a 100GB partition to install the 'new' Windows to; this will make the new SysResv partition the system volume making it very easy to remove the 'old' Windows when the time comes.

OK, I see what you are saying (thanks). I have spent more time reading the amazing amount of info you have on this site - well done.

While I am quaking in my boots somewhat, I think that the steps outlined in http://www.sevenforums.com/tutorials/123170-system-reserved-create-dual-boot.html are probably the best way forward for me? I will read that again a few times and print it out too. Maybe it will seem less daunting then!

Thanks for the intro to Partition Wizard - terrific!

Adrian
 

My Computer

Computer Manufacturer/Model Number
Acer Aspire 8930G
OS
Microsoft Windows 7 Home Premium 32-bit, Service Pack 1
CPU
Intel(R) Core(TM)2 Duo CPU P8600 @ 2.40GHz
Motherboard
Acer Aspire 8930
Memory
4.00 GB, 3.00 GB usable
Graphics Card(s)
NVIDIA GeForce 9700M GT
Sound Card
(1) NVIDIA High Definition Audio (2) Realtek High Definiti
Monitor(s) Displays
18.4"
Screen Resolution
1920 x 1080
Hard Drives
(1) WDC WD3200BEVT-22ZCT0 (2) WDC WD3200BEVT-22ZCT0
Did you make your Vista REcovery Disks off that 13gb Recovery Partition so you have a path back to factory condition if ever needed?


If so, then you could consider deleting the Recov partition during install along with the C: Vista partition, create a New partition there to install Win7 using the Custom Install Drive Options shown here:
click to enlarge
Source: http://www.sevenforums.com/tutorials/1649-clean-install-windows-7-a.html

Hi Greg, I take an image of my G: Partition (Win 7 plus all apps only) every 10 days or so and keep about 4 versions to revert to if necessary. So I can certainly lose that 13Gb recovery partition.

I am still stuck a little - the new Windows 7 "System Reserved" partition seems to be absent in the methodology described on http://www.sevenforums.com/tutorials/1649-clean-install-windows-7-a.html. The advice from BFK seems to suggest that partition is also desirable for ease of removing the old Win 7 partition in stage 2. So it seems that the process described in http://www.sevenforums.com/tutorials/123170-system-reserved-create-dual-boot.html might be the best route to take?

For a relative novice like me, this is all a pending nightmare :sarc:

Cheers
Adrian
 

My Computer

Computer Manufacturer/Model Number
Acer Aspire 8930G
OS
Microsoft Windows 7 Home Premium 32-bit, Service Pack 1
CPU
Intel(R) Core(TM)2 Duo CPU P8600 @ 2.40GHz
Motherboard
Acer Aspire 8930
Memory
4.00 GB, 3.00 GB usable
Graphics Card(s)
NVIDIA GeForce 9700M GT
Sound Card
(1) NVIDIA High Definition Audio (2) Realtek High Definiti
Monitor(s) Displays
18.4"
Screen Resolution
1920 x 1080
Hard Drives
(1) WDC WD3200BEVT-22ZCT0 (2) WDC WD3200BEVT-22ZCT0
Hi Adrian -

Are you asking if you should create a System Reserved partition to place in front of a restored image? Or do you plan to clean reinstall?

If you plan to clean reinstall and you don't wipe the HD (to get the cleanest possible install) or delete all partitions, repartition and format with Installer as shown above, then you'd have to construct the System Reserved partition from scratch. Since it's your intention to get rid of G eventually then the only reason you'd really need it is if you want the convenience of having the Repair Console on the F8 Advanced Boot Tools menu - the same Repair console which is on the DVD or Repair CD.

If you want it then either wipe the HD or delete all partitions and it will assign 100mb when you create the new partition(s) using installer's Drive Options. Otherwise you'd have to construct it from scratch by making a (suggested) 200mb Primary first partition, mark it Active, then install to the second partition you create.

What I would do if you're not eager to move the data off of DISK0 and wipe the HD is to boot the installer, choose Custom install, then use Drive Options (shown above) to delete Recovery partition and C, create a new partition there and install to it.

Ask back with any additional questions.
 
Hi Adrian -
What I would do if you're not eager to move the data off of DISK0 and wipe the HD is to boot the installer, choose Custom install, then use Drive Options (shown above) to delete Recovery partition and C, create a new partition there and install to it.

Hi Greg, I think I will try and keep it simple and do as you suggest above. Looks like I had better increase that C: partition size from 55Gb to 100Gb before doing anything though. My complete OS and (large number of) apps only take up 35Gb of space on G: Win 7, so I really don't know why so much space is recommended for the OS. I always move the Page file to the 2nd HDD, so that's not taking up space.

Anyway, I just need to blindly follow the recommendations and not query every damned thing - I am no expert!

Thanks
Adrian
 

My Computer

Computer Manufacturer/Model Number
Acer Aspire 8930G
OS
Microsoft Windows 7 Home Premium 32-bit, Service Pack 1
CPU
Intel(R) Core(TM)2 Duo CPU P8600 @ 2.40GHz
Motherboard
Acer Aspire 8930
Memory
4.00 GB, 3.00 GB usable
Graphics Card(s)
NVIDIA GeForce 9700M GT
Sound Card
(1) NVIDIA High Definition Audio (2) Realtek High Definiti
Monitor(s) Displays
18.4"
Screen Resolution
1920 x 1080
Hard Drives
(1) WDC WD3200BEVT-22ZCT0 (2) WDC WD3200BEVT-22ZCT0
Hello again Adrian.


I've closely simulated your system Disk 0 to show an easy method to create the new Windows 7 "System Reserved" partition and a new fully formatted partition to install Windows 7 to in-place of Vista and this will still give you the automatically configured Windows 7 dual boot menu at PC startup.

This in no way will have any affect on the "BACKUP DATA E:" partition.

Do not enter a product activation key during the installation, that can be done later.

Activation Trial Period - Extend Up to 120 Days


It's not at all as complicated as it may look at first glance; it is all done using the Windows 7 installer while booting from the Windows 7 installation disk; take all the time needed; you said you have the capability of making copies of these posts, if you can't get copies of the snips post back and I'll list the commands for you in another post here so they can be copied. All commands are followed by hitting the <Enter> key.


DISKPART : At PC Startup

Start by booting the Windows 7 installation disk as outlined in Method One in the tutorial above and just follow the commands one by one, I couldn't get it all in a single snip so I made 2 but they're in sequence.
click to enlarge, click a second time to really enlarge
Adrian1.jpg
Adrian2.jpg
After you "exit" diskpart and the command window it will take you back to the first installer dialog box to continue with the clean install as usual, when you get to "Where do you ... " this dialog box, click to highlight/select the Windows 7 partition then click Next and do not use the installer to format anything as diskpart runs full formats.

Of course your installer will list all the partitions on the system but I showed this to give you the idea of where to do the install to, that's the reason to give the partition you want to install to an easily recognizable Label (name) it can be anything you like. ;)
Adrian3.jpg
When the installation finishes, this is what you will have.
Adrian4.jpg
 

My Computer

Computer Manufacturer/Model Number
* BFK Customs *
OS
W 7 64-bit Ultimate
CPU
Intel Q9550 Yorkfield
Motherboard
ASUS P5Q Pro
Memory
8GB Dominator 8500C5D
Graphics Card(s)
ATI : XFX 5870
Sound Card
Realtek HD Audio 7-1
Monitor(s) Displays
1x 47" LCD HDMI & 3x 26" LCD HDMI
Screen Resolution
1920x1080P & 1920x1200
Hard Drives
1x 80GB Intel X25-M G2 SSD : 1x 500GB & 1x 640GB WD Caviar Black(s)
PSU
Corsair 620HX
Case
Cooler Master RC-690
Cooling
Tuniq Tower 120, 2x 140mm and 3x 120mm case fans
Keyboard
Microsoft 500
Mouse
Razer Diamondback 3G
Internet Speed
14 Mb/s
Other Info
1x Koutech 3Gb/s SATA HDD Hot Swap Rack
Adrian -

To expand C to the right, burn free Partition Wizard bootable CD using ImgBurn at 4x speed with Verify: Free Download Magic Partition Manager Software - Partition Wizard Online
ImgBurn - Free software downloads and software reviews - CNET Download.com

Back up your files externally, boot PW CD, rightclick D, select Resize, drag left grey border to right to make as much space as you'd like to add to C, OK.

Now rightclick C to Resize, drag right grey border to right to take up the space you made, OK, Apply all steps.

If you want to save doing this until just before you do the reinstall, you only need to Resize D left border since you'll be deleting C and Recovery partition to create a new partition there using the Custom install Drive Options I showed you earlier.

Be sure to delete the paging file from other HD. I would keep it on C since it will be big enough.
 
You can do all the Partition Wizard stuff after you have the 'new' Windows 7 installed; also most of what you would want done can be done with the Windows 7 installable version found at this second link below; have a look at this first tutorial for some more ideas on its many uses.


Partition Wizard : Use the Bootable CD

Partition Wizard Home Edition
 

My Computer

Computer Manufacturer/Model Number
* BFK Customs *
OS
W 7 64-bit Ultimate
CPU
Intel Q9550 Yorkfield
Motherboard
ASUS P5Q Pro
Memory
8GB Dominator 8500C5D
Graphics Card(s)
ATI : XFX 5870
Sound Card
Realtek HD Audio 7-1
Monitor(s) Displays
1x 47" LCD HDMI & 3x 26" LCD HDMI
Screen Resolution
1920x1080P & 1920x1200
Hard Drives
1x 80GB Intel X25-M G2 SSD : 1x 500GB & 1x 640GB WD Caviar Black(s)
PSU
Corsair 620HX
Case
Cooler Master RC-690
Cooling
Tuniq Tower 120, 2x 140mm and 3x 120mm case fans
Keyboard
Microsoft 500
Mouse
Razer Diamondback 3G
Internet Speed
14 Mb/s
Other Info
1x Koutech 3Gb/s SATA HDD Hot Swap Rack
Hello again Adrian.

I've closely simulated your system Disk 0 to show an easy method to create the new Windows 7 "System Reserved" partition and a new fully formatted partition to install Windows 7 to in-place of Vista and this will still give you the automatically configured Windows 7 dual boot menu at PC startup.

This in no way will have any affect on the "BACKUP DATA E:" partition.

Jeez Ted, that is a LOT of trouble you have gone to, many, MANY thanks.

I have read and re-read the instructions, cutting away to the linked info too and I think I may have actually "got it". I have assembled a 6 page word doc that goes through the DISKPART formatting and subsequent Win7 installation process. I will print that out and follow it to the letter when I screw up courage to do this (within the next 24 hours).

Just one point to double-check first. In the 2nd DISKPART screenshot there are the following instructions

DISKPART> select disk 0
Disk 0 selected
DISKPART> create partition primary size=200
Succeeded in creating
DISKPART> format fs=ntfs label=”System Reserved”
100 percent completed, successfully formatted
DISKPART> active
Marked current partition as active
DISKPART> create partition primary

That last line above does not contain any size info, unlike the similar command for the System Reserved volume. Does DISKPART just take all the remaining available space automatically? Seems likely, but I am just checking.

Cheers
Adrian
 

My Computer

Computer Manufacturer/Model Number
Acer Aspire 8930G
OS
Microsoft Windows 7 Home Premium 32-bit, Service Pack 1
CPU
Intel(R) Core(TM)2 Duo CPU P8600 @ 2.40GHz
Motherboard
Acer Aspire 8930
Memory
4.00 GB, 3.00 GB usable
Graphics Card(s)
NVIDIA GeForce 9700M GT
Sound Card
(1) NVIDIA High Definition Audio (2) Realtek High Definiti
Monitor(s) Displays
18.4"
Screen Resolution
1920 x 1080
Hard Drives
(1) WDC WD3200BEVT-22ZCT0 (2) WDC WD3200BEVT-22ZCT0
Back
Top