

How to Create a "Control Panel All Tasks List" Shortcut in Windows 7 and Windows 8
InformationAll Tasks (aka: GodMode) is a list of all Control Panel items.
This will show you how to create or download a Control Panel All Tasks List "God Mode" shortcut.
NoteCredit belongs to our member Iggy for this tip.WarningIf pinned to the taskbar, be sure to keep the Control Panel All Tasks List icon positioned (dragged) to the right of the default pinned Windows Explorer icon location on the taskbar. If it's to the left of it, then all opened Windows Explorer windows will have their thumbnail previews show in the pinned Control Panel All Tasks List icon instead.
EXAMPLE: Control Panel All Tasks List
NOTE: This will show you every task available in the Control Panel listed by category. Some of these are not normally displayed in the Control Panel.
OPTION ONETo Download the "Control Panel All Tasks List" Shortcut
NOTE: This shortcut is the same one from OPTION TWO below.
1. Click on the Download button below to download the file below
Control_Panel_All_Tasks_List.zip2. Save the .zip file to the desktop.
3. Open the .zip file and extract (drag and drop) the Control Panel All Tasks List shortcut to the desktop.
4. Right click on the Control Panel All Tasks List shortcut, and click on Properties, General tab, and on the Unblock button. (See screenshot below)
NOTE: If you do not have a Unblock button under the General tab, then the shortcut is already unblocked and you can continue on to step 5.
5. In Windows 7, you can now Pin to Taskbar or Pin to Start Menu, add to Quick Launch, assign a keyboard shortcut to it, or move this shortcut to where you like for easy use.
6. In Windows 8, you can Pin to Taskbar on desktop, Pin to Start screen, add to Quick Launch, assign a keyboard shortcut to it, or move this shortcut to where you like for easy use.
7. When finished, you can delete the downloaded .zip file on the desktop if you like, or save it to use again.
OPTION TWOTo Manually Create a "Control Panel All Tasks List" Shortcut
1. Right click on a empty area on desktop, and click on New and Shortcut.
2. Copy and paste the location below into the location area, and click on the Next button. (See screenshot below)
%windir%\explorer.exe shell:::{ED7BA470-8E54-465E-825C-99712043E01C}3. Type Control Panel All Tasks List for the name, and click on the Finish button. (See screenshot below)
NOTE: You can name this anything you would like though.
4. Right click on the new Control Panel All Tasks List shortcut on the Desktop and click on Properties.
5. Click on the Shortcut tab, then click on the Change Icon button. (See screenshot below)
6. In the line under "Look for icons in this file", copy and paste the location below and press Enter. (See screenshot below)
%windir%\System32\imageres.dll7. Select the icon highlighted in blue above and click on OK. (See screenshot above)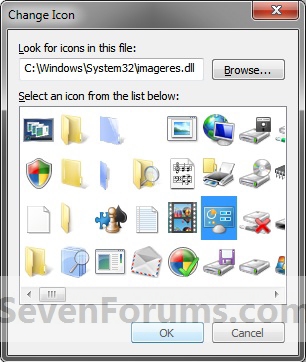
NOTE: You can use any icon that you would like instead though.
8. Click on OK. (See screenshot below)
9. In Windows 7, you can now Pin to Taskbar or Pin to Start Menu, add to Quick Launch, assign a keyboard shortcut to it, or move this shortcut to where you like for easy use.
10. In Windows 8, you can Pin to Taskbar on desktop, Pin to Start screen, add to Quick Launch, assign a keyboard shortcut to it, or move this shortcut to where you like for easy use.
OPTION THREETo Manually Create a "Control Panel All Tasks List" Folder Shortcut
NOTE: This option will not have the Pin to Taskbar or Pin to Start Menu options in it's Properties page since it is treated like a folder in Windows 7 instead. However, it does allow you to use in say Opject Dock without the Windows Explorer issue.
1. Right click on your desktop, then click on New and Folder.That's it,
2. Copy the name below.
Control Panel All Tasks List.{ED7BA470-8E54-465E-825C-99712043E01C}3. Right click on the New Folder, click on Rename, paste the name above, and press Enter.
4. You can now pin this folder to Start Menu (Windows 7 only), pin this folder to taskbar, or move it to where you like for easy use.
Shawn
Related Tutorials
- How to Create a Control Panel All Tasks (GodMode) Toolbar in Windows 8 and 8.1
- How to Set a Default Control Panel View in Windows 7 and Windows 8
- How to Pin the Control Panel to the Windows 7 Taskbar
- Create a Control Panel Shortcut that Always Opens to Icons View in Windows 7 and Windows 8
- Create a Control Panel Shortcut that Always Opens to Category View in Windows 7 and Windows 8
- How to Add a "Control Panel" Cascading Desktop Context Menu in Windows 8
- How to Enable or Disable the Control Panel in Vista and Windows 7
- How to Enable or Disable Access to Control Panel and PC settings in Windows 8
- How to Hide or Show Icons in the Control Panel in Vista, Windows 7, and Windows 8
- How to Add or Remove "All Tasks" (God Mode) from Control Panel in Windows
- How to Create a "Search Settings" Shortcut in Windows 8
Control Panel All Tasks List Shortcut
-
New #1
Another option
Could be a option 3:
Type "C:\Windows\explorer.exe shell:::{ED7BA470-8E54-465E-825C-99712043E01C}" in Windows explorer window, which will open the "all tasks" then just drag to desktop and it creates a short cut.
-
New #2
Hello Jeff, and welcome to Seven Forums.
Thank you. To bad creating a shortcut using that method does not have a option to "Pin to Start Menu" or "Pin to Task Bar" though.
-
New #3
I copied and pasted as it appeared in the tutorial. Once the shortcut was on the desktop I had options to pin to taskbar or start menu. With the taskbar UNLOCKED I was also able to drag it to my quick launch toolbar.
-
-
New #5
Why do MS hide useful options like this all the time?
This is much more logical than hiding things within sub categories of sub categories
-
New #6
BTW you can name the first part anything you want it does not have to be GodMode. It can be AdminMode or MyComputersSettings it does not matter.
-
Posts : 8,375 W7 Ultimate x64/W10 Pro x64/W11 Pro Triple Boot - Main PC W7 Remote PC Micro ATX W7 Pro x64/W11 ProNew #7
Digg it! Digg it! already!
This is a lot easier then one 3rd party app having everything rolled in one scroll down listing then the free app Windows 7-in-a-box whcih divides everything up with several buttons. No 3rd party app requiring installation to download!
-
-
Posts : 8,375 W7 Ultimate x64/W10 Pro x64/W11 Pro Triple Boot - Main PC W7 Remote PC Micro ATX W7 Pro x64/W11 ProNew #9
If I'm not mistaken WindowsStar may be referring to renaming the shortcut once created. Here I simply right clicked on the shortcut once made and selected properties to rename it in the general tab to "Control Panel - All Tasks".
I did find that once renamed you can right click to pin the new shortcut or simply drag it onto the taskbar it seems. The image here shows how it looks when you see it right next to the Control Panel icon on the taskbar with a rather different icon Red, White, and Blue in use there.
The shortcut was also dragged into the folder used for an addon toolbar and when right clicked there the option to pin to the Start menu was seen. That was seen right under the unpin from taskbar option. Remember when right clicking on it to select properties first in order to then see the options once you rename the shortcut it seems.
Looks great just the same and as you can see simplifies everything. Good find!

Control Panel All Tasks List Shortcut
How to Create a "Control Panel All Tasks List" Shortcut in Windows 7 and Windows 8Published by Brink


 Quote
Quote
Related Discussions