

View Reliability and Problem History with Reliability Monitor in Windows 7 and Windows 8
InformationThis tutorial will show you how to open and use Reliability Monitor to review reliability and problem history to help resolve issues in Windows 7 and Windows 8.
NoteReliability Monitor is an advanced tool that measures hardware and software problems and other changes to your computer. It collects 24 hours of data before it displays any results and calculates the stability index that ranges from 1 (the least stable) to 10 (the most stable). You can use the index to help evaluate the reliability of your computer by reviewing the reported application failures, Windows 7 failures, Miscellaneous failures, Warnings, and Information. Any change you make to your computer or problem that occurs on your computer affects the stability index.
EXAMPLE: Reliability Monitor
NOTE: You can tell your Index score (scales from 1 to 10, 10 is the best score) by looking at how the chart line ends in the upper right corner boxed in red below compared to the scale of 10 to 1 on the left upper corner boxed in red below.
Here's How: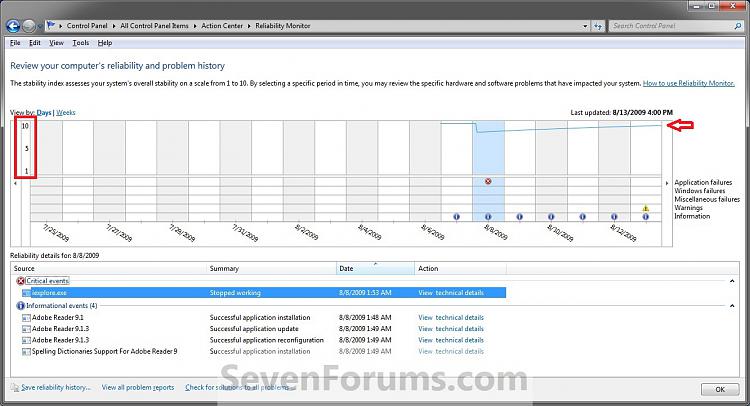
1. Click on the Action Center icon in the notification area of the taskbar, click on Open Action Center, and go to step 3 below. (see screenshot below)
ORThat's it,
2. Open the Control Panel (icons view) in Windows 7 or Windows 8, click/tap on the Action Center icon, and go to step 3 below.
3. Click on the Maintenance drop down arrow to expand it, then click on the View reliability history link under the Check for solutions to problem reports section. (see screenshot below)
4. In the Reliability Monitor, you can: (see screenshot below)
- Next to View by, click on Days, Weeks, Month, or Year to view the stability index over a specific period of time that you want.
- In the upper pane, click on any event on the graph to view its reliability details in the lower pane.
- Under the lower Reliability details pane, you can click on an available link under the Actions column. For example, View technical details to see more details about the reported problem.
- At the bottom, click on the View all problem reports link to view only the problems that have occurred on your computer. This view does not include the other computer events that show up in Reliability Monitor, such as events about software installation.
- At the bottom, click on the Save reliability history link, to save this Reliablilty Monitor report as an .xml file to give to support if needed.
5. When done, click on OK. (see screenshot above)
Shawn
Related Tutorials
- How to Reset the Windows 7 Reliability Monitor
- How to Open Resource Monitor in Windows 7
- How to Change "Problem Reporting Settings" in Windows 7 and Windows 8
- How to Review Reliability and Problems History Details in Windows 7 and Windows 8
- How to Clear Your Windows 7 Problem Report History
- How to Run a Startup Repair in Windows 7
- How to Boot to the System Recovery Options in Windows 7
- How to Boot to the Advanced Boot Options in Windows 7
- How to Run the Memory Diagnostics Tool in Windows 7
- How to Do a System Restore in Windows 7
- How to Repair Windows 7 System Files with System File Checker
- How to Update or Refresh the WEI Score in Windows 7
- How to Run Disk Check in Windows 7
- How to Create a "Reliability Monitor" Shortcut in Windows 7 and Windows 8
- How to See the Last Shutdown Time of Your Windows PC
- How to Generate and View a System Health Report in Windows 8.1
- How to Generate and View a System Performance Report in Windows
Reliability Monitor
-
-
New #2
LOL, nope. IE8 keeps crashing on me now and then destroying my score.
I guess I should look into that one day.
-
Posts : 1,003 Win7 Ultimate x64 on Desktop / Win7 Ultimate x86 on laptop / Win7 x86 Starter on NetbookNew #3
Thanks, it looks great at first......lol. Mine is starting to go up now after taking off some software windows didn't like!
-
-
New #5
Shawn,
Great forum! You always seem to have the "best" stuff... exactly what I am interested in!
I just made the leap to W7 RTM.... foolish me ... on 4 machines!
Ok, so with your help I found the reliability monitor once again. (I thought it was MIA until I read your How To article). As you might recall, I am anal about showing a 10.0 . So, how can I reset the rating in 7 back to 10? Just delete the RAC the same way as Vista?
Thanks!
Charlie
-
New #6
Hello Charlie, and welcome to Seven Forums.
You can just clear the history to reset this.
Problem Reports and Solutions - Clear History
Hope this helps,
Shawn
-
New #7
Thanks Shawn,
I saw that before. You delete the items in a very similar fashion to Vista. It doesn't reset the history though. In Vista you had us delete the files in sub directories under RAC. After you did that and rebooted, the Relieablity number was back to 10 as if you had just installed the operating system. I tried to delete those file in 7 but they seem to be different. The database file is locked as well. Any thoughts on how to get the reliability number back to "ground zero"... day 1. . . literally?? . . without really screwing up the system...
Thanks again Yoda!
Charlie
-
-
New #9
Charlie,
Sorry, yes it's the exact same method as in Vista below to do so. I'll make a new tutorial on it tonight for the Windows 7 version of it though. :)
Reliability Monitor - Reset - Vista Forums

Reliability Monitor
View Reliability and Problem History with Reliability Monitor in Windows 7 and Windows 8Published by Brink


 Quote
Quote
Related Discussions