How to Change the Screen Resolution in Windows 7
Information
This will show you how to change the screen resolution in Windows 7 with the recommended native settings based on the monitor size.
Note
The screen resolution setting determines how much information is displayed on the display screen. It is measured horizontally and vertically in pixels. At lower screen resolutions, such as 640 x 480, fewer items will fit on the screen, but they will be larger. At higher resolutions, such as 1600 x 1200, more items will fit on the screen but they will be smaller. The resolution options will vary with each computer based on the video card device, monitor size, and video & monitor drivers. If the screen looks distorted or fuzzy, then you may have an incorrect screen resolution size set for your monitor.
Warning
- Windows 7 does not allow for each user to have their own screen resolution. Changing the screen resolution in one user account will change it for all user accounts on the computer.
- Make sure the Color Depth (Colors) is set to True Color (32 bit) to help have the best picture.
Here's How:
1. Do step 2 or 3 below for you would like to open the Screen Resolution window.
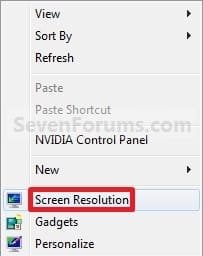
2. Right click on a empty space on the desktop and click on Screen Resolution. (See screenshot below)

A) Go to step 4.
OR
3. Open the Control Panel (icons view), and click on the Display icon. Next, click on the Change display settings link in the left pane. (see screenshot below)

A) Go to step 4.
4. Select the monitor Display you want to change the screen resolution for. (See screenshot below step 5B)
NOTE: You will only be able to select a different display if you have more than one monitor connected.
5. To Change only the Screen Resolution
A) Select an available screen Resolution. (See screenshot below step 5B)
NOTE: The native resolution will have (Recommended) next to it. See the tables below for common native screen resolutions of monitors based on their screen size.
| Monitor Size | Native Resolution |
|---|---|
| 14-15 inch | 1024x768 |
| 17-19 inch | 1280x1024 |
| 20-23 inch | 1600x1200 |
| 24 + inch | 1900x1200 |
| 17-18 inch Widescreen | 1280x800 |
| 19 inch Widescreen | 1440x900 |
| 20-23 inch Widescreen | 1680x1050 |
| 24-29 inch Widescreen | 1920x1080 to 1920x1200 |
| 30 + inch Widescreen | 1920x1080 to 2560x1600 |
| Laptop Screen Size | Native Resolution |
|---|---|
| 13-15 inch | 1400x1050 |
| 13-15 inch Widescreen | 1280x800 |
| 17 inch Widescreen | 1680x1050 |
| Tablet screen | 1366x768 |
B) Click on the Apply button. (See screenshot below)

C) Click on Keep changes to apply the screen resolution. (See screenshot below)
NOTE: Click on Revert to not accept the screen resolution from step 5A, and to select another screen resolution.

D) Go to step 6.[/INDENT]
6. To Select from a List of All Display ModesA) Click on the Advanced settings link. (See screenshot below step 5B)
B) Click on the Adapter tab, and on the List All Modes button. (See screenshot below)

C) Select the display mode with the screen resolution, color depth, and screen refresh rate that you want to use, and click on OK. (See screenshot below)
NOTE: It is recommended to use a native screen resolution with a True Color (32-bit) color depth.

D) Click on OK. (See screenshot below step 6B)
E) Click on Yes to confirm the change. (See screenshot below)

7. When finished, click on OK. (See screenshot below step 5B)
That's it,
Shawn Brink
Related Tutorials
- How to Create a Windows 7 Screen Resolution Shortcut
- How to Change the Screen Refresh Rate in Windows 7
- How to Change the Color Bit Depth in Windows 7
- How to Change the Display DPI Size in Windows 7
- How to Open and Use Display Color Calibration in Windows 7
- How to Force DVI or HDMI Resolutions and Refresh Rates in Windows 7
- How to Change the Main Display in Windows 7
- How to Create a Custom Screen Refresh Rate with NVIDIA Control Panel in Windows
- Enable or Disable Changing "DPI" and "Screen Resolution" Display Settings in Windows 7 and Windows 8
- How to Add or Remove "Screen resolution" from Desktop Context Menu in Windows
Attachments
Last edited:

")