How to Change the Display DPI Size in Windows 7 and Windows 8
Information
This will show you how to change the DPI (Dots per Inch) size settings to allow text and other items, such as icons, fonts, and windows, to display larger or smaller in Windows 7 and Windows 8.
For Windows 8.1, see instead: How to Change DPI Scaling Size for Displays in Windows 8.1
The DPI setting you set below only affects the current user account that you are logged in, and not all users.
In Windows 8, the DPI setting only affects screens on the desktop. For only Metro (modern UI) screens, see: How to Turn "Make everything on your screen bigger" On or Off in Windows 8
Note
Setting the DPI size to a smaller number or percentage will decrease all items size on the display, while setting the DPI size to a larger number or percentage will increase all items size on the display.
Tip
Typically, the higher the dots per inch (DPI), the better the fonts will look. If you set the DPI higher than 96, and you are running a Windows Aero theme, the text and other items on the screen might appear blurry in some programs that are not designed for high–DPI display in this version of Windows. You can avoid this issue by using legacy DPI scaling (Windows XP style DPI scaling) for these programs.
OPTION ONE
Change DPI Through Display Settings
OR
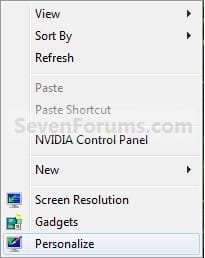
2. Right click or press and hold on an empty area of your desktop, and click/tap on Personalize. (See screenshot below)
NOTE: The Windows 7 Starter and Home Basic editions do not have Personalize included in them.

A) Towards the bottom left corner, click/tap on the Display link. (See screenshot below)

B) Go to step 4.
OR
3. Right click or press and hold on an empty area of your desktop, and click/tap on Screen Resolution. (See screenshot below step 2)A) Click/tap on the Make text and other items larger or smaller link. (See screenshot below)

4. You will now see this screen. (See screenshots below)


5. To Select a DPI SizeA) Dot a size that you want for the Display DPI size. (See screenshot above)
- Smaller - 100% = 96 DPI (Pixels/Dots Per Inch)
- Medium - 125% = 120 DPI (Pixels/Dots Per Inch)
- Larger - 150% = 144 DPI (Pixels/Dots Per Inch)
6. To Set a Custom DPI SizeA) In the left pane, click/tap on the Set custom text size (DPI) link (Windows 7) or Custom sizing options link (Windows 8). (See screenshot below step 4)
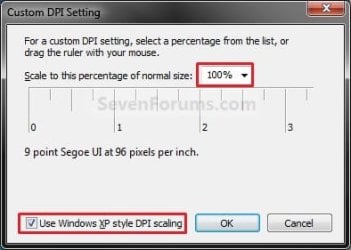
B) To the right of Scale to this percentage of normal size, click on the drop down arrow and select a percentage you want the DPI size to be. (See screenshot below step 6D)
NOTE: You can also click and hold on the Inch Scale below this and drag it to change the percentage.
C) If needed, check the Use Windows XP style DPI scaling box to make text and items clearer in programs that are not designed for higher settings than 96 DPI (100%). (See screenshot below step 6D)
NOTE: See the TIP box at the top of the tutorial.
D) Click/tap on OK. (See screenshot below)

8. Click/tap on the Apply button. (See screenshot below step 4)
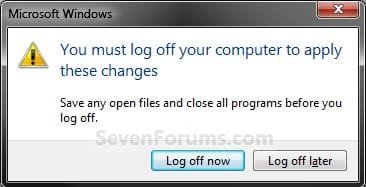
9. Click/tap on the Log off now button to apply the DPI changes. (See screenshot below)
WARNING: This will log you off immediately. Be sure to save anything you are working on before you click on this.

10. Log back on.
OPTION TWO
Change DPI Manually in Registry Editor
2. If prompted by UAC, click/tap on Yes.
3. In regedit, navigate to the location below: (see screenshot below)HKEY_CURRENT_USER\Control Panel\Desktop

4. In the right pane of Desktop, double click/tap on LogPixels to modify it. (see screenshot above)
NOTE: If you do not have the LogPixels DWORD value, then right click on a empty space in the right pane of Desktop, click on New and DWORD (32-bit) Value, type LogPixels, and press Enter.
5. In the edit/modify window, select (dot) Decimal, type in the registry data value from the table below for the DPI setting that you want to use, and click/tap on OK.
| DPI Setting | Registry Data Value |
|---|---|
| Smaller - 100% | 96 |
| Medium - 125% | 120 |
| Larger - 150% | 144 |

6. Close regedit.
7. Log off and log on, or restart the computer to apply.
OPTION THREE
To Restore Default 96 DPI Using a REG File Download
NOTE: This can be handy if you accidentally set the DPI to large and everything is extended way past the display screen, making them distorted and unreadable. You can also boot into Safe Mode and change the DPI scaling back to a smaller number using a option above.1. Click/tap on the download button below to download the file below.Restore_Default_96_DPI.reg
Download
2. Save the .reg file to your desktop.
3. Double click/tap on the downloaded .reg file to merge it.
4. Click/tap on Run, Yes (UAC), Yes, and OK when prompted.
5. Log off and Log on, or restart the computer to apply changes.
6. When finished, you can delete the downloaded .reg file if you like.
That's it,
Shawn Brink
Related Tutorials
- How to Change DPI Scaling Size for Displays in Windows 8.1
- How to Change the DPI for Modern UI in Windows 8
- Enable or Disable Changing "DPI" and "Screen Resolution" Display Settings in Windows 7 and Windows 8
- How to Create a "Display" DPI Shortcut in Windows 7 and Windows 8
- How to Change the Screen Resolution in Windows 7
- How to Change the Screen Refresh Rate in Windows 7
- How to Change the Color Bit Depth in Windows 7
- How to See a Preview of the Fonts in Windows 7
- How to Change the Default Fonts in Windows 7
- How to Create a Font Settings Shortcut in Windows 7
- How to Add or Remove "Display" from Desktop Context Menu in Windows 7 and Windows 8
- How to Enable or Disable "Smooth Edges of Screen Fonts"
- How to Change Your Main Display in Windows 8 and 8.1
Attachments
Last edited:
")