How to Change Maximum Disk Space Used by System Protection and System Images in Windows 7
Information
By default, Windows 7 will allocate up to 10% of your total C: drive/partition size to be used by system protection to store system restore points in this allocated disk space. This allocated space will no longer be available as free space on the drive/partition.
This same setting also determines the maximum disk space that can be used to store system images on a drive letter. The size of a system image can be quite large since it will include all system drives in the image by default plus any drives you have included. If you want to keep multiple system images, be sure to increase the max size accordingly.
This tutorial will show you how to manage and change the maximum disk space you want to be used for system protection restore points and system images in Windows 7.
Note
Restore points are saved until the disk space System Restore reserves is filled up. As new restore points are created, old ones are deleted.
It really depends on how many restore points you would like to have stored on your computer for what you should set the MAX storage size to be.
The size of each restore point will vary from system to system due to what you may have installed. As a rough guidline, I would give about 1.3GB of space for each restore point that you would like to keep. You can adjust the MAX size as needed if you are not getting the amount of restore points you would like though.
Warning
As space fills up, older restore points and system images will be deleted to make room for new ones.
OPTION ONE
Through System Protection Properties Page
1. Open the Control Panel (icons view).
A) Click on the System icon.
B) Go to step 3.
OR
2. Open the Start Menu.
A) Right click on the Computer button and click on Properties.
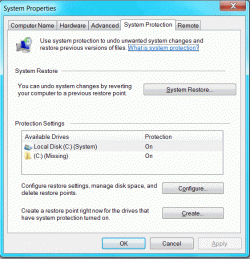
3. Click on the System Protection link. (See screenshot below)
4. Close the System window. (See screenshot below)

5. Click on the available hard disk drive or partition, that you want to change the System Protection disk space usage for, to select it. (See screenshot below step 6)
NOTE: Windows 7 should be the C: disk with (System). System Protection will need to be turned on for the selected disk to be able to adjust it's disk space usage.
6. Click on the Configure button. (See screenshot below)

7. Adjust the Max Usage slider to how much disk space you want System Protection to use for restore points for the selected disk (step 5). (See screenshot below step 8)
NOTE: Slide left for less space, and slide right for more space.
8. Click on OK. (See screenshot below)

9. Click on OK. (See screenshot below step 6)
NOTE: If you reduced the max size, then it may take a day for the "Current Usage" size to automatically shrink down to be within the set max size.
OPTION TWO
Manually Using an Elevated Command Prompt
1. To See the Current Allocated System Restore Size
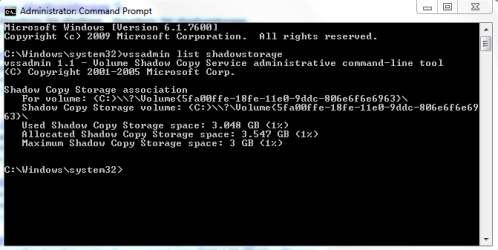
A) Open an elevated command prompt.
B) If prompted by UAC, click on Yes.
C) In the elevated command prompt, type in the command below and press Enter. (see screenshots below)
NOTE: This will give your the details on the Used, Allocated, and Maximum spaces of Shadow Copies for the available disks that you selected to have system restore turned on for. The left screenshot is for just one drive selected, and the right screenshot is for two drives (C & D ) selected.
vssadmin list shadowstorage


Allocated | This is the amount that is currently reserved from the hard disk.
Maximum | This is the maximum amount that could be allocated and used from the hard disk.
NOTE: If you turn System Restore off for a selected drive, the original default values will be set back and the restore points will be deleted.
A) In the elevated command prompt window, type the command below for the drive letter and max size you want.
WARNING: If you change the MAX size to a smaller size than the current Used size shown in step 1 above, then the older restore points will be deleted to adjust to the new size. Nothing will happen to the restore points if you make the MAX size larger than the current Used size shown in step 1 above.
* For a listed C: drive, you would type the command below and press Enter.
Code:
vssadmin Resize ShadowStorage /For=[B][COLOR=red]C:[/COLOR][/B] /On=[B][COLOR=red]C:[/COLOR][/B] /Maxsize=[B][COLOR=red]3GB[/COLOR][/B]
Code:
vssadmin Resize ShadowStorage /For=[B][COLOR=red]C:[/COLOR][/B] /On=[B][COLOR=red]C:[/COLOR][/B] /Maxsize=[B][COLOR=red]5%[/COLOR][/B]
Code:
vssadmin Resize ShadowStorage /For=[B][COLOR=red]D:[/COLOR][/B] /On=[B][COLOR=red]D:[/COLOR][/B] /Maxsize=[B][COLOR=red]3GB[/COLOR][/B]
Code:
vssadmin Resize ShadowStorage /For=[B][COLOR=red]D:[/COLOR][/B] /On=[B]D:[/B] /Maxsize=[B]5%[/B]
Note
See the screenshots below step 1 above under the Shadow Copy Storage association line for each drive listed.
Command
|
Description
/For=
|The
For volume:
listed. (Ex: C or D above)
/On= |The Shadow Copy Storage volume: listed. (Ex: C or D above)
/Maxsize= |The % of HDD size or amount of KB, MB, GB, TB, PB, or EB you want to limit the maximum storage size of shadow copies and restore points to. This must be 300MB or larger .
/On= |The Shadow Copy Storage volume: listed. (Ex: C or D above)
/Maxsize= |The % of HDD size or amount of KB, MB, GB, TB, PB, or EB you want to limit the maximum storage size of shadow copies and restore points to. This must be 300MB or larger .
B) You will get a Successfully resized the shadow copy storage association message.

C) If not, repeat step 2 checking for any mistakes that may have been made.
D) If yes, then check with step 1 above to confirm the change for the selected drive.
3. Close the elevated command prompt when done.
NOTE: If you reduced the max size, then it may take a day for the "Current Usage" size to automatically shrink down to be within the set max size.
That's it,
Shawn
Related Tutorials
- How to Turn System Protection On or Off in Windows 7
- How to Enable or Disable Windows 7 System Restore
- How to Delete System Protection Restore Points in Windows 7
- How to Make a Create System Restore Point Shortcut in Windows 7
- How to Add "Create Restore Point" to Context Menu in XP, Vista, Windows 7, and Windows 8
- How to Create a System Restore Point in Windows 7
- How to Do a System Restore in Windows 7
- How to Manage the Offline Files Disk Space Usage in Windows 7
- How to Create a Windows 7 System Protection Properties Shortcut
- How to Enable or Disable Windows 7 System Restore Configuration
- How to Restore Files and Folders in Windows 7 with Previous Versions
- How to Change the Recycle Bin Storage Size in Vista and Windows 7
- How to Free Up and Recover Hard Drive Space in Windows 7
- How to Stop System Restore Points from being Deleted in Vista and Windows 7 when Dual Booting with XP
- How to Delete Shadow Copies in Vista and Windows 7
- How to Extract Files and Folders from System Restore Points in Windows 7 and Vista
- How to Enable or Disable Automatic System Restore Point Creation in Windows
Last edited:
")
 ..
..") Ted
Ted