How to Turn On or Off BitLocker for Internal Data Hard Drives in Windows 7
InformationThis will show you how to turn Windows 7 BitLocker Drive Encryption on or off for internal hard drives or partitions without a operating system installed on them. When BitLocker Drive Encryption is turned on for the selected internal data hard drive or partition, you will be required to either use a smart card or enter a password to unlock the drive before allowed access to it.
NoteWhen you add new files to the Windows 7 or other operating system drive or partition that is encrypted with BitLocker, BitLocker will encrypt them automatically. Files remain encrypted only while they are stored on the encrypted drive. Files will be decrypted if they are copied on another drive, partition, or computer. You can log on and work with your files normally, but BitLocker can help block hackers from accessing the system files they rely on to discover your password, or from accessing your drive by removing it from your computer and installing it in a different computer.
WarningBitLocker is only available in the Windows 7 Ultimate and Enterprise editions.
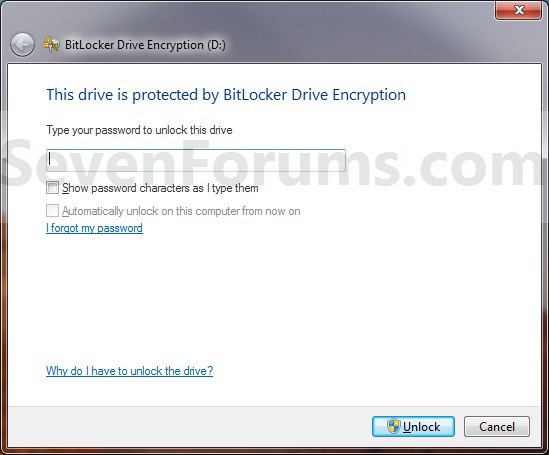
EXAMPLE: A Internal Data (non-OS) Hard Drive with BitLocker turned on for it
NOTE: This is what you will see when you attempt to open or access the encrypted internal data hard drive or partition after you have logged off or restarted the computer. You will then need to enter your password to unlock the drive to gain access.
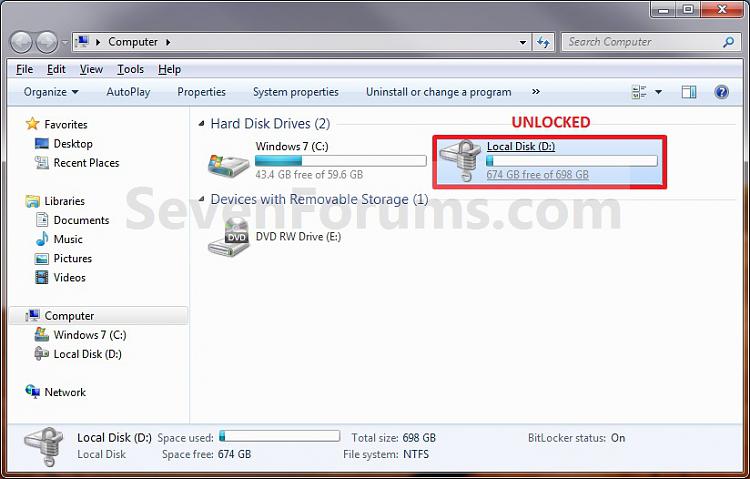
EXAMPLE: A Internal Data (non-OS) Hard Drive Locked and Unlocked by BitLocker
NOTE: When you have BitLocker Drive Encryption turned on, then this is how you can tell if the drive is currently locked or unlocked in the Computer window.
OPTION ONETurn On BitLocker and Encrypt a Internal Drive
1. Decide if you want 128-bit or 256-bit encryption.
NOTE: By default, Windows 7 will use AES encryption with 128-bit encryption keys and Diffuser unless changed already by you previously.
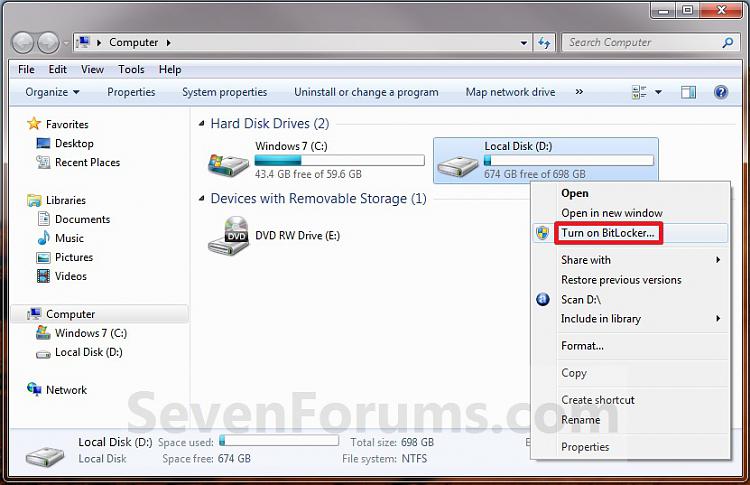
2. Open the Start menu and click on the Computer button, then right click on the non operating system internal drive or partition letter that you want to encrypt with BitLocker and click on Turn on BitLocker. (See screenshot below)
OR
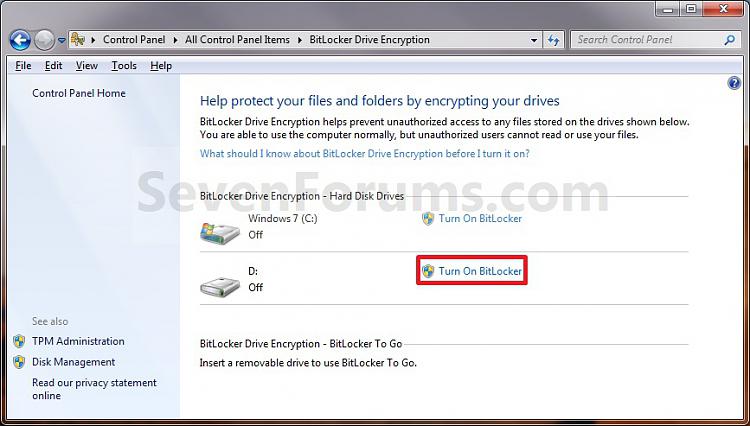
4. Open the Control Panel (All Items view), and click on the BitLocker Drive Encryption icon.
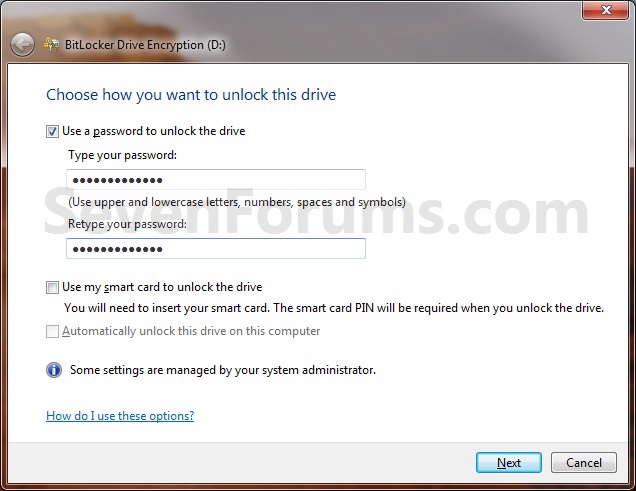
A) Click on Turn On BitLocker for non operating system internal drive or partition letter that you want to encrypt with BitLocker. (See screenshot below)5. Select a option, say (check) Use a password to unlock the drive, then type in a password that is at least 8 numbers and/or letters long that you would like to use to unlock the drive with twice, and click on the Next button. (See screenshot below)
WARNING: Be sure to write down this password and keep it somewhere safe. The password you enter here will be required to be entered to unlock the drive to gain access to it.
NotePassword
A password is a string of characters used to access information or a computer. For more information about passwords, see Tips for creating strong passwords and passphrases.
Smart card
- You can use a password to unlock fixed data drives (such as internal hard drives) and removable data drives (such as external hard drives and USB flash drives).
- Passwords allow you to use your encrypted drive on both home and work computers or share the drive with other people.
- The BitLocker To Go Reader allows you to unlock encrypted drives on computers running Windows Vista or Windows XP. To use the BitLocker To Go Reader, the drive must be formatted using the FAT file system and you must use a password to encrypt the drive.
- You can change your password in the BitLocker Drive Encryption Control Panel.
A smart card is a small plastic card containing a computer chip. Smart cards are generally issued by information technology (IT) departments in large companies. To use a smart card, you also need a smart card readeróa device thatís installed in or connected to your computer and can read the information stored on a smart card.
NOTE: When encrypting a drive using a smart card, a certificate-based protector will be created on the drive. This protector contains some unencrypted information that is required to unlock the drive. In the specific case where a certificate-based protector is used, the public key and certificate thumbprint of the certificate that was used to encrypt the drive will be stored unencrypted in the protectorís metadata. This information could be used to locate the certification authority (CA) that was originally used to generate the certificate and then try to extract some personal information.
- Smart cards are used primarily in work environments.
- You will be required to use a BitLocker certificate that is provided by your system administrator. If you have multiple certificates, you might have to choose one.
- Smart cards cannot be used with the BitLocker To Go Reader, which allows you to unlock drives on computers running Windows Vista or Windows XP.
- To unlock the drive, you will insert your smart card and type your smart card PIN.
Automatically unlock
When you encrypt fixed data drives, you can choose to have the drive automatically unlock when you log on to Windows.
NOTE: To be able to automatically unlock fixed data drives, the drive that Windows is installed on must also be encrypted by BitLocker.
- Removable data drives can be set to automatically unlock after they are encrypted by right-clicking the drive in the Computer folder, and then clicking Manage BitLocker.
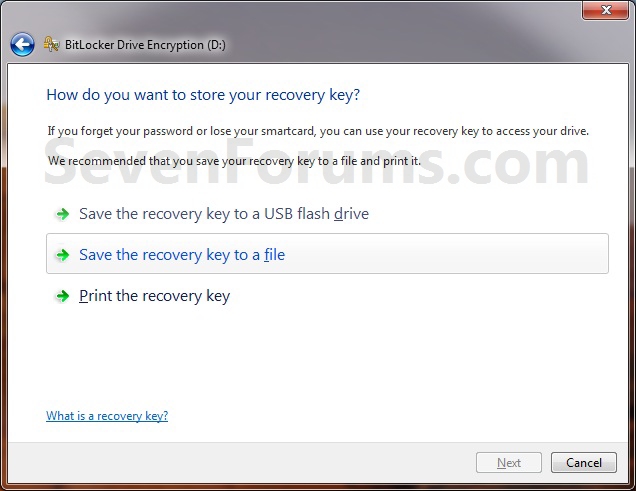
6. Click on Save the recovery key to file option. (See screenshot below)
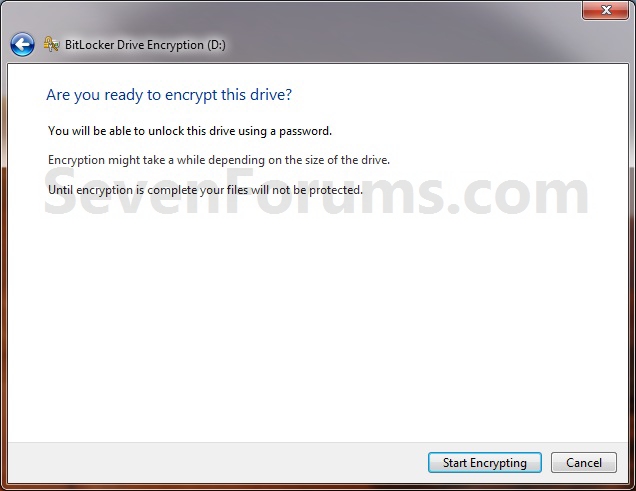
7. Click on the Start Encrypting button. (See screenshot below)
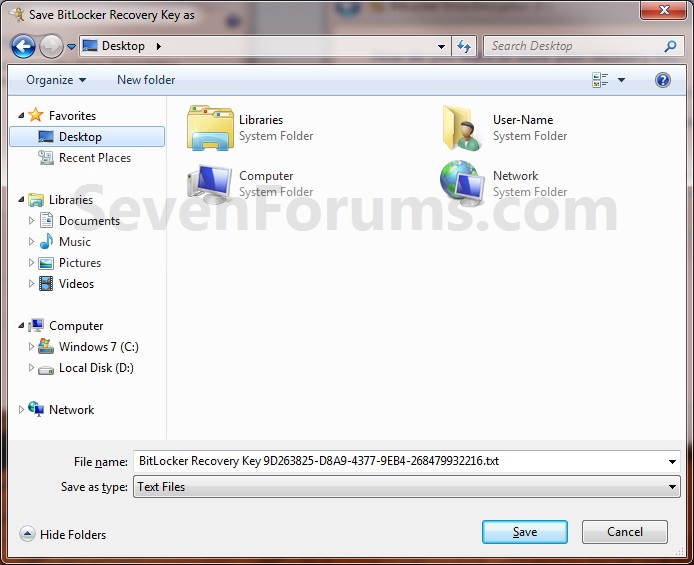
A) Select where you want to save this file at, and click on the Save button. (See screenshot below)
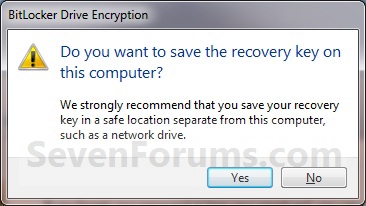
B) If prompted, click on Yes. (See screenshot below)
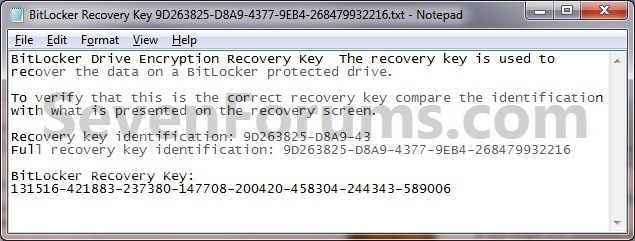
C) It is highly recommended that you save this file somewhere safe, and not on the encrypted drive. You will need the "BitLocker recovery key" number (bottom number in screenshot below) to gain access to you encrypted drive if you should forget the password, lose the smart card, or BitLocker locks the drive.
D) It is also recommended that you click on the Print the recovery key option as well to have a printed hard copy of the file to be extra safe. (See screenshot below step 6)
E) When done, click on the Next button. (See screenshot below step 6)
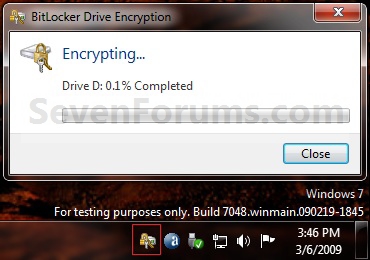
8. BitLocker will now start encrypting the drive. (See screenshot below)
NOTE: This may take a while to finish.
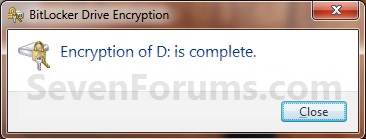
9. When it is finished, click on the Close button. (See screenshot below)
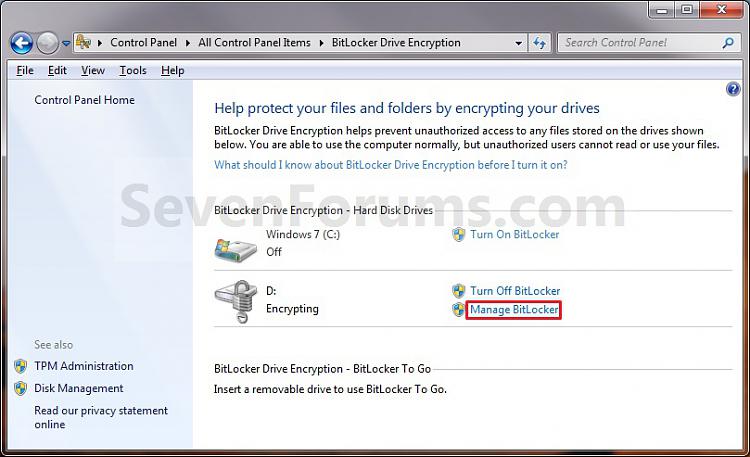
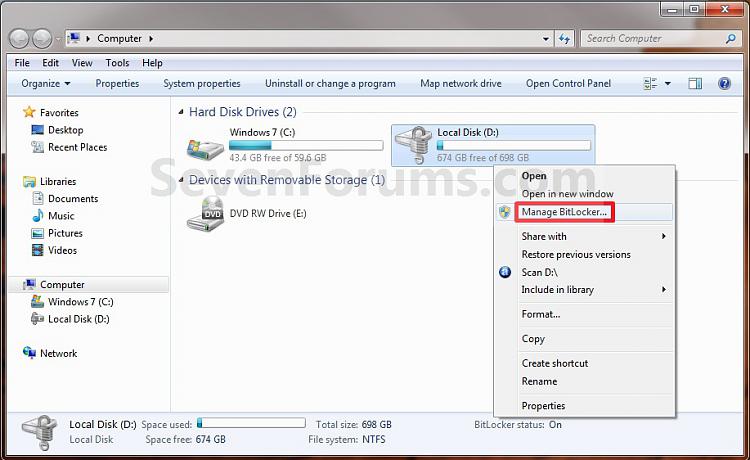
10. You will now have a Manage BitLocker option in the Control Panel and Computer for the encrypted drive. (See screenshots below)
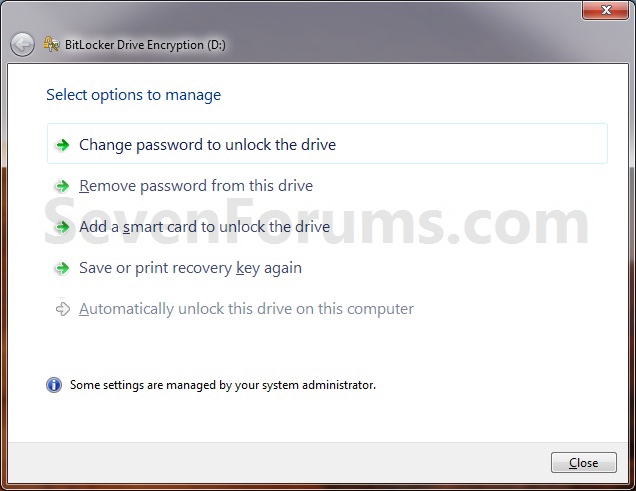
11. If you click on Manage BitLocker, these will be the options that you will have below. (See screenshot below)
12. You're done. The internal data drive or partition is now encrypted with BitLocker (turned on).
OPTION TWOTurn Off BitLocker and Decrypt a Internal Drive
NOTE: If you do not care about losing all data on the drive/partition, then formating or using the clean command will allso turn off BitLocker for the drive/partition.
1. Open the Control Panel (icons view), and click on the BitLocker Drive Encryption icon.That's it,
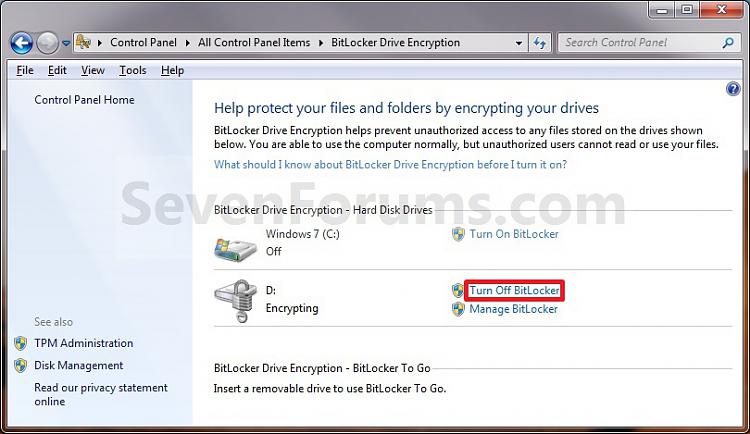
2. Click on Turn Off BitLocker for the non operating system internal drive or partition letter that you want to turn off BitLocker with. (See screenshot below)
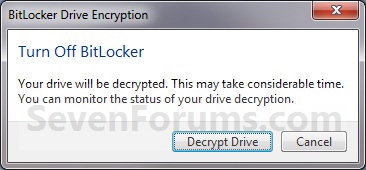
3. Click on the Decrypt Drive button. (See screenshot below)
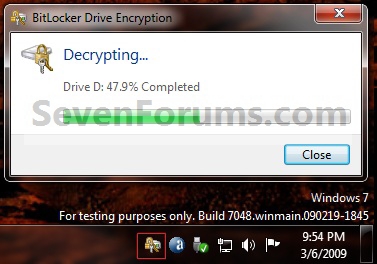
4. BitLocker will now start decrypting the drive. Click on the BitLocker icon in the taskbar notification area (far right) to see the encryption status. (See screenshot below)
NOTE: This may take a while to finish.
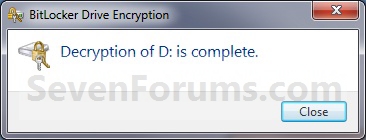
5. When finished, click on the Close button. (See screenshot below)
6. The Control Panel and Computer will now have the Turn On BitLocker option again for the selected drive.
7. You're done. The internal data drive or partition is now decrypted by BitLocker (turned off).
Shawn
Related Tutorials
- How to Change Windows 7 BitLocker Drive Encryption Method and Cipher Strength
- How to Turn BitLocker On or Off without a TPM for Windows 7 Drive
- How to Suspend or Resume BitLocker Protection on Windows 7 Drive
- How to Turn Windows 7 BitLocker To Go On or Off for Removable Drives
- How to Create a Windows 7 BitLocker Drive Encryption Shortcut
- How to Lock an Unlocked BitLocker Drive
- Add "Lock Drive" to Unlocked BitLocker Drives Context Menu in Windows 7 and Windows 8
- How to Unlock a Data or Removable Drive Locked by BitLocker Drive Encryption
- How to Create a USB Startup Key to Lock or Unlock Windows
- How to Check BitLocker Status of Drive in Windows 7 and Windows 8
BitLocker Drive Encryption - Internal Data Hard Drives - Turn On or Off
-
New #1
Thank you Brink !!
I finally enabled BitLocker Drive Encryption on my WD 1TB hard drive.
Just a small ? when i reboot it shows locked, i enter the password, fine it unlocks, but how do i lock it again?
As a side note to people when encrypting a certain sized hard drive it may take, in my case, just under 3 hrs to fully encrypt a 1TB hard drive.
-
Posts : 8,375 W7 Ultimate x64/W10 Pro x64/W11 Pro Triple Boot - Main PC W7 Remote PC Micro ATX W7 Pro x64/W11 ProNew #2
This one will definitely come in timely here!
In fact besides the two WD 1tb storage drives I will be looking at another 500gb test drive that no longer be used as an OS drive once 7 is out. This will secure data on that drive.
-
New #3
Hi Grim,
You will either need to log off, or restart the computer to lock the drive again, otherwise it will remain unlocked as long as you are still logged on. :)
-
-
New #5
You're welcome Grim. I agree. Windows 7 is so much better than Vista. I can't wait to see what all they may add or improve more in the years to come with Windows Updates.
-
Posts : 8,375 W7 Ultimate x64/W10 Pro x64/W11 Pro Triple Boot - Main PC W7 Remote PC Micro ATX W7 Pro x64/W11 ProNew #6
I think we'll be looking for what new things find support in 7 and beyond in general as well as the new goods in the eventual service packs there too!
-
New #7
Problem with BitLocker
Hi,
I was enabling BitLocker to my 16GB PNY pendrive. Unfortunately while the encryption was going on i clicked on pause. After that i am not able to use my Pen drive. it showed locked and when i enter the password it says " Request could not be performed because of I/O error". Then i tried clicking forget password and gave the key which got generated but that is also not working. It says wrong key.
When i plug my Pendrive to a machine with XP it says connect to a machine with Windows 7 and complete the encryption.
Kindly advice how to resolve it.
Santosh
-
Posts : 8,375 W7 Ultimate x64/W10 Pro x64/W11 Pro Triple Boot - Main PC W7 Remote PC Micro ATX W7 Pro x64/W11 ProNew #8
Welcome to the Se7en Forums! SantoshVasudeva
With the process of encrypting the flash drive interrupted while in progress you may be forced to simply go into the Disk Management tool, right click on the item for the drive there, and select format! Going from 7 to XP would be another problem for the older version since the process was never completed in order to use on an older version or even taking with you to another machine entirely.
Hopefully you didn't have any unreplacable files already on the device since reformatting it to NTFS to make available again will wipe the flash drive completely. The next time I think you will be a little more cautious and allow the BitLocker to complete the process first however before trying to pause or simply go to use the drive itself.
Verify the next encryption is working well before placing any data on it just to be safe if you still go to use the tool. The tool does work but can be vulnerable at times so remember to back things up first before counting on the data you place on it to be locked up.
-
New #9
Problem with BitLocker
Hi thanks for your help. I tried this option before posting my question here and it did not work. I am not able to format my Pen Drive. It gives an error saying format did not complete successfully.
BitLocker Drive Encryption - Internal Data Hard Drives - Turn On or Off
How to Turn On or Off BitLocker for Internal Data Hard Drives in Windows 7Published by Brink
Related Discussions




 Quote
Quote