How to "Clean" or "Clean All" a Disk with the Diskpart Command
InformationThis will show you how to use the clean or clean all command on a selected disk to delete all of it's MBR or GPT partitions, volumes, and any hidden sector information on MBR disks is overwritten.
The data on the HDD is not written over using the clean command like it does with the clean all command below. With the clean command, the data on the HDD is only marked as being deleted instead and is only written over when new data is written/saved to the same location on the HDD next.
OR
You could use the clean all command (secure erase) to do the above and also have each and every disk sector on the HDD written over and zeroed out completely to securely delete all data on the disk to help prevent the data from being able to be recovered. "Clean All" takes about an hour per 320 GB to finish running.
Note
- You cannot use the clean or clean all diskpart commands on a boot disk (ex: disk Windows is installed on) unless you do it from a command prompt at boot.
- Be sure to backup anything that you do not want to lose on the disk that you use clean or clean all on first. It will be to late afterwards. All data will be permanently lost on the disk.
WarningYou do not want to use clean all on a SSD disk often. Having every sector written over to 0 on a SSD can reduce it's life span faster.
Here's How:
1. In Windows 7, open an elevated command prompt, or a command prompt at boot.
OR
2. In Windows 8 and 8.1, open an elevated command prompt, or a command prompt at boot.
NoteBe sure that you have the correct Disk #. You would not want to wipe clean the wrong disk.
A) Press the Windows + R keys to open the Run dialog, type compmgmt.msc, and press Enter.
B) If prompted by UAC, click/tap on Yes.
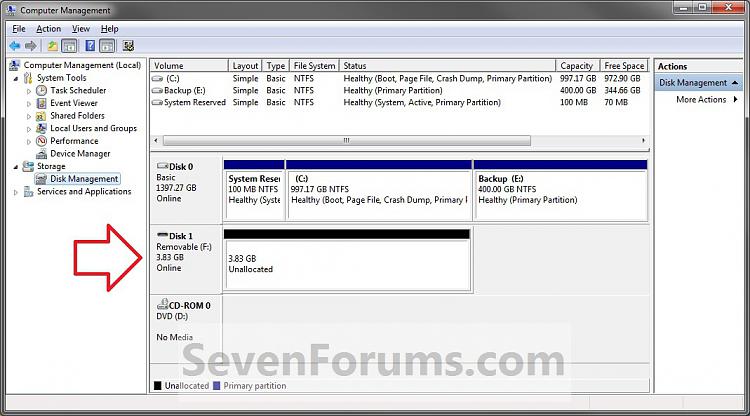
C) Click/tap on Disk Management in the left pane, and make note of the disk # in the middle pane of the disk that you want to clean or clean all. (see screenshot below)
NOTE: For example, I would use Disk 1 if I wanted to use clean or clean all on my USB key drive.
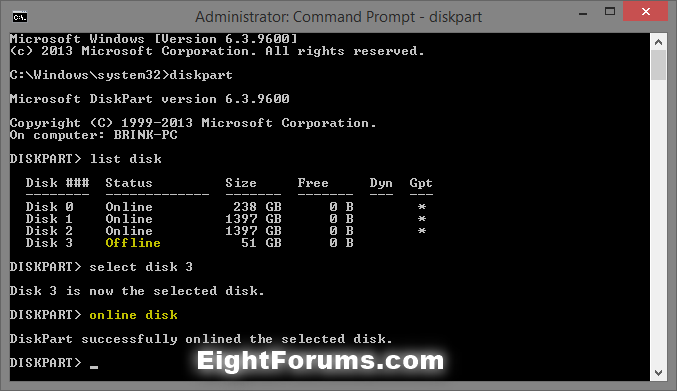
3. In the elevated command prompt, type diskpart and press Enter. (see screenshot below)
4. In the elevated command prompt, type list disk and press Enter. (see screenshot below)
NOTE: This will give you a list of disk numbers to select from.
5. In the elevated command prompt, type select disk # and press Enter. (see screenshot below)
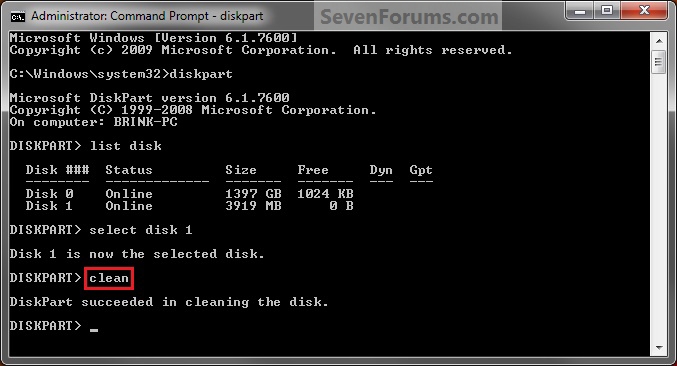
NOTE: You would substitute # for the disk number listed that you want to use clean or clean all on. For example, I want to use one of them on Disk 1 (from step 1) for my USB key drive, so I would type select disk 1 and press Enter.
6. If the status of the selected disk # (ex: Disk 3) shows as Offline, type online disk, and press Enter to make it online. (see screenshot below)
7. Do either step 8 or 9 below for which command you would like to use.
8. To Use the Clean Diskpart Command
NOTE: (Recommended) See the green INFO box at the top of the tutorial for more information about this command. This command will wipe the HDD quickly.
A) In the elevated command prompt, type clean, press Enter, and go to step 10 below. (see screenshot below)9. To Use the Clean All Diskpart Command
NOTE: This will not take long to finish. Think of it as being like a quick format.
NOTE: See the green INFO box at the top of the tutorial for more information about this command. This command will wipe the HDD, and perform a secure erase. "Clean All" takes about an hour per 320 GB to finish running. It's best to only use this command if you wanted to help make sure that the data on the HDD cannot be recovered say when giving or selling the HDD to another person.
A) In the elevated command prompt, type clean all, and press Enter, and go to step 10 below. You will see the command prompt below as is until the "clean all" command is finished. (see screenshot below)10. When finished, in the elevated command prompt, type exit and press Enter. Close the elevated command prompt.
NOTE: This will take quite some time (several hours or more) to finish depending on how large the disk is since it is writing over each and every sector on it to zero. Think of it as being like a full or low level format.
11. The disk will be left as unallocated space. (see screenshot below)
12. You will now need to create a new partition or volume on the disk to be able to use it again.
That's it,
Shawn
Related Tutorials
- How to Shrink a Partition or Volume in Windows 7
- How to Create a New Partition or Volume in Windows 7
- How to Extend a Partition or Volume in Windows 7
- How to Delete a Partition or Volume in Windows 7 and Windows 8
- How to Convert a FAT or FAT32 Volume to NTFS in Windows 7
- How to Convert a MBR Disk to a GPT Disk
- How to Convert a GPT Disk to a MBR Disk
- How to Convert a Basic Disk to a Dynamic Disk
- How to Convert a Dynamic Disk to a Basic Disk
- How to Quick Format a HDD or USB Drive
- How to Securely Wipe a Hard Disk with "Darik's Boot and Nuke"
- How to Overwrite Deleted Data using the "Cipher" Command in Windows
Disk - Clean and Clean All with Diskpart Command
-
Posts : 8,375 W7 Ultimate x64/W10 Pro x64/W11 Pro Triple Boot - Main PC W7 Remote PC Micro ATX W7 Pro x64/W11 ProNew #1
I can remember zero filling drives only 13gb or less using a dos tool and that would take just about the entire day when you mention "full format"!
Nice and simple! This will be a help when going to wipe any flash drive as well.
-
New #2
Hello Brink.
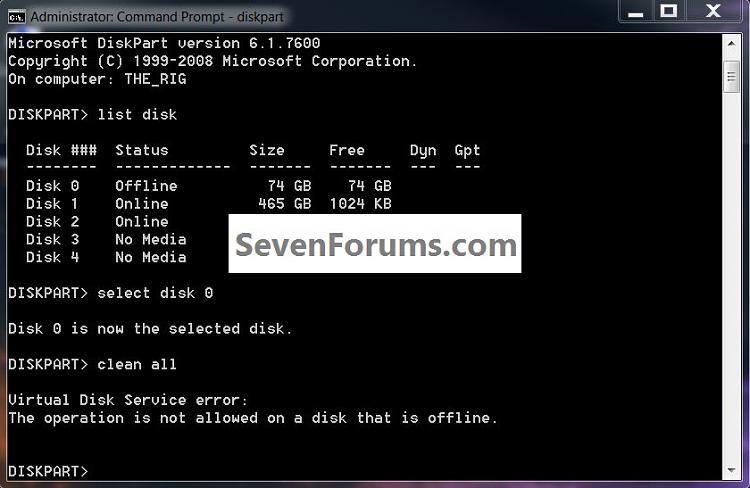
I just did this on my SSD and at first I thought to make the SSD "Offline" in disk management but in the command window it said that it could not "clean all" on a disk that's "Offline"; you may want to add a mention of this in the tutorial; I'm sorry I didn't think to get you a snip of it, but it should be easy to replicate.
It only took about 15 minutes to do a "clean all" on an 80GB SSD, not bad.
Thank you!
-
-
-
New #5
You're welcome Shawn, thank you for all the hard work you put in around here making it easy for the rest of us. :)
-
New #6
Thanks a lot for this great post.
-
-
New #8
Thanks
Thanks
but unfortunately it doesn't work with me i will give up maintaining my flash drive
-
New #9
Hello Zezoclo, and welcome to Seven Forums.
Could you give us more details on what part did not work for you, and include any error messages or screenshots? We may be able to help to get it to work for you.
Disk - Clean and Clean All with Diskpart Command
How to "Clean" or "Clean All" a Disk with the Diskpart CommandPublished by Brink
Related Discussions




 Quote
Quote