How to Change "Welcome" Text Message at Log On in Vista and Windows 7
InformationThis will show you how to change the Welcome text message you get after a user logs in to Windows 7 and Vista to any text message that you want it to say instead.
You can only do this tutorial while logged on as an administrator.
NoteIf you run a sfc /scannow command, then you will lose all changes made to the system file in the tutorial below since it and all other system files will be restored back to default by the command.
For Windows 7 Only:
- This tutorial works with UAC turned on or off.
- This tutorial works in all 32-bit and 64-bit Windows 7 SP1 editions.
- For Windows 7 without SP1, you will need to turn off a Windows Feature (ex: Windows Gadget Platform), and restart the computer before this tutorial will work. Afterwards, you can turn back on the Windows Feature again.
WarningMaking a mistake while modifying system files can render your Windows 7 installation unusable. To be safe, you should create a restore point before doing this tutorial in case you need to do a system restore at boot using the restore point to undo any mistakes that may be made.
EXAMPLE: Default and Changed "Welcome" Text Message at Log On
OPTION ONEChange "Welcome" Text Message at Log On
1. In Windows Explorer, navigate to C:\Windows\System32\en-US\winlogon.exe.mui. (see screenshot below)
2. Take ownership of the winlogon.exe.mui file with your user account, and set it's permissions to Allow your user account Full Control. Close Windows Explorer when finished.NoteThe en-US folder is in English Windows 7 copies. If you have a non-English Windows 7 copy, then this folder will have a different name reflecting your language instead.The table below are a few of the most common ones.
Folder Name Language da-DK Danish en-GB English-Great Britian en-US English-U.S. fi-FI Finnish fr-FR French de-DE German el-GR Greek it-IT Italian no-NO Norwegian es-ES Spanish sv-SE Swedish
3. Copy this winlogon.exe.mui file to your desktop.
4. If you have not already, download and install Resource Hacker.5. Right click on the Resource Hacker shortcut in Start Menu - All Programs, then click on Run as administrator. (see screenshot below)6. If prompted by UAC, then click on Yes (Windows 7) or Continue (Vista).
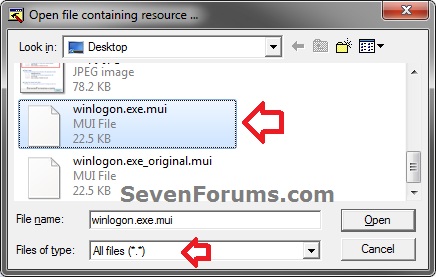
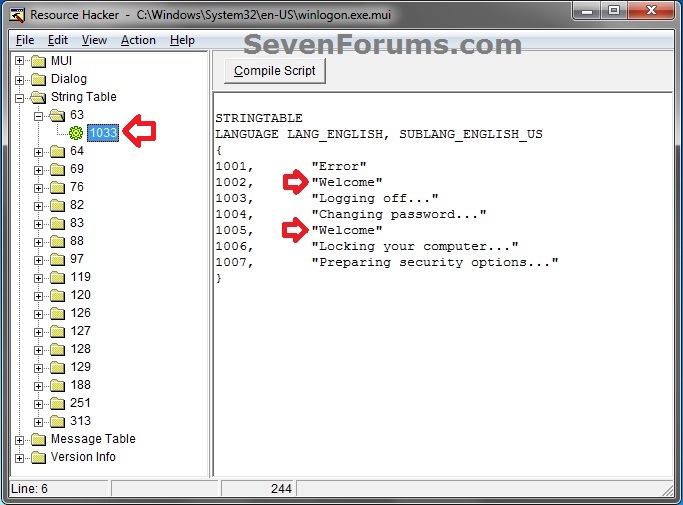
7. In Resource Hacker, click on File and Open. (see screenshot below)8. In Resource Hacker, select All Files (*.*) in the Files of type drop down box, navigate to and select the copied winlogon.exe.mui file on your desktop, then click on the Open button. (see screenshot below)9. In the left pane of Resource Hacker, expand String Table, and 63, to 1033. (see screenshot below)10. In the right pane of 1033, replace the Welcome text in quotes at both 1002 and 1005 locations with the text you want instead (ex: Hello) within quotes, then click on the Compile Script button. (see screenshot above and below)11. Click on File and Save, then close Resource Hacker. (see screenshot below)12. Copy the modified winlogon.exe.mui file on your Desktop, and Paste it into the C:\Windows\System32\en-US folder from step 1. (see screenshot below step 1)
NOTE: The en-US folder is in English Windows 7 copies. If you have a non-English Windows 7 copy, then this folder will have a different name reflecting your language instead.
13. Click on Copy and Replace. (see screenshot below)
14. If prompted, click on Continue (UAC) and Yes to approve.
15. Open a elevated command prompt, type mcbuilder, press Enter, then close the command prompt. (see screenshot below)
NOTE: Thanks to Fimble for pointing this out.16. Restart the computer.
17. Restart the computer and log in to see the changes made.
NOTE: If this does not work for you in Windows 7, then see the NOTE box at the top of the tutorial.
18. You can delete the winlogon.exe_original.mui that ResHacker created if you like since you can easily do OPTION TWO below to restore the default settings.
OPTION TWORestore Default "Welcome" Text Message at Log On
1. Repeat OPTION ONE above, but type Welcome in both locations at step 10 instead.That's it,
Shawn Brink
Related Tutorials
- How to Display a Log on Screen Title and Text Message in Vista and Windows 7
- How to Display Information About Previous Logons During User Logon in Vista and Windows 7
- How to Change the Windows 7 Log On Screen Text Shadow
- How to Change the Windows 7 Log On Screen Background
- How to Change the Windows 7 Startup Sound
- How to Change the "Logging off..." Text Message at Shut Down in Windows 7 and Vista
- How to Change the "Shutting down..." Text Message at Shut Down in Windows 7 and Vista
- How to Change the Logon Screen Text Color in Vista and Windows 7
Welcome Log On Text Message - Change
-
-
-
-
-
New #5
i can not do it
-
New #6
Hello Drifking,
Try the same thing I posted at the link below for your other issue, but substitute the file in this tutorial instead.
Logging off... Text Message - Change
-
New #7
Help it won't work for me. When I try to open it with ResHacker, it's just simply not there. When I try to copy it to my desktop Windows says "The file can not be found"
Help please!
-
New #8
Hello Tatenforts, and welcome to Seven Forums.
Double check through the steps to make sure that you did not miss anything in them and are doing it exactly step by step. Be sure that you select All Files (*.*) in the Files of type drop down box at step 7 to be able to see, select, and open the winlogon.exe.mui file in ResHacker.
Hope this helps,
Shawn
-
New #9
Shawn, Nice tutorial. But here's a problem similar to Tatenforts. I'm quite sure I've taken its ownership and ran Resource hacker as admin but no luck. It and even winload.exe.mui simply don't appear in the list.
What to do? Will Ive to use admin account, but this will make changes to the admin acc. only, no?

Welcome Log On Text Message - Change
How to Change "Welcome" Text Message at Log On in Vista and Windows 7Published by Brink
Related Discussions


 Quote
Quote