

How to Change the Default "Libraries" Folder Icon in Windows 7
InformationThis will show you how to change the main default Libraries icon to any custom icon that you want instead in Windows 7.Warning
- You can only do this while logged into an administrator account.
- This will affect all user account's Libraries icon on the computer.
EXAMPLE: Libraries Icon
NOTE: This is the default (left screenshot) and custom (right screenshot) Libraries icon.

Here's How:
1. Open the Start Menu and type regedit.exe in the search line, then press enter.
2. If prompted by UAC, then click on Yes.
3. In Regedit, go to the location below: (See screenshot below step 4)Code:HKEY_CLASSES_ROOT\CLSID\{031E4825-7B94-4dc3-B131-E946B44C8DD5}\DefaultIcon4. In the left pane of regedit, right click on the DefaultIcon key and click on Permissions. (See screenshot below)
5. At the top, select the Administrators group. At the bottom, check the Allow box to the right of Full Control and click on OK. (See screenshot below)
6. In the left pane of regedit, right click on (Default) and click on Modify. (See screenshot below)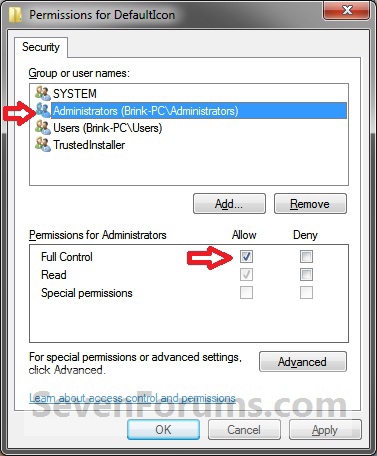
7. To Restore the Default Libraries Icon
A) In the Modify window from regedit, type in the path below and click on OK.8. To Use a Icon of Your Own
%SystemRoot%\system32\imageres.dll,-1023B) Go to step 10.
A) In the Modify window from regedit, type in the full path of where you have your custom icon (.ico file) stored at, then click on OK. (See screenshot below)9. To Use another Windows 7 Icon
WARNING: You will need to use a 256x256 pixel icon that was made for Windows 7 and Vista for them to display properly at all of the available icon view sizes in Windows 7. You will also need to leave the icon (.ico file) saved at the exact location you typed below for it to continue to work. If you delete or move this icon, then it will no longer be displayed.
B) Go to step 10.
A) Download and install the free program IconViewer to add the Icons tab in the screenshot below step 9B.10. If you have 64-bit Windows 7 Installed
NOTE: Be sure to download the correct 32-bit or 64-bit version for your Windows 7.
B) In Windows Explorer navigate to the .exe (ex: for program icons) or .dll (ex: Windows 7 icons) file that contains the icon that you want to use for the default Library icon, then right click on the file, click on Properties, and the Icons tab. (See screenshot below)
NOTE: The most common Windows 7 icons come from the C:\Windows\System32\imageres.dll file.
C) Make note of the icon number for the icon that you want to use instead. (See screenshot above)
NOTE: For example, the default Libraries icon number is 1023. I'm going to change it to the 1027 icon number just as an example.
D) In the Modify window from regedit, type in the full path of the .exe or .dll file followed by ,-icon# (fullpath,-####) and click on OK. (See screenshot below)
NOTE: For example, if I want to use the path (step 9B) and the 1027 icon (step 9C), I would type:
%SystemRoot%\system32\imageres.dll,-1027
OR
C:\Windows\System32\imageres.dll,-1027
NOTE: This is the default Libraries icon value.
NoteTo also change the Libraries icon in the "Open" and "Save as" type windows as well in 64-bit Windows 7, you will also need to do this step.
If you have a 32-bit Windows 7 installed, then skip this step since doing steps 1 to 7/8/9 will change the Libraries icon in the "Open" and "Save as" type windows as well.
A) In regedit, go to the location below:Code:HKEY_LOCAL_MACHINE\SOFTWARE\Wow6432Node\Classes\CLSID\{031E4825-7B94-4dc3-B131-E946B44C8DD5}\DefaultIconThat's it,B) Repeat steps 4 to 7/8/9 above.11. Close regedit.
12. Restart the computer to fully apply.
Shawn
Related Tutorials
- How to Change a Library Icon in Windows 7
- How to Add or Remove the Libraries Desktop Icon in Windows 7
- How to Change or Restore Default Windows 7 Desktop Icons
- How to Change the Windows 7 Default User Folder Icons
- How to Change the Windows 7 Default Folder Icon
- How to Change Windows 7 Default Folder Icons using Resource Hacker
- How to Change Windows 7 Default Control Panel Icons
- How to Change the Open Folder Icon in Windows 7
- How to Change the Default New Library Icon in Windows 7
- How to Add or Remove the Windows 7 Libraries Folder from the Navigation Pane
- How to Change a Drive Icon in Vista, Windows 7, and Windows 8
- How to Change Default Icon of Favorites in Navigation Pane in Windows 7 and Windows 8
- How to Change the Default HomeGroup Icon in Windows 7
- How to Change Windows 7 System Icons Using Resource Hacker
- How to Rename "Libraries" in the Windows 7 Explorer Navigation Pane
Libraries Icon - Change Default Icon
-
-
-
New #3
When I pin it to the taskbar it comes up as the default yellow icon.
-
New #4
Hello Psyh0t1c,
That would be because it is actually pinning the Windows Explorer icon with the Libraries icon in it's jump list instead. Sorry.
-
New #5
Yeah so what I did was just changed the explorer icon and now everything is cool. :)
-
-
New #7
Perfect! Thank you :)
-
New #8
this seems like a completely great tutorial but i ran into a problem, why dont i have a CLSID folder in my HKEY_CLASSES_ROOT folder?
-
New #9
Hello Mhelseth,
You do. You will just need to keep scrolling past the file extensions until you see it. :)

Libraries Icon - Change Default Icon
How to Change the Default "Libraries" Folder Icon in Windows 7Published by Brink

 Quote
Quote
Related Discussions