How to Change a Drive Icon in Vista, Windows 7, and Windows 8
Information
This tutorial will show you how to change a drive icon for an internal or external drive that has a drive letter in the Computer window to any icon you want for just your or all user accounts in Vista, Windows 7, and Windows 8.
Tip
If your default drive icon is missing or was changed and you did not do it with the methods below, then look for a hidden (not always hidden though) autorun.inf file (OPTION ONE below) in the root directory of the affected drive, right click on the autorun.inf file, and click on Delete. Next, approve the deletion. If this was an external device, then you may need to disconnect and reconnect the device for the icon to appear afterwards.
Warning
If you select to use a custom icon of your own, then it must be a 256x256 pixel icon (.ico) file for it to display properly in all icon sizes.
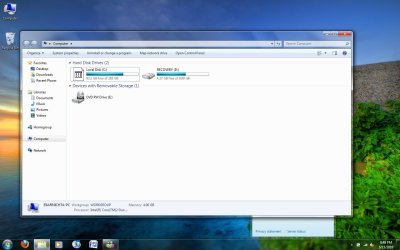
EXAMPLE: C Drive icon - Default and Changed


OPTION ONE
Change a Drive Icon using a "autorun.inf" File
NOTE: While this option can be used for any drive, it is really useful for external drives like a USB flash drive.
1. Set your known file extentions to no longer be hidden.
NOTE: This way you will be able to rename the file extension in step 3 below.
2. Connect and/or open the drive that you want to change the icon of.
3. In the root of the drive that you want to change the icon of, right click or press and hold on an empty space, and click/tap on New and Text Document. Rename this .txt file to autorun.inf, and press Enter. (see screenshots below)
NOTE: If you already have a autorun.inf file in the root of this drive, then skip this step and proceed to step 4.


4. Copy the icon .ico file (ex: Thumb_Drive.ico) that you want to use to the root of the drive that you want to change the icon of. (see right screenshot below)

5. If this is a New autorun.inf File
A) Open the autorun.inf file, then type each line below followed by pressing enter. (see screenshot below)
NOTE: Substitute icon file name with the actual name of your icon file (ex: Thumb_Drive.ico) from step 4.
Code:
[autorun]
icon="[B][COLOR=red]icon file name[/COLOR][/B].ico"
B) Click/tap on File (menu bar) and Save, then close the autorun.inf file. (see screenshot above)
6. If you already have an autorun.inf File
NOTE: Be sure that you also check the Show hidden files, folders, and drives option in Folder Options in case the existing autorun.inf file (if there) may have been hidden.
A) Open the autorun.inf file, then add or change the icon= line below. (see screenshots below)
NOTE: Substitute icon file name with the actual name of your icon file (ex: Thumb_Drive.ico) from step 4.
Code:
[autorun]
[B]icon="[COLOR=red]icon file name[/COLOR].ico"[/B]
B) Click/tap on File (menu bar) and Save, then close the autorun.inf file. (see screenshots above)
7. If this is for an Internal or eSATA Dive
A) Restart the computer to apply.
8. If this is for an External Dive
A) Unplug and plug in the drive to apply.
9. Open the Computer window to see the changes.
Note
To Restore the Default Icon
You would just need to do either option below and repeat steps 7 to 9 above.
You would just need to do either option below and repeat steps 7 to 9 above.
- Delete the autorun.inf and .ico file.
- If you have other lines (ex: label=) in the autorun.inf while editing it that you wish to continue using, then remove the icon= line entry for the drive, and save the changes.
OPTION TWO
Change a Drive Icon in Registry Editor for Current User Account Only
1. If you did OPTION ONE previously, then you will need to either remove the icon=icon file name.ico entry from the autorun.inf file, or delete the autorun.inf file in the root of the drive that you want to change the icon of.
2. Press the Windows + R keys to open the Run dialog, type regedit, and press Enter.
3. If prompted by UAC, then click/tap on Yes (Windows 7/8) or Continue (Vista).
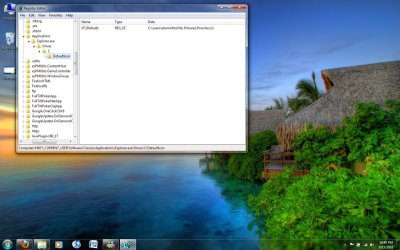
4. In regedit, navigate to the location below. (see screenshot below)
HKEY_CURRENT_USER\Software\Classes

5. In the left pane, right click on Classes, click/tap on New and Key, type Applications, and press Enter.
NOTE: If you already have the Applications key under Classes, then go to step 6. (see screenshot above and below)

6. In the left pane, right click on Applications, click/tap on New and Key, type Explorer.exe, and press Enter.
NOTE: If you already have the Explorer.exe key under Applications, then go to step 7. (see screenshot above and below)

7. In the left pane, right click on Explorer.exe, click/tap on New and Key, type Drives, and press Enter.
NOTE: If you already have the Drives key under Explorer.exe, then go to step 8. (see screenshot above and below)

8. In the left pane, right click on Drives, click/tap on New and Key, type the drive letter (ex: C ) that you want to change the icon for, and press Enter.
NOTE: If you already have the drive letter (ex: C ) key under Drives, then go to step 9. (see screenshot above and below)

9. In the left pane, right click on the drive letter (ex: C ), click/tap on New and Key, type DefaultIcon, and press Enter.
NOTE: If you already have the DefaultIcon key under the drive letter (ex: C ), then go to step 10, 11, or 12. (see screenshot above and below)

10. To Restore the Default Drive Icon
A) Right click on the drive letter (ex: C ) from step 8 above that you want to restore, and click/tap on Delete and Yes. (see screenshot below step 8)
B) Go to step 14.
11. To Use a Custom Icon of Your Own
A) Make sure that the icon is unblocked if not already.
B) Make sure that the icon is located in a folder where you have access permission rights. The icon will need to stay here for as long as you are using it for the drive icon, otherwise it will break the link and no longer display as the drive's icon.
C) In the right pane of DefaultIcon, double click/tap on (Default) to modify it. (see screenshot below step 9)
D) In the Modify window, type this below, and click/tap on OK. (see screenshot below)
NOTE: Substitute with your icons full path and name with file extension in quotes instead.
Code:
"[B][COLOR=red]full path of the icon file with file extension[/COLOR][/B]"
Code:
"G:\Windows 7 PNG Files\Start_Orb.ico"
E) Go to step 13.
12. To Use another Icon Included in Windows 7
A) Download and install the free program IconViewer for your 32-bit or 64-bit Windows 7.
NOTE: This program will add a Icons tab to files (ex: imageres.dll) that contain a icon library in them so you can see the icons available in it.
B) In Windows Explorer, navigate to C:\Windows\System32\imageres.dll and right click on imageres.dll, click on Properties, and click on the Icons tab.
NOTE: You can use any of the Windows 7 files that include icons in them that you want though. This is just the most common one.
C) Scroll through the icons and make note of the icon number of the one you want to use to replace the default file extension icon with, then close the properties window. (see screenshot below)
NOTE: For example, icon number 36 for the default C drive icon.

D) In the right pane of DefaultIcon, double click/tap on (Default) to modify it. (see screenshot below step 9)
E) In the Modify window, type in the location below, and click/tap on OK. (see screenshot below)
Code:
[B][COLOR=red](full path of the Windows 7 file with file extension)[/COLOR][/B],-[B][COLOR=red]####[/COLOR][/B]
Code:
C:\Windows\System32\imageres.dll,-36
13. The registry should look similar to this now depending on the icon path you entered in either step 11 or 12. (see screenshot below)

12. Close Regedit.
13. The changes should be immediate, but in some cases you may need to restart the computer to apply the changes. If the drive icon does not change for you using this option, then try OPTION ONE or OPTION THREE to change it instead.
OPTION THREE
Change a Drive Icon in Registry Editor for All User Accounts
NOTE: You must be logged in as an administrator to be able to do this option.
1. If you did OPTION ONE previously, then you will need to either remove the icon=icon file name.ico entry from the autorun.inf file, or delete the autorun.inf file in the root of the drive that you want to change the icon of.
2. Press the Windows + R keys to open the Run dialog, type regedit, and press Enter.
3. If prompted by UAC, then click/tap on Yes (Windows 7/8) or Continue (Vista).
4. In regedit, navigate to the location below. (see screenshot below)
HKEY_LOCAL_MACHINE\SOFTWARE\Microsoft\Windows\CurrentVersion\Explorer

5. In the left pane, right click on Explorer, click/tap on New and Key, type DriveIcons, and press Enter.
NOTE: If you already have the DriveIcons key under Explorer, then go to step 6. (see screenshot above and below)

6. In the left pane, right click on DriveIcons and click/tap on New and Key, type the drive letter (ex: C ) that you want to change the icon for, and press Enter.
NOTE: If you already have the drive letter (ex: C ) key under DriveIcons, then go to step 7. (see screenshot above and below)

7. In the left pane, right click on the drive letter (ex: C ), click/tap on New and Key, type DefaultIcon, and press Enter.
NOTE: If you already have the DefaultIcon key under the drive letter (ex: C ), then go to step 8, 9, or 10. (see screenshot above and below)

8. To Restore the Default Drive Icon
A) Right click on the drive letter (ex: C ) from step 6 above that you want to restore, and click/tap on Delete and Yes. (see screenshot below step 6)
B) Go to step 12.
9. To Use a Custom Icon of Your Own
A) Make sure that the icon is unblocked if not already.
B) Make sure that the icon is located in a folder (ex: a C:\Users\Public folder) where all users (everyone) have access permission rights. The icon will need to stay here for as long as you are using it for the drive icon, otherwise it will break the link and no longer display as the drive's icon.
C) In the right pane of DefaultIcon, double click/tap on (Default) to modify it. (see screenshot below step 7)
D) In the Modify window, type this below, and click/tap on OK. (see screenshot below)
NOTE: Substitute with your icons full path and name with file extension in quotes instead.
Code:
"[B][COLOR=red]full path of the icon file with file extension[/COLOR][/B]"
Code:
"G:\Windows 7 PNG Files\Start_Orb.ico"
Warning
The custom icon file that you are using must be saved at a location that can be accessed by all user accounts for it to be displayed in all user accounts. For example, in the C:\Users\Public folder.
E) Go to step 11.
10. To Use another Icon Included in Windows 7
A) Download and install the free program IconViewer for your 32-bit or 64-bit Windows 7.
NOTE: This program will add a Icons tab to files (ex: imageres.dll) that contain a icon library in them so you can see the icons available in it.
B) In Windows Explorer, navigate to C:\Windows\System32\imageres.dll and right click on imageres.dll, click on Properties, and click on the Icons tab.
NOTE: You can use any of the Windows 7 files that include icons in them that you want though. This is just the most common one.
C) Scroll through the icons and make note of the icon number of the one you want to use to replace the default file extension icon with, then close the properties window. (see screenshot below)
NOTE: For example, icon number 36 for the default C drive icon.
D) In the right pane of DefaultIcon, double click/tap on (Default) to modify it. (see screenshot below step 7)
E) In the Modify window, type in the location below, and click/tap on OK. (see screenshot below)
Code:
[B][COLOR=red](full path of the Windows 7 file with file extension)[/COLOR][/B],-[B][COLOR=red]####[/COLOR][/B]
Code:
C:\Windows\System32\imageres.dll,-3611. The registry should look similar to this now depending on the icon path you entered in either step 9 or 10. (see screenshot below)

12. Close Regedit.
13. The changes should be immediate, but in some cases you may need to restart the computer to apply the changes.
That's it,
Shawn
Related Tutorials
- How to Rename a Drive in Vista, Windows 7, and Windows 8
- How to Hide or Show Empty Drives in Windows 7 Computer Folder
- How to Show Windows 7 Computer Drive Letters Before or After Drive Name
- How to Rebuild the Icon Cache in Windows 7
- How to Change or Restore Default Windows 7 Desktop Icons
- How to Restore Windows 7 Default User Folder Icons
- How to Change the Default Icon of a File Extension in Windows 7
- How to Change Windows 7 Default Control Panel Icons
- How to Change the Windows 7 Default Folder Icon
- How to Change Windows 7 Default Folder Icons using Resource Hacker
- How to Change the Open Folder Icon in Windows 7
- How to Change a Library Icon in Windows 7
- How to Change the Default Libraries Icon in Windows 7
- How to Change Windows 7 System Icons Using Resource Hacker
- How to Add, Change, or Remove a Drive Letter in Vista, Windows 7, and Windows 8
- How to Pin or Unpin a Drive to the Windows 7 Taskbar
- How to Change a Folder Icon in Vista and Windows 7
- How to Completely Block Autorun.inf Files in Windows
Last edited:
")
")

