

How to Create and Attach a Virtual Hard Disk in Windows 7
InformationA Virtual Hard Disk is a created VHD file on your hard drive that acts as a separate hard drive disk in Computer. This will show you how to create and attach (mount), or only attach (mount) an existing, a VHD in Windows 7.
Special thanks to Steven (dmex) for pointing out this new feature in Windows 7.
TipWarningThe VHD is only attached for the current session. When you restart the computer, any attached VHD files you have will no longer be attached and appear in Computer. You will have to reattach any VHD file to have it display back in the Computer window again until the next restart.
If you disable the Disk Defragmenter service, then you will get the error below when you try to do anything in Disk Management. If you get this error, then make sure that the Disk Defragmenter service is set to only Manual.
EXAMPLE: New Virtual Hard Disk (VHD) in Computer
Here's How:
1. Open the Control Panel (icons view).That's it,
A) Click on the Administrative Tools icon, and click on Computer Management.OR
B) Go to step 3.
2. Open the Start Menu.
A) In the Search box, type compmgmt.msc and press Enter.3. If prompted by UAC, click on Yes, then do either step 4 or 5 below.
4. To Attach an Existing VHD File
NOTE: This is for a detached VHD file that you had already created in step 5 below, or from an existing VHD file.
A) In the left pane, right click on Disk Management, and click on Attach VHD. (See screenshot below)5. To Create and Attach a New Virtual Hard Disk (VHD file)
NOTE: You can also click on Disk Management, Action on the menu bar, and Attach VHD.
B) Click on the Browse button. (See screenshot below)
C) Navigate to the VHD file location and select it, then click on the Open button. (See screenshot below)
D) If you want the VHD to be read-only, then check the box, otherwise leave it unchecked. Click on OK. (See screenshot below)
E) If the existing VHD file is unallocated, go to step 6. (See screenshot below step 6A)
WARNING: Be sure to create a backup copy of the VHD file first to be safe in case of data loss.
F) If the existing VHD file is allocated, go to step 8. (See screenshot below step 8)
A) In the left pane, right click on Disk Management, and click on Create VHD. (See screenshot below)6. To Initialize the Virtual Hard Disk
NOTE: You can also click on Disk Management, Action on the menu bar, and Create VHD.
B) Click on the Browse button. (See screenshot below)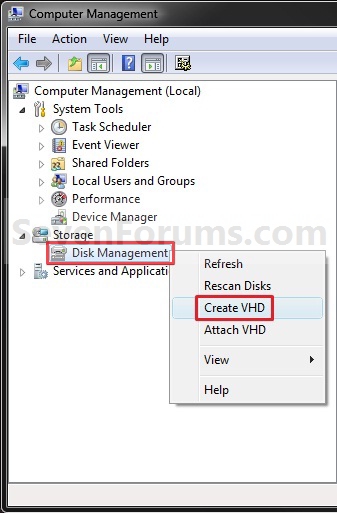
C) Navigate to the location you would like to store the new VHD file, type in a name for the VHD file, and click on Save. (See screenshot below)
D) Type in the maximum size you want the Virtual Hard Disk to be, and select the size to be MB, GB, or TB (1024 MB = 1 GB, 1024 GB = 1 TB). (See screenshot below)
E) Select (dot) if you want the new VHD size to be Dynamic or Fixed, and click on OK. (See screenshot below)
F) Continue to step 6.
A) Right click on the new unallocated VHD Disk # and click on Initialize Disk. (See screenshot below)7. To Create a New Simple Volume in the VHD
B) Select (check) the Disk # from above for the new VHD. Select (dot) if you want the new VHD to have a MBR (Master Boot Record) or GPT (GUID Partition Table) partition, and click on OK. (See screenshot below)
C) Continue to step 7.
A) Right click on the new unallocated VHD and click on New Simple Volume. (See screenshot below)8. The VHD is now attached and ready to access like a HDD. (see screenshot below)
B) Click on the Next button. (See screenshot below)
C) Type in how much of the maximum disk space (step 5D) you want for the size of this VHD partition, and click on Next. (See screenshot below)
NOTE: If you do not use the maximum space, then you will have a second unallocated VHD partition left with the remaining available disk space.
D) Select the file system (NTFS or FAT32) you want the VHD partition to be. (See screenshot below)
E) Type in a name for the VHD to be displayed in Computer. (See screenshot below)
F) Check the Perform a quick format box, and click on Next. (See screenshot below)
G) Click on the Finish button. (See screenshot below)
Shawn
Related Tutorials
- How to Create a Windows 7 VHD at Boot to Start with from Boot
- How to Unattach and Delete a Virtual Hard Disk in Windows 7
- How to Setup Windows 7 to Boot from a VHD (Virtual Hard Disk)
- How to Shrink a Partition or Volume in Windows 7
- How to Extend a Partition or Volume in Windows 7
- How to Delete a Partition or Volume in Windows 7
- How to Create a New Partition or Volume in Windows 7
- How to Burn a "ISO" or "IMG" Disc Image file to a CD/DVD in Windows 7 and Windows 8
- How to Mount a Hard Drive or Partition as a Folder in Windows 7
- How to Convert a VHD File to a ISO File
- How to Extract Windows 7 System Image Files Using Disk Management
- How to Create a VHD of a Physical Hard Disk in Windows 7
Virtual Hard Disk - Create and Attach VHD
-
New #1
At first glance when you see Windows 7 it doesn't look allot different from Vista, But when you start to dig a little you start to see all of extra hidden features and this is only a Pre Beta, so it will more than likely have many more features with the final release.
Nice work Shawn.
-
-
New #3
My English is not good
Please help, after 4e ->error

thanks you!
And, why did admin band my Ip 118.71.66.77?Last edited by Brink; 27 Nov 2014 at 16:48. Reason: fixed image
-
New #4
Excellent work as always Shawn. I noticed this option a couple of days ago & thought to myself 'I wonder if there's a tutorial on it yet' & 'Wouldn't it be great to write 1?'. Guess you're just 3 steps ahead of every1 LOL
-
-
New #6
Hello Son,
It looks like you mave some group policy setting set preventing you from doing this. Are you part of a domain?
If needed, this can help with translations.
Google Translate
-
-
-
Virtual Hard Disk - Create and Attach VHD
How to Create and Attach a Virtual Hard Disk in Windows 7Published by Brink


 Quote
Quote
Related Discussions